Cricut & The Dollar Tree


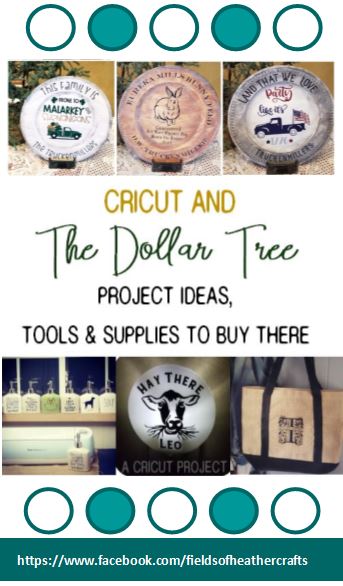
The Dollar Tree is one of my favorite places for "blanks" - items to put cricut vinyl designs on - but it's also where I find some of my basic supplies and tools.  These are the the items I buy there, followed by some of my projects with Dollar Tree blanks. 

 If there is a link with the project, it usually includes the svgs and fonts I used, along with step by step instructions.  

Supplies To Buy At Dollar Tree
 
These are the two items I suggest everyone with a cricut buys first thing.  
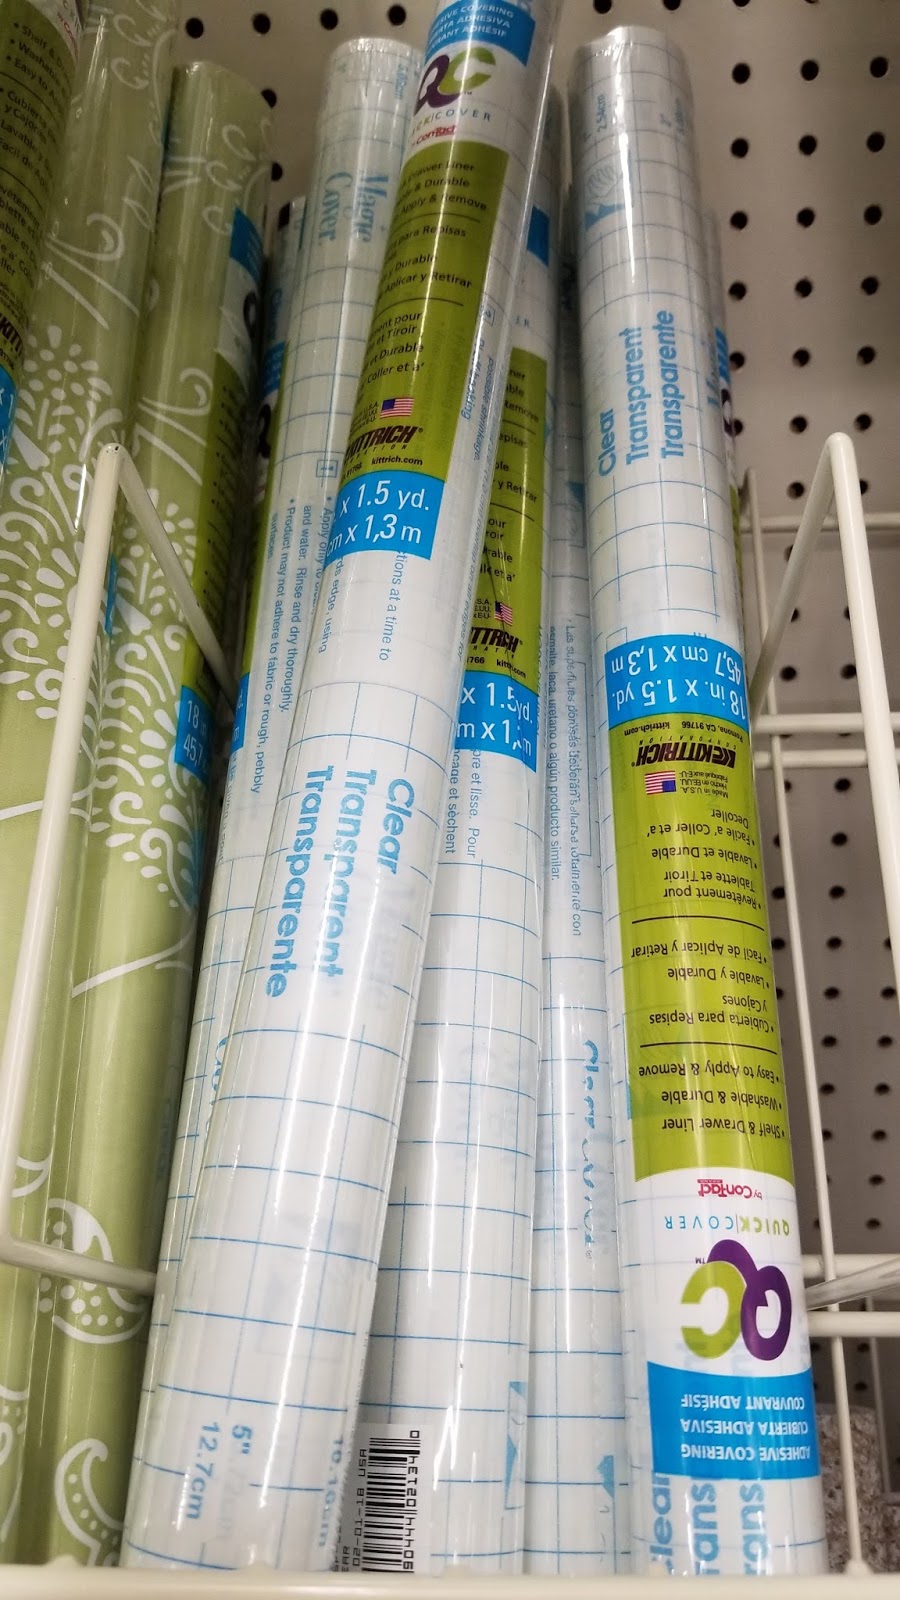
The clear contact paper ($1 a roll!) is the only transfer tape I use for transfering vinyl.  It also works for stencils.
The fabric tape measure I use for every single project.  It's my most used tool.  That is what I use to figure out how large my design should be.  (I found the tape measure in the check out aisle)

 
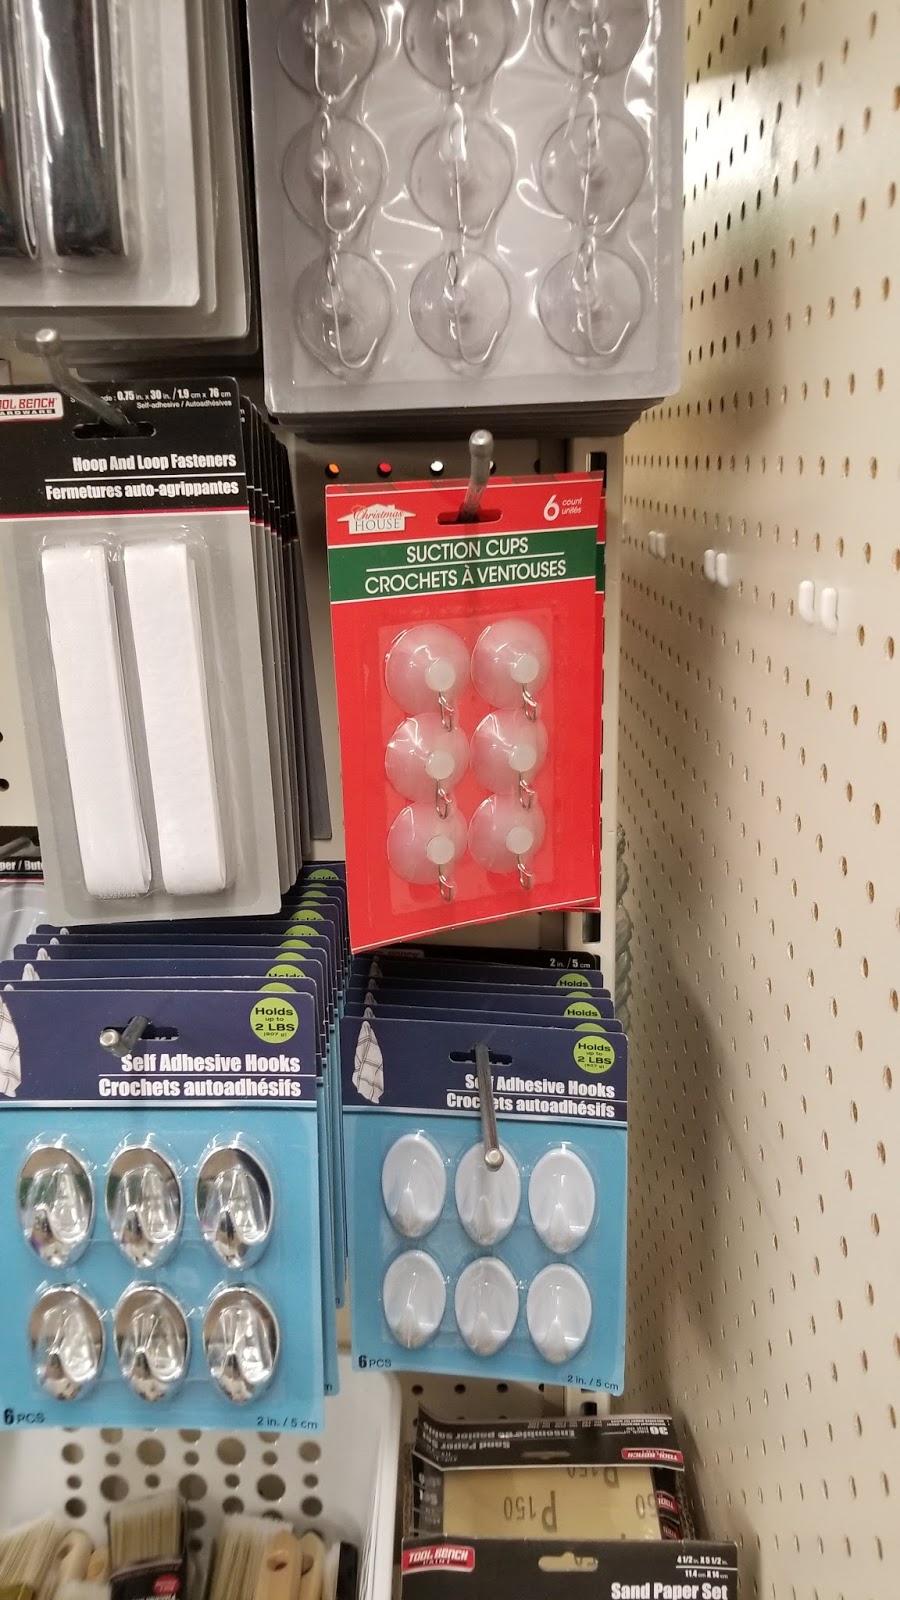
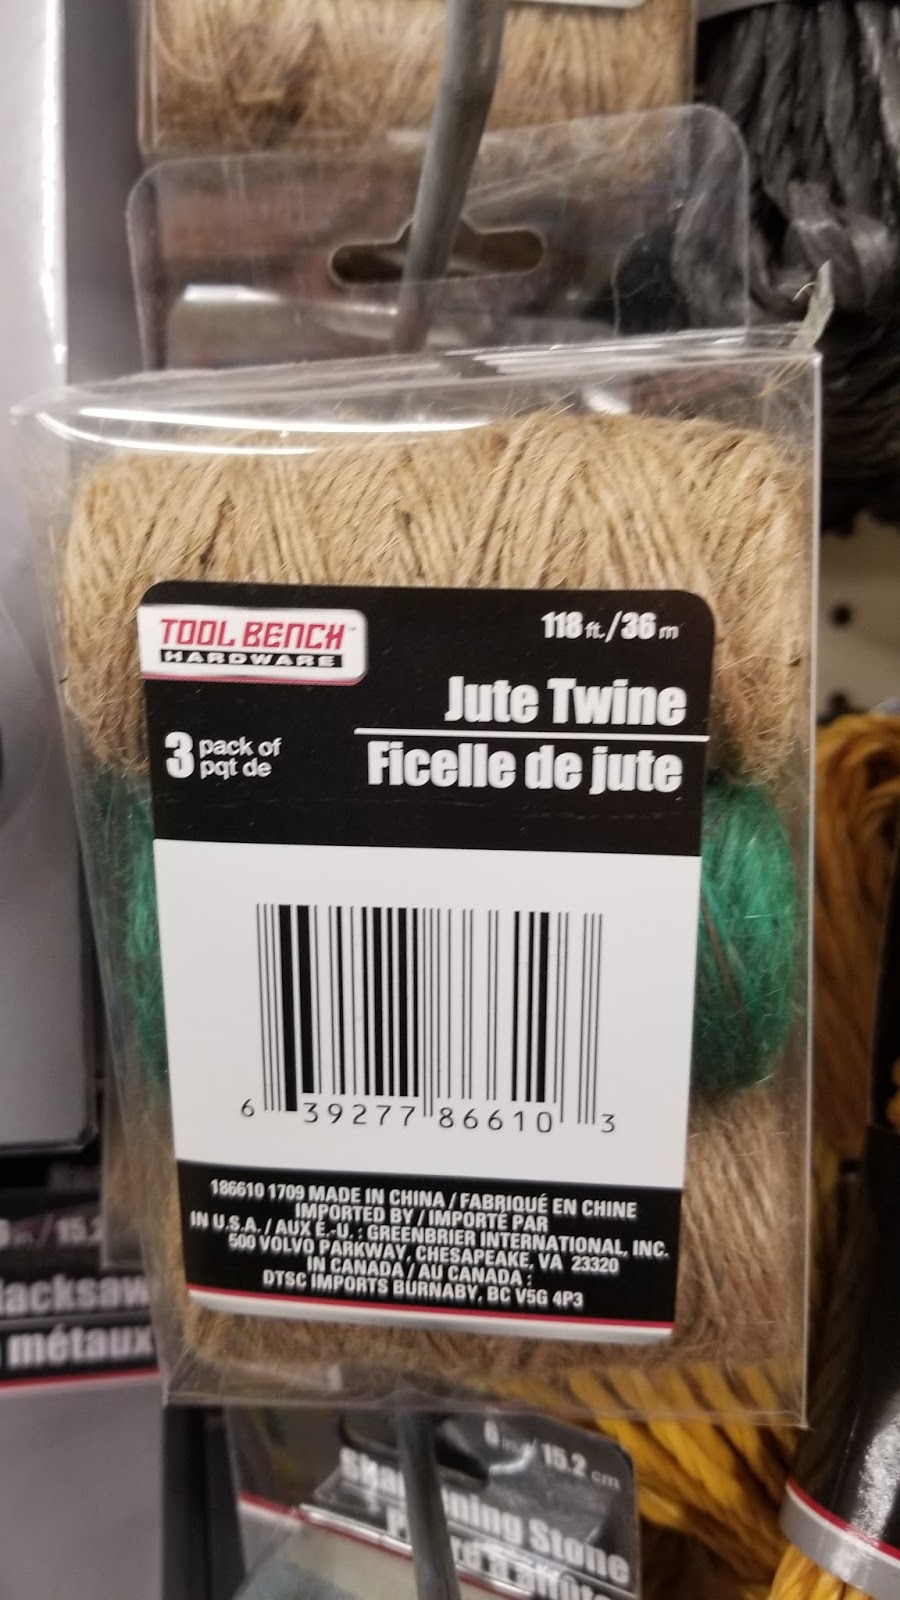
These items are a little more craft related than specifically cricut - but I still recommend them!  I use those hooks to hold my cricut mats on the wall (storage) and the jute is nice for so many of my projects - either to hang them, decorate them, or wrap them.

Blanks from Dollar Tree Decorated With Vinyl

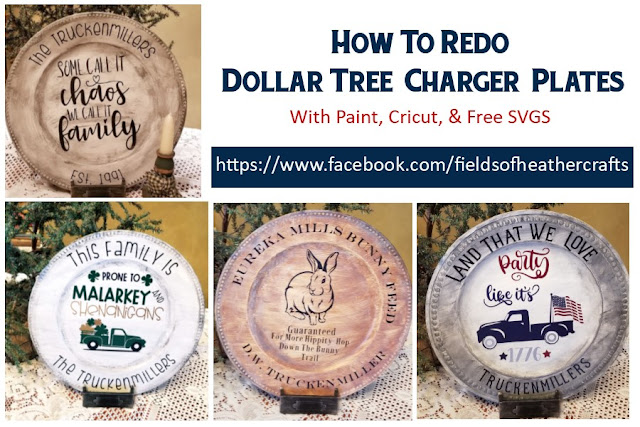
Dollar Tree Chargers Decorated With Cricut


Metal Flowers From Dollar Tree Foil Cookie Sheets

Layered Paper Shadow Box (Light Box)


Dollar Tree Lanterns

Roll A Doodle Game

Decorating Dollar Tree Cake Carriers

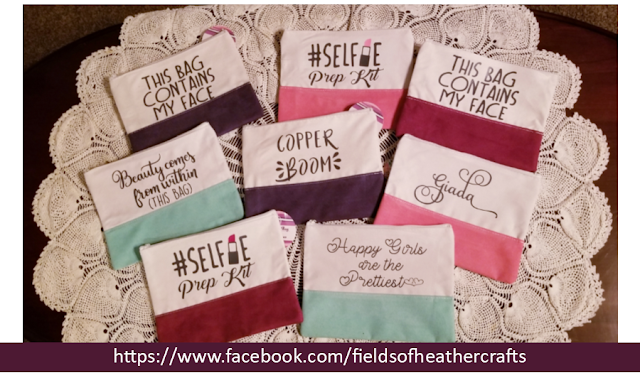
Dollar Tree Cosmetic Bags Decorated with Cricut (With Free SVGS)


Dollar Tree Soap Dispensers
http://fieldsofhether.blogspot.com/2017/12/decorating-soap-dispensers-with-cricut.html


Dollar Tree Night Lights Redone With  Cricut
https://fieldsofhether.blogspot.com/2019/01/personalizing-dollar-tree-night-lights.html

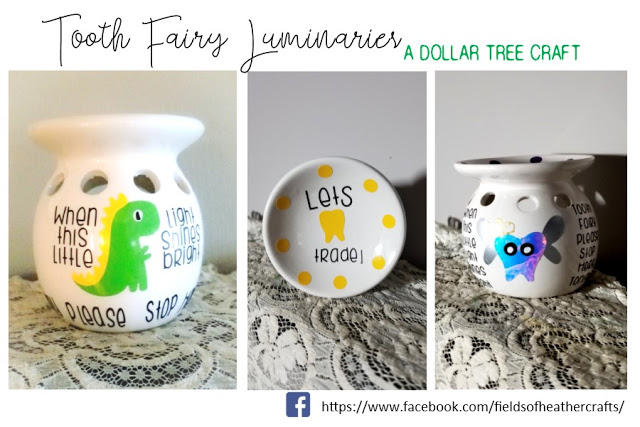
Tooth Fairy Luminaries from Dollar Tree Tart Warmers
https://fieldsofhether.blogspot.com/2019/01/tooth-fairy-luminary-with-free-svgs.html

Step By Step (With Links to The Free Font & SVG)
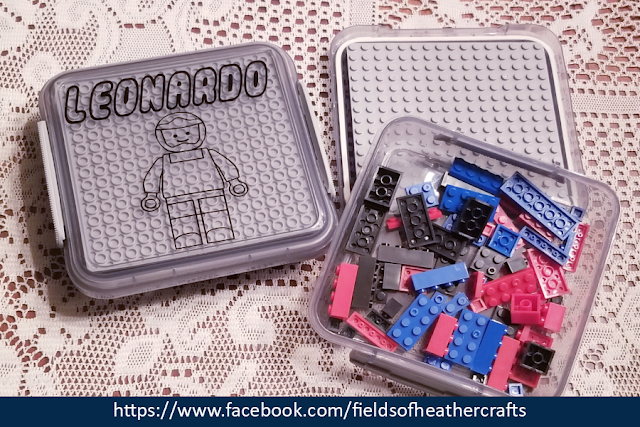
Travel "Lego" (Building Blocks From The Dollar Tree)
https://fieldsofhether.blogspot.com/2019/03/dollar-tree-travel-lego-building-blocks.html


Pot Holders 
These are one of my favorite items!
They are:  Home Collection Cotton/Neoprene Pot Holders 
I use a silicone baking sheet in the pocket before ironing on my design.
(The dish towels are from JoAnns)


Split Monogram On A Dollar Tree Tote


Copycat Starbucks Logo on a Dollar Tree Travel Mug
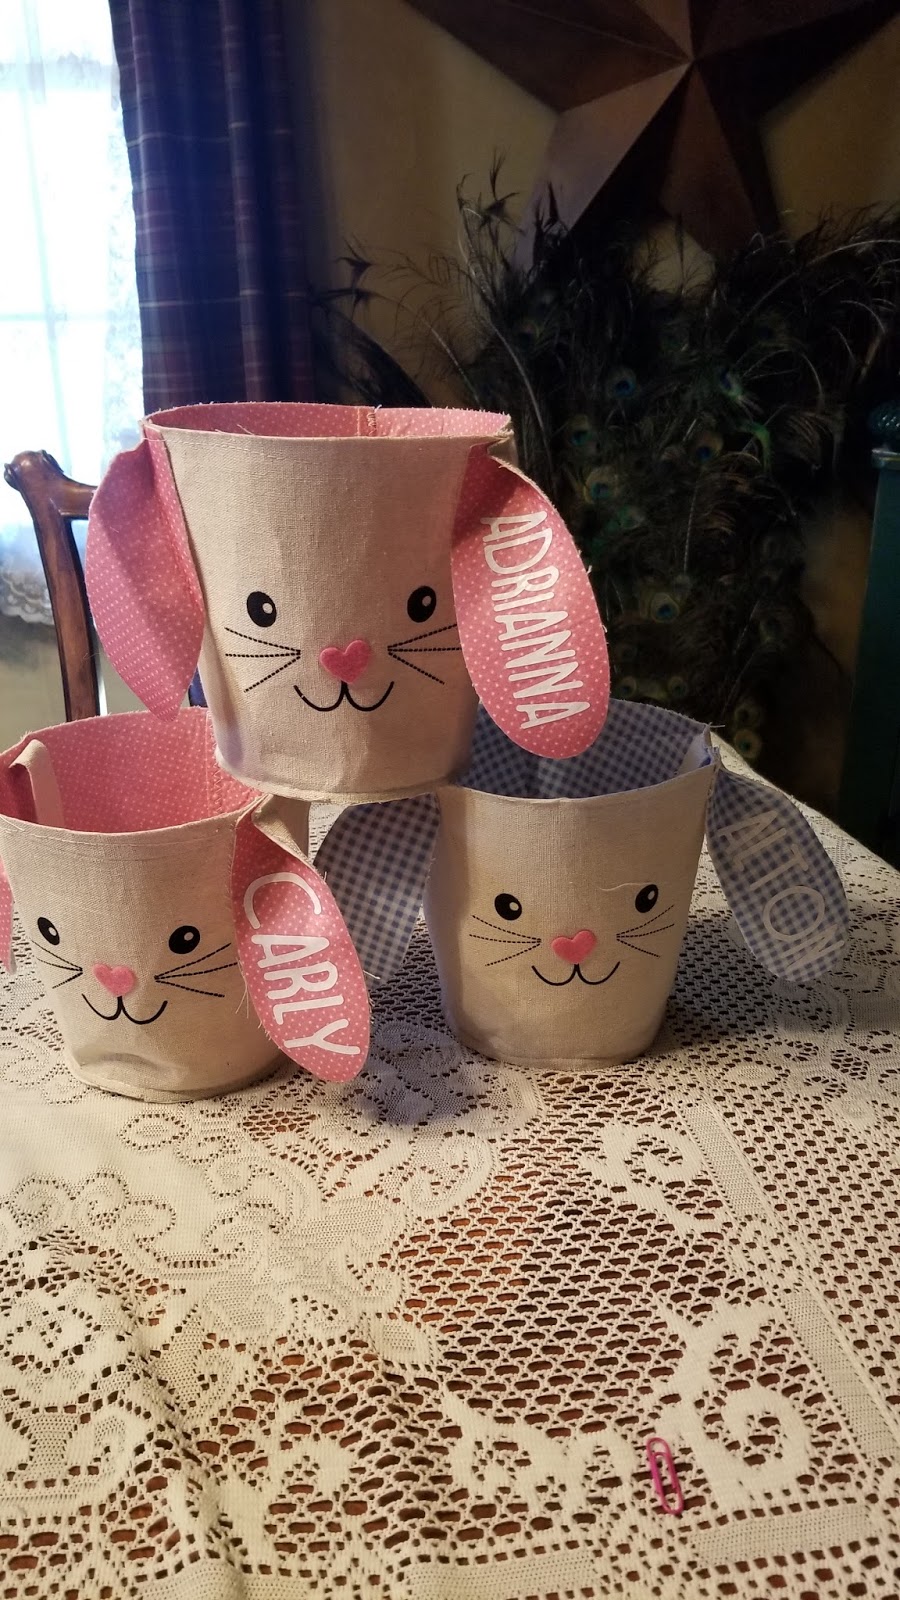
Easter Baskets


Cricut Easter Baskets


Cliff Notes:
  • Baskets are from the Dollar Tree, Target, & DH Gate.  Details are below, for each.
  • Designs are from all over.  I've started this post with a list of places to find free bunny faces, then later in the post I describe each design I used and where I got the elements for it.
  • I used a regular iron for all of these.  It's what I always use, I never have any problem using an iron.  I use a silicone baking sheet inside (or behind) items when Ironing on my designs, I think it helps.  
  • Siser Easyweed HTV.  I buy it on Amazon, with prime free shipping, it's always the cheapest that way, for me.

Free Bunny Face SVG Files:

Fonts I liked for the names: Pharmacy, Twinable, Messy Marker, Moonlight, Chuck Noon


The Bags & Baskets:


Burlap Bunny Bags:
 
On Amazon, these are around $30 for 6.  Free Shipping with Prime, and a variety of additional colors, shapes, and designs are available. 

DH Gate has these at a lower price, but you have to buy a larger amount, and shipping may  take weeks - but it is also free.  


Ironing  on them:


I used the silicone baking sheet inside the bags, as I do with most items, but because of the way the burlap and fabric are layered here, I'm not sure how much it helped.  I used it anyway.  :-)

The seams and layers at the bottom made it a little more difficult to get the good pressure on the letters, but they have held up well.

Dollar Tree Baskets:
Find them online on the Dollar Tree Site Here -
 https://www.dollartree.com/easter-bunny-shaped-baskets/302822
  For $1.25 each, these are by far the quickest and easiest and cheapest to make!  Big Lots has similar baskets, but not nearly as cheap.

Ironing Them On - 

You have 4 inches in length to work with on these ears.
I chose the font Moonlight - one of my current faves.  As much as I love beautiful scripty fonts, when making things for young children, I like to keep the letters clear and readable so they easily recognize their own name.


Target Baskets
In 208 these were inside the door, in the "Dollar Spot" aisles.  (Why is this called Dollar Spot?  Almost nothing there is just $1....)  They cost $3, and are sturdy - with a plastic bucket inside the layers of canvas material.  The ears have wire in them.

Five Below has similar buckets, just a bit larger, with a bunny silhouette already on them, for $5 each.  They are 3 for $18 on amazon here - https://amzn.to/30OKGeP

Ironing On Them:
This is the only time I have used my iron more like an iron than a "press" for htv.  Because of the curve of the bucket, I kind of ran the iron around over the design.  It attached quickly and easily - the htv seems to like this material!   I didn't put anything inside of the buckets, just my hand. I kind of held the bucket in the air with one hand, and moved the iron around the design with my other hand.  It sounds difficult, I know, but this was actually much easier than the burlap bags. 

The Designs:


For the Bunny with the sunglasses:
I used the llama face with sunglasses from Caluya design, ungrouped, deleted the ears.
Selected both areas on the glasses, and sliced, so the cut outs are cut out, not layered.
Changed the circle behind the nose to pale blue
I added the whiskers from the printable cuttable creatables face
Font is chuck noon.

Because I have a LOT of black scraps, rather than fuss with how to place everything to use up scraps, I just changed the whiskers & nose, sunglasses, and letters all to different colors and cut each one.  I put black on the mat each time, but because the software thought I was using different colors, it automatically prompted me to put in a new mat for each item.  It was a little more (but not much!) time consuming to do it this way, but I did almost all of these with just my scraps - and I found it quicker to put in a new mat than any other option.


This is the face I used for the girls burlap bags.  It was in my svg files names BunnyFace.svg - but there is no information in the properties for me to know where i downloaded it from.  I downloaded it in November of 2017...  The links above give similar faces, but if anyone knows where I got this particular svg (I'm positive it was free) I'd love to link to it.

The font I used for the girls burlap bags was DK Jambo.


Molly's basket was made with a photo of her.  I used graphics software to convert it to an svg, for Christmas ornaments last year.  For this, I simply had to make the graphic larger.  Font is Moonlight.  Here's a variety of software that will convert a photo to svg - 
https://fieldsofhether.blogspot.com/2019/02/programs-sites-for-converting-to-svg.html


Travel Tissue Cover Keychains - Decorated With HTV

Travel Tissue Holder Keychains

If you are a beginner sewer, this is another great project to start with.  It's just a few straight seams, quick and easy!  And then you can add designs with your cricut and some htv.

The ones above were made for my BSF group back in 2018.  The keychains are a nice addition when clipping to tote bags.

Using Gedmatch to Better Analyze My Raw DNA from Ancestry.com

This is my Ethnicity Estimate, as given by Ancestry
For a basic explanation of what is shown here, read this: More Than A Pie Chart

I keep telling you all to download your raw DNA from your ancestry.com DNA tests, upload it to gedmatch, and run some of the algorithms there.  It can be a little overwhelming, there is so much to learn with our DNA, so today I'm just going to run a few quick projects to show you some of the things Gedmatch can do. 

 Gedmatch is a very barebones site  - it does a lot, but it does not explain a lot.  If you want to learn a lot more than what I am showing you here, go to this amazing site that breaks down what each option is, and why you should, or should not run it.  For instance, if you are not Jewish and you run the "Eurogenes Jtest" you may get false Ashkenazi (Jewish) results.  So you don't really just want to blindly run each test and believe the answers you see.  

First you have to download your raw DNA.  If you did an Ancestry test, I know this is easy, because I have done it myself.  I explain how to do that here: http://heathersgen.blogspot.com/2017/07/ive-done-dna-test-now-what.html  If you have taken a test through another company, google "how to download my raw DNA from ----------" and I'm sure you will find your answer.  :-)  Upload your results to Gedmatch, (also explained at the link  I gave for downloading the raw dna) and you will receive a kit number.  Once you have a kit number, lets Analyze Some Data.


One to Many and One to One comparisons are such great tools for genealogists - but for this post, I'm just going to concentrate on the ethnicity estimates, as that seems to be what most of you are most interested in.

Click on Admixture (heritage), and choose MDLP.  Enter your kit number, and leave the default option - MDLP K11 Modern.  This is the VERY basic overview, and shouldn't really tell you anything that your ancestry results didn't already show, and in my opinion, it just makes the results look more confusing -   Mine gives me this result:
Although our family is believed to have native american ancestry, a .56% Amerindian result on this calculator is not enough to confirm this trace ancestry, as an amount this low could amount to what some call statistical “noise”.  My great great grandfather was born in Indian Territory, reportedly to Cherokee parents, although I cannot find any evidence or records of his parents anywhere.  I would need my grandmother to take a DNA test to get a better percentage here, as an indicator.  
WHG = Western Hunter-Gatherers, the most indigenous modern humans of Western/Central Europe
EHG = Eastern Hunter-Gatherers

So now let choose The Eurogenes Project (because most of you who have asked me about this are going to have a lot of European roots.  If your results at Ancestry do NOT show a lot of European roots, then you will want to go here, scroll down and find the descriptions of the options and choose one that better fits your results).  Choose the Eurogenes K13, which is the default, to start - because that will be the broadest option for most of us with European roots.  It just takes a minute or so to run, and then you will see something like this:


Admix Results (sorted):

# Population Percent
1 North_Atlantic 43.85
2 Baltic 23.54
3 West_Med 17.81
4 West_Asian 7.33
5 East_Med 5.18
6 South_Asian 1.38
7 Oceanian 0.92


You an actually map your admixture by chromosome.  This will show you what percentages of each of your 22 chromosomes are most commonly found in which populations/ethnicity.  For more information, I'm sending you back to my favorite site  for this stuff - http://genealogical-musings.blogspot.com/2017/09/a-gedmatch-admixture-guide-parts-3-and-4.html


The next admixture project I ran was the Eurogene/ Hunter Gatherer.  I could not find much information on this, but after running it, then looking at the map here, it's essentially the same break down as above, just with different labels.


And because I am now bored with this (there are absolutely no surprises here for me, I already knew what my results would be), I tried the eye color option.
My eyes are Hazel, so this was pretty accurate, but not exact.  They state that the results should be better from the 23andMe test - mine is from Ancestry.


Predicted Eye Color for Kit A772390 (F2)

/opt/gedmatch/databases/kits/V0A772390.bin Resource id #5
1323980
Read rules from top to bottom. In some cases, a rule cancels out results from rules above it.

CT at: rs17762363 - Increased melanin production. Adds yellow, amber, or brown. Some darkening. Contributes to brown.
AG at: rs4778138 - Adds melanin. Adds yellow, amber, or brown. Some darkening. Contributes to brown.
CT at: rs1800407 - Penetrance Modifier - Blue
CT at: rs3947367 - Contrasting sphincter around pupil.
CT at: rs1129038 - Adds Yellow.
AA at: rs4778241 - Medium melanin on Anterior Epithelium. Brown.
GT at: rs1470608 - Medium melanin on Anterior Epithelium. Gives dark eyes.
CT at: rs1667394 - Medium melanin production on Anterior Epithelium. Adds yellow, amber, or brown. Some darkening.
CT at: rs916977 - Adds melanin. Adds yellow, amber, or brown.
AG at: rs7174027 - Adds Yellow.
CC at: rs12203592 - No pigmented Collarette.
AG at: rs11634406 - Flecks (Nevi).
GT at: rs1448485 - Inhibits weak amber gradient.


And then the "Are Your Parents Related"- 
No shared DNA segments found
No indication that your parents are related.
(I know I'd get different results if I ran this on some of the grandparents in our lines...)


There is a lot more you can do with gedmatch, but that's a quick overview.

==========================================================
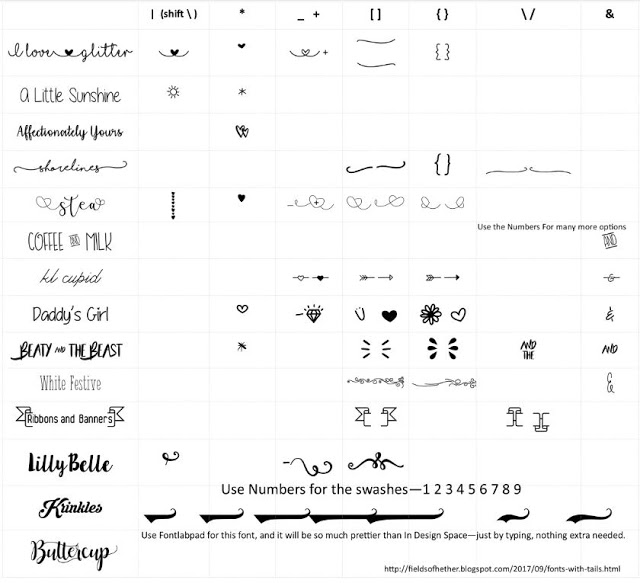
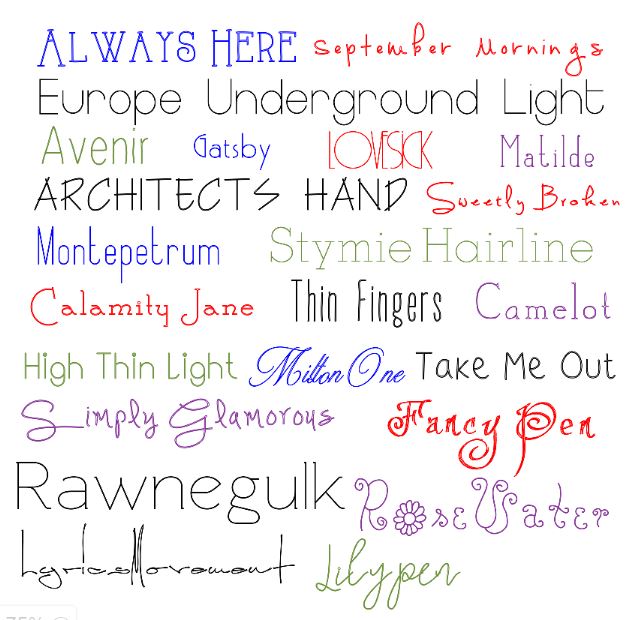
I have two blogs for my genealogy - Heathers Genealogy Notes for direct relatives of myself and Dan, and NOT Heathers Genealogy, for indirect ancestors, research I have done for others, and research that I did to rule out ancestors.

For New Cricut Users - What To Buy, What To Download, & How To Use It All -

For New Cricut Users - What To Buy, What To Download, & How To Use It All 

The cricut machine can be just as overwhelming as it is amazing. SO much you can do, it's hard to know where to even start. Often the easiest way to get started is simply to start.  Choose a project, and learn just what you need to know for that first project.  But I know that's hard - so I've made a list of resources that might help while you decide where to start.

==========
Tools & Accessories
==========
What else should I buy? Tools & Supplies that will help with your projects - 
You can get a LOT of supplies at the Dollar Tree!  

Apps & Websites to use with cricut - sites & software that will make a lot of this easier!

======================
Do I Need to Subscribe to Cricut Access?
=======================
No.  You may choose to, but you do not need to! 
Paying For Cricut Access is like renting svgs.
And that's great, if that is what you want to do!  Personally, I prefer to outright buy the few designs I use, rather than rent hundreds I have no interest in.  

To use free svgs, in most cases, you will download them, UNZIP them, then upload the file that looks like a website or html file.

Here's a much clearer step by step on how to download and use free svgs in Design Space:

As with svgs, there are LOADS of free fonts available to use in cricut!  The process is a little bit different.  Unlike SVGS, Fonts are not uploaded to Design Space,  but they are installed on your device, then you find them under the "system" tab when you choose your font in Design Space.

Here's a  more detailed step by step for using fonts in Design Space:

And here's a "Font Index" with links tons of free fonts by type & style, and more information on how to use them all:


Update: Design Space has added what they call "kerned fonts".  When you use system fonts, you can now filter them and see only "kerned" fonts - which means the fonts that Design Space has optimized to space properly.  You still will not see ligatures if a font has them.

  When font designers design a font, they write instructions into the font, telling software how to space them, and in the case of ligatures, when to do fancy things with certain letter combinations.  Design Space ignores all of those instructions.  Most users will tell you to ungroup your text and manually space the letters.  Please don't do that.  You will never space them the way the designer intended.

 Fontlab pad is a free utility that will space your text properly, and save it as an svg.  It's an extra step, yes, but it is still much faster than trying to properly space text yourself - and the results will be much better!  If a font has ligatures [these are different than glyphs] they will appear automatically in Fontlab pad.

Here's more information on how to use Fontlab Pad

Here's a cheat sheet of Font terms, to explain the differences between ligatures, glyphs, etc.

==============
Attach, Weld, & Flatten
=============

Group is for grouping items together to move around in Design Space.  The group command is NOT sent to the machine, and will have no effect on how the design cuts.

Attach keeps your design exactly the way you placed it. If you click make it and your design looks like a puzzle, go back and attach.  You can only attach ONE color at a time.  Attach all black, then select all red and attach, etc.  More about attach: 

Flatten is for print then cut.  If you do not flatten your text to a shape, cricut will cut out each letter of your print then cut project individually.  Find more about Flatten here:


There are now several options for Weld - all in a menu labeled "Combine".  Here's a look, with examples,  at what each of those options will do:


================
"Operation" is where you tell cricut what you want it to do with a design.  Find the operation menu on the top left of the screen in Design Space.

===================
What are the different kinds of vinyl?
===================


HTV is the same as iron on - it's Heat Transfer Vinyl, and what you need if you are putting vinyl on fabric. 651 is permanent vinyl, and 631 is temporary vinyl (for things like wall decals)

For a more detailed list, along with the price guidelines I use when buying, and my favorite sites and brands:

Which Vinyl Do I Need & Where Should I Buy It?

==================
Do I Need To Buy A Heat Press?
================
No.  You may chose to buy one, and you will hear a lot about how you have to "use all of your body weight" to use an iron (false) and that vinyl will "not hold up as well" without a heat press (also false).  Another option is an Easy Press, which is basically an iron made by cricut, with a chart for temps and times. 
 But a plain old regular iron will work just fine too.
A Project To Start With 
Using Vinyl For the First Time 
===========
Using your Cricut To Cut A Vinyl Decal For The Very First Time:


=======================


Looking for more?  I have an index of my cricut related posts sorted by theme here:
https://fieldsofhether.blogspot.com/2019/02/an-index-of-cricut-resources-how-tos.html
============
Find Even More On Facebook - 
The facebook page for my crafting posts
https://www.facebook.com/fieldsofheathercrafts

And a facebook group, where you can share your projects and ask questions:


Cricut Cheat Sheets & Printables

A few of the various cheat sheets I have made and used over the years, for crafting with Cricut:

My Cheat Sheet of My Favorite Fonts
is updated regularly.  I include links to download each of them, and all of these are free, most are from Dafont: http://fieldsofhether.blogspot.com/2017/12/my-favorite-fonts-cheat-sheet.html

Fonts With Tails Cheat Sheet
This cheat sheet is for fonts with "easy glyphs".  Fun fonts like I love glitter, where you can quickly access the pretty tails and swirls without needing a full character map (as is needed for Samantha).  I update this post regularly, and have links to download all of the FREE fonts here as well.  http://fieldsofhether.blogspot.com/2017/09/fonts-with-tails.html


Writing Fonts Cheat Sheet

Most fonts will write as an outline in cricut, but I have a long list of FREE fonts that will collapse on themselves and work great as writing fonts.  I'm constantly adding to this, so be sure to actually go to the link and check out the full sample sheet, and all the links for downloading them can be found there too.

Alternative Pens For Cricut
I keep testing new ones, so please check the link.  I have samples of how various pens work in Cricut - with no modifications. These do not require removing anything, or using pencil grips - these all just slip right into the machine the same as if they were the official Cricut Markers.  But some of them write so much nicer than the cricut markers - and they are all cheaper! http://fieldsofhether.blogspot.com/2017/12/alternative-markers-for-cricut.html


In Addition to writing, cricut can draw.  These are some great fonts for sketching words with cricut: http://fieldsofhether.blogspot.com/2017/12/writing-with-fun-fonts-in-cricut.html


Font Terms & What They Mean
https://fieldsofhether.blogspot.com/2020/12/cheat-sheet-font-terms.html


list of free fonts & Resources for monograms and split monograms
http://fieldsofhether.blogspot.com/2017/11/free-monograms-split-monograms-for.html
--------------------------------------------------------------------  


This is more of a "Create Your Own" Cheat Sheet.  :-)  A Vinyl tracker, to track prices on the vinyl brands you purchase and try.

Projects At A Glance
A printable to help track the projects you are currently working on

==============================
Design Space Basics
I need to update this one - the menu for line types looks a little different since all of the updates, although the basic idea is still the same...


Print Then Cut with Cricut

Print & Cut Little Blue Truck Designs, made with cricut, on wal-mart shirts using Avery Transfer Paper