Showing posts with label Cricut Print Then Cut. Show all posts

Making Perforated Tickets With Cricut

 
Making Perforated Tickets With Cricut

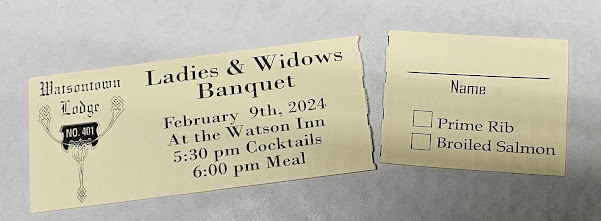
My husband needed 70 tickets for a banquet the Masons are hosting.

There are two dinner options, and they need to know how many of each dinner is needed..  so the ideal ticket has the information on one side, to be kept by the purchaser, and a tear of section for the name and meal choice.  

For just 70 tickets, this was easy to do with cricut.  For larger numbers..  I think I'd have called our local printer and placed an order.   Doing it myself was MUCH much cheaper.  :-)  Here's how I did it:

New Larger Print Then Cut Option In Design Space

 
The New Print Then Cut Options Are Here!

Only on the desktop version - not yet available on mobile. 
Must be using the Beta Design Space [Instructions Below]
Click on the Red Error Message in the layers panel, that's where you will find the new options to choose a larger size.

How To Use Print Then Cut If You Do Not Own A Printer

If you do not own a printer, you can choose to "print to pdf" and print the pdf at your local library, or office supply store.   THEORETICALLY.  

Cricut says absolutely not.  And in the past year in particular, print then cut has been so finnicky, and often requires a  calibration, so  this may no longer work.  But it may still be possible.  No guarantee - especially since so much changes every week with Design Space.

After your project is printed, bring it back to your Cricut machine, open Design Space, Click "Make It" and then on the far right choose "I've already printed".

The first step in a print then cut project will be to "Send To Printer"

A printer dialog box will then pop up, asking which printer you would like to use.  The above screenshot is on a Windows Computer, it may look a little different on Mac, but Mac does have a Print to PDF option as well.
Remember that your project will print with a black box around it.  These are the registration marks cricut needs to know exactly where to cut.  You cannot just print any item with a black box around it - your project MUST come out of the Design Space App, so the app can tell the machine exactly where to cut.


The most common mistake with print then cut is not flattening to a shape.  Before you send your project to print, look at your layers panel and make sure you only see the items you want cut out individually. 

 If you see letter  in the layers panel, Cricut will cut out each letter of that text individually.  Flatten it to a shape if you only want the outline to cut.
======================

Eight Projects For Tattoo Transfer (or Waterslide ) Paper

Projects Using Temporary Tattoo, Or Waterslide, Paper

While working on a list of ideas for stocking stuffers to make with cricut, I came across Temporary Tattoos you can make yourself, using print then cut and temporary tattoo paper.  And then I found a tutorial on transferring photos to wood, using the same paper.  From there, I found you could also use it for nail tattoos, on foam pumpkins, on Easter Eggs and more! Here are six projects using temporary tattoo paper.

Note - I see some tattoo paper described as Waterslide Paper.  I'm not certain what the difference is, if any, between waterslide and tattoo paper.  When my tattoo paper gets here later this week, I will compare the two!  The waterslide paper I purchased was cheaper - at 20 sheets for $15.  It can be used for all of the projects below - except possibly as a temporary tattoo, I'm not certain about that yet.  I'm looking into it!

Quick Links:


On Foam Pumpkins


Navage Patch did these, on Dollar Store Pumpkins


They also work on Easter eggs!

For Nail Decals

Nail Decals
This looks so much easier than applying vinyl to nails!

On Candles

Candles

Another Candle:

Here's another tutorial, with Christmas Images

Temporary Tattoos - A Stocking Stuffer Idea!

100Directions made Halloween Tattoos.  She used Cricut Access Images, which you can rent from Cricut by paying a monthly fee - but I have a list of free svgs for Halloween here if you prefer not to do that. 

There's a free seed packet svg here:
For a stocking stuffer idea - make your tattoos, then package them in the seed packet envelope, with a custom label.

Primitive Mountain also has a tutorial for making Temporary Tattoos
https://primitivemountainquiltsandcrafts.com/diy-temporary-tattoos-with-cricut/
She used the silhouette brand tattoo paper, but that's a lot more expensive than the Sunnyscopa Brand.

On Giftbags

Create your own floral monograms to apply to gift bags

Wood Transfers

Wood Slice Photo Christmas Ornaments


Another wood slice transfer. These are so vivid and gorgeous!

She used the silhouette brand tattoo paper, but that's a lot more expensive than the Sunnyscopa Brand.  The cheapest option is still Waterslide Paper on Amazon - 20 sheets for $15  I have not done a comparison to know which works best - but from what I have seen, they should all have very similar results.


On Christmas Ornaments


Another example, with a tutorial

On Mugs


This mug uses a combination of alcohol inks and tattoo paper


On Coasters


She used the silhouette brand tattoo paper, but that's a lot more expensive than the Sunnyscopa Brand.  The cheapest option is still Waterslide Paper on Amazon - 20 sheets for $15

================

Find More Cricut Project Tutorials Here:

https://fieldsofhether.blogspot.com/2019/04/cricut-step-by-step-project-tutorials.html

==========================


Quick Tip - What To Try When Cricut Can't Read The Registration Marks

What To Try When Cricut Can't Read The Registration Marks On Your Print Then Cut Project

Additional things to try:
Sometimes matte scotch tape over the black registration marks helps.
Make sure your mat is about 1/8 of an inch inside the lines on your mat.
Trying taking a black marker over the registration marks

For more Tips For Solving Simple Print Then Cut Problems:

=======================


Quick Tip - Enable Printer Dialog Box To Set "Best Quality"

Set Your Printer To "Best Quality"

When you click "Make It" on your print then cut project, the project will first be sent to you printer.  On the box that pops up for you to choose your printer, System Dialog is often disabled by default.  

Enable it, and then you can change your printer settings.

You will almost always want to choose "Best Quality" in the print options.

For more Tips For Solving Simple Print Then Cut Problems:


If you have an HP Printer, check out instant Ink.
It's SO much cheaper.  You pay by the page, not the ink cartridge.
So you can always print in best quality, for the same price as draft.
See the details here:

==================


Quick Tip - Why Does My Image Have A Black Box Around It?

Why Does My Project Have a Black Box Around it when I click Make it? Because it is a print then cut image. If you do not want to Print then Cut, change it to a cut image. If you want to Print, Then Cut, you want the black box [currently it's 4 brackets, previously a box surrounded the entire image] to be there.

The black box is the "registration marks".  Cricut will scan the image, then line up the design to cut based on where those black lines are.

Sometimes if your machine is not reading the registration marks, and closing the lid didn't help, nor did changing the lighting, you can go over the black box with a black marker, to make it darker, and that may help the machine to cut.

For more Tips For Solving Simple Print Then Cut Problems:

If you did not want to print the image, but only cut it, you can switch the operation to Cut/Basic


HOWEVER, that could just give you an outline shape to cut, if you uploaded an image that is not an svg file.  When uploading the svg, look for the image that looks like a website, or html file:

Read More Here:


If you have an HP Printer, check out instant Ink.
It's SO much cheaper.  You pay by the page, not the ink cartridge.
So you can always print in best quality, for the same price as draft.
See the details here: