

I knew I wanted to put a monogram on them, but I wanted to do a "split" monogram, and it took me a bit to figure out how to do that. This was the first I have used the weld and split features - I didn't even know they were there until I tackled this project. You'll find them on the bottom right of your cricut design screen. They will be faded out until you select two images at he same time.

I started with a T - for Truckenmiller. 5x5 works nicely on these totes. I used the Imprint Mt Shadow font for the T.

Next use the shape tool, and choose Square. Unlock the shape (bottom left) and you can stretch it into a rectangle. I like to keep the rectangle just about as wide as the letter.
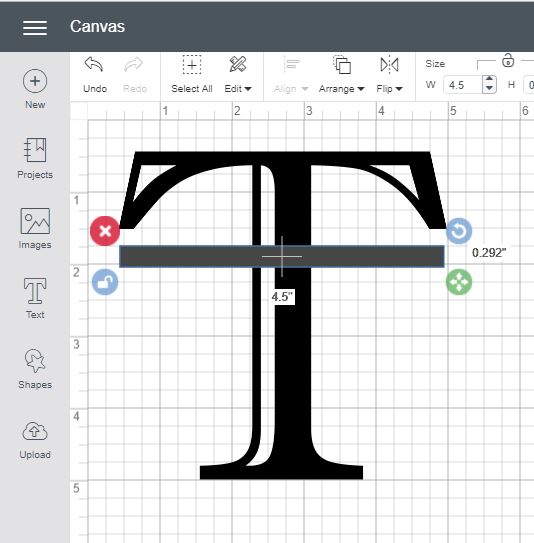
Now is when you "weld" the image. First select both the rectangle and the letter. Then choose weld, from the menu on the bottom right. This will merge the two images into one.

Next select the shape tool, and create a square to cover the bottom of your image. I like to split that first rectangle so it's thinner on top and wider on bottom. It should look similar to the image above. Again, select both images, but this time instead of Weld, choose "slice"

Once you have clicked slice, click on the image and start dragging, you will find there are now 4 images. Delete the two gray ones (on the right) and stretch the two black ones on the left so there there is a space between them, as shown on the left above.

Once you separate the images, it will now be much taller than the 5 inches you started with. Click the unlock button on the bottom left, and you can shorten the bottom of the image.

Next use the Text tool, and type the full last name. I used the Engravers MT Font. You can again use the unlock to resize the font into the space - I made it a little taller and a lot narrower to make our long last name fit.

Next, going to images, search for Phone Vinyl #M3E3B3.

Resize the image to roughly the same size as your first image. Then select the shape tool, and splice this image. I cut right below the butterfly.

Once you have the image split, select the top and bottom. Then choose edit, copy, and edit, paste, so that you have two copies. Select one of the images, then choose Flip, and flip horizontally.

Now drag the 4 bird and leaf images and position them around the monogram, resizing as needed. Next select all parts, and weld. Then flip the image, so it is backwards, or remember to use mirror print. I don't trust myself to remember mirror print, so I flip the image.
This is not a simple image to "weed". If you print a couple of these at the same time though, weeding the image a great project while you are watching tv. Once you have the image cut to size and all of the extra vinyl weeded out, it's time to iron it on to the tote bag.

This is how not to do this. Do not turn your iron on high, place iron over the plastic & vinyl, and press hard. These bags are some kind of plastic and WILL melt, as shown above.
Instead, use a piece of wax or parchment paper over the design, and keep the iron on cool. work a few seconds at a time and keep repeating until the plastic will pull away, leaving the design behind.

It took me quite awhile to learn all of this today, but once I learned the process, it's a pretty quick project to make more.
Very helpful.
ReplyDelete