

I've been crafting at least weekly, often daily, with a cricut machine now for 9
years. And I have never used a heat press.
I just use a plain old iron. I set it between cotton and wool.
No steam.
It's a thrift store iron. It cost me $2. It's good and heavy - and old. Probably a 1980's model.
And my projects hold up great. I have no issues at all, which is why I have never felt the need to look at heat presses. I know this is not the case for everyone, and if I were to do this as a business, I'd probably consider a heat press because I think it might be faster when doing a lot of shirts all at once. But I really don't know, because I've never actually used one. :-)
Note - I do not use Cricut Vinyl. I tried some when I first got my machine, but it was the priciest option available to me at the time, and I didn't find anything about it to be special. I quickly switched to Sizzix, and then eventually switched to a variety of other brands - Transwonder, Caregy, HTVront, & Craftables are some of my favorites. Find links, and price comparisons, here:
Here's a look at how I do what I do:

parchment paper, silicone baking sheet, thrift store iron, on an ironing board.
Others may tell you it HAS to be a solid surface, not a padded ironing board. I don't know what to tell them - this is what I have always used. I suspect the silicone baking sheets may be what makes the difference, but again, I don't know.
Silicone Baking Sheet

I use silicone baking sheets inside my items when ironing. It reflects the heat back, and gives me a nice flat surface inside the item.. Ok, I don't really know why this helps. Its just how I do it, and it works well for me, so I keep using them. :-)
A few have messaged me, they did not have silicone baking sheets and wondered what I would recommend in their place. Honestly, I recommend ordering silicone baking sheets.. but after taking to one woman a bit, we came up with the idea to wrap piece of cardboard from a cereal box in aluminum foil. I heard back from one of the women who tried this and it worked great! I haven't heard back from the other, so maybe it didn't work at all for her. I don't know.
Cover With Parchment Paper

I place parchment paper over the carrier sheet. Most of the time. I've done a few items without, and it's sometimes fun to watch the carrier sheet melt up a little... but I'm usually afraid I will mess up the design if I do not use the parchment paper. YOU CAN OVER HEAT HTV AND BURN IT. So be cautious at first, do a test design on scrap fabric to get used to your iron. I'd recommend that even if you are using a heat press.
I have used wax paper when I was out of parchment paper. Apparently you shouldn't do that, it could transfer the wax from the paper to your item and ruin your t-shirt or pillow or whatever. I only did it a few times, and it was cheap wax paper, so maybe there wasn't enough wax to cause a problem. I'm not recommending it, I'm just telling you that I am very casual with the "rules" and so far have not had any problems.
PRESS

I press for 15-30 seconds in each area. Just press the iron down, do not move the iron back and forth as you would if you were ironing.
Silicone Baking Sheet

A few have messaged me, they did not have silicone baking sheets and wondered what I would recommend in their place. Honestly, I recommend ordering silicone baking sheets.. but after taking to one woman a bit, we came up with the idea to wrap piece of cardboard from a cereal box in aluminum foil. I heard back from one of the women who tried this and it worked great! I haven't heard back from the other, so maybe it didn't work at all for her. I don't know.
Cover With Parchment Paper

I have used wax paper when I was out of parchment paper. Apparently you shouldn't do that, it could transfer the wax from the paper to your item and ruin your t-shirt or pillow or whatever. I only did it a few times, and it was cheap wax paper, so maybe there wasn't enough wax to cause a problem. I'm not recommending it, I'm just telling you that I am very casual with the "rules" and so far have not had any problems.
PRESS

I press for 15-30 seconds in each area. Just press the iron down, do not move the iron back and forth as you would if you were ironing.
I usually start with 15 seconds or so, then try to peel back the carrier sheet. If the vinyl sticks to the carrier sheet, I put the carrier sheet back down and press it a few seconds more.
You CAN iron too long, or at too high of a temp, and burn the htv. So go slow, until you get used to the process - or better yet, cut out a test design and practice on scrap fabric, to find the right temperature and time for your iron.
NOTE - Some vinyl is "cold peel". Eventually you'll be comfortable with the difference, but when starting out, be really sure to read the description. Cold Peel means you have to let the vinyl cool for a few seconds before you pull off the carrier sheet. That can be confusing at first, because it will look like the htv is not attaching to the fabric, if you do not let it cool first. The nice thing about htv is that you can always iron again - so err on the side of caution.
CHECK FOR FIBERS

The most important step! Hold your item up to a good light, and look for the fibers to show through the vinyl. Your vinyl should now have the pattern of the material showing through it.
If you cannot see the pattern, put the parchment paper back on top, and press again.

Another example - this is on a t-shirt

And one more example. This particular shirt has been washed MANY times.

This is one of my husbands favorite shirts. It's been washed dozens of times. The top and bottom are htv, the center circle is print and cut on avery transfer paper. It was all pressed with an iron, and it has held up great! It's just starting to show a little wear (which is more noticeable in the photo than in person) on the left side of the circle. Nothing is peeling, but the print and cut paper does tend to wear a bit more in repeated washings.
I do not wash anything special. Everything gets tossed in the regular wash, and if it happens to be inside out, it's only because that's how it was tossed in the hamper. I line dry in the summer and use a dryer all winter. No problems with either. :-)

For a few years, it wasn't unusual for me to make 5-10 shirts in a week, we have a huge family. And grandchildren. And two sons who have been deployed, so that was a LOT of red friday t-shirts... But I do not sell. I wish I could, but it is just way too stressful for me.

I won't tell you you don't need a heat press. I don't really know what you need. All I can tell you is that I most certainly do not need a heat press. Thankfully - because as you can see here, I really don't have room for one!
You can tour my very small cricut/soap making/sewing space here - http://fieldsofhether.blogspot.com/2018/04/my-cricut-craft-space.html

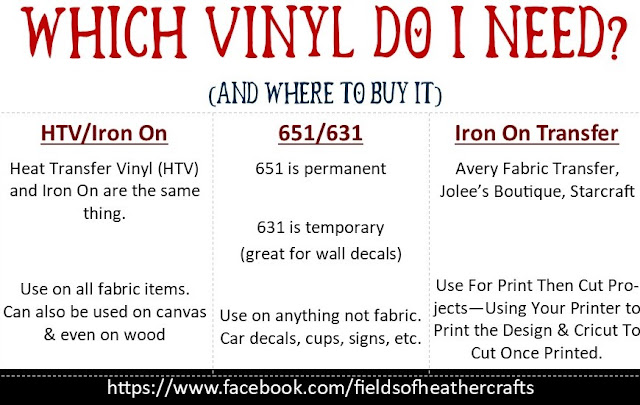
Tips For Using HTV:
Remember, for HTV you place the HTV Shiny side down on the mat
And you Reverse, or Mirror the design. You're cutting on the BACK of the material. Once weeded, you'll flip the design onto the fabric, and iron [or heat press] it on.
 |  | .png) |
==============================
==============

Find The Facebook Group For This Page
where do you keep all your supplies, Shirts, cups etc...
ReplyDeleteYou can see some of them here, on that shelf at the top of the room. More are in the cabinet over the sewing machine. :-)
Delete