Showing posts with label Cmas In July. Show all posts

Christmas In July - To Do Lists


My Christmas In July To Do Lists

A few years ago  when I started thinking about Christmas in July, I was originally thinking of a new version of my "12 Weeks Of Cricut Christmas Crafting" - a series of how to make various projects, step by step.  And I DO plan to revamp that series eventually.   It's on my list.  

But as I got started, I realized that's not really what I need from Christmas in July, personally.

What I need is to get organized.  I need my Christmas Svgs all sorted in one place, I need to think about what projects need done EARLY and focus on those (advent calendars!  Do not wait until after Thanksgiving to start the advent calendars and count downs!)  I need to update our Christmas card list with all of those cards and address changes I tossed in the basket, and I need to look at ordering matching blank pajamas for the grandkids before their sizes sell out.  Often many sizes are sold out by October!  I need to look at what Christmas projects I cut out and didn't finish assembling, last year.

I came up with a 4 week plan, and made the following two page to do list:


These two pages are part of my Christmas planner, which you can see, and download FREE, from here:


======================

Find the index to all of my Christmas In July Posts here:


Christmas In July Week 3 - Count Downs & Advent Calendars

 
Christmas In July - Count Downs & Advent Calendars

This is probably the #1 Christmas item I SHOULD be starting in July.  For the grandkids in England, I need to mail these at the end of October.  For the local kids, I should send them home with them after Thanksgiving dinner.  That way they all have them for December 1st.


Find the free printable Advent Calendar Planner Page from My Christmas in July Planner here:

I try to purchase the chocolate "fillers" from local candy shops - especially for my adult children who have moved out of the area.  One year however, I did an alcohol theme.  Not actual alcohol - Jim Beam Fudge, Baileys Carmels, etc.    For loose chocolates - Glad Press and Seal worked great for wrapping them before placing them in the boxes.


Here's the count down I made for the grandkids this year
(Includes free svgs download)
https://fieldsofhether.blogspot.com/2023/07/santa-cotton-ball-count-down.html

Another paper count down - please note that I have this sitting in a very large frame that was already hanging in my hallway,   The sleigh moves each day to count down!  This is a Craft With Sarah project, and it was free during her Christmas event.  It's about $10 for the file now.
https://www.craftwithsarah.com/product/giant-advent-calendar/


Here's a step by step tutorial for making this Christmas Countdown board, using a dry erase board from the Dollar Tree:
(There's a list of other free count down svgs on this post too)

And here's a look at some of the advent calendars I've made in the past

Where to find FREE Advent Calendar SVGS

=====================
The Christmas In July Index

A Free Printable Christmas Planner


Christmas In July Week Two - Getting Ready For Christmas Card Making

Christmas In July Week Two
Getting Ready For The Christmas Card Making & Addressing

I keep a basket just for Christmas Cards.  In the back is a printed version of our card list, all of the printed Avery labels to address this years cards, return address labels, card saying inserts, and completed cards. Read more about all of those things, here:

Find my Christmas Card Planning Sheet here:

And there's an index to all of my Christmas in July printable planning sheets, here:

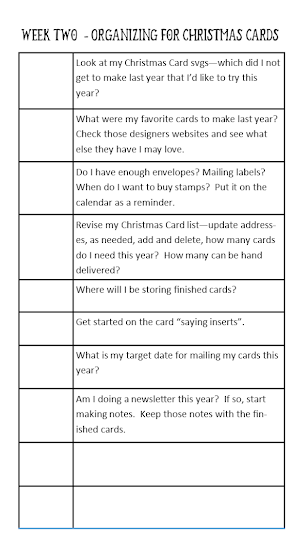
This is taken from one of my Christmas In July Planner printables - find the entire page here:
On My Christmas In July To Do List This Week:
  • Look at my Christmas Card svgs—which did I not get to make last year that I’d like to try this year?
  • What were my favorite cards to make last year?  Check those designers websites and see what else they have I may love.
  • Do I have enough envelopes? Mailing labels?  When do I want to buy stamps?  Put it on the calendar as a reminder.
  • Revise my Christmas Card list—update addresses, as needed, add and delete, how many cards do I need this year?  How many can be hand delivered?
  • Where will I be storing finished cards?  
  • Get started on the card “saying inserts”.
  • What is my target date for mailing my cards this year?
  • Am I doing a newsletter this year?  If so, start making notes.  Keep those notes with the finished cards.
Christmas newsletters went out of fashion back when facebook became more popular - but for years, I wrote one each year strictly for my Grandmother.  Then I made a copy and kept it in our Christmas binder, so our newsletters are a snapshot of our years, always including photos...  My grandmother has passed away, and I can't imagine I'll be mailing a newsletter this year, but I think I will continue writing one, for our Christmas binder.  My grandkids may enjoy them some day.  :-)

===================
HOW TO ADDRESS CHRISTMAS CARDS WITH CRICUT
===================

How to Use Cricut To Address An Envelope
(And a list of FREE fonts that work well with the pens)

FREE fonts that work great (no bubbling) with the pens in Cricut
These were all tested with super fine tip pens - like a simple Bic pen.  See the samples here, along with links on where to download the fonts.  There are two pages - 48 fonts - tested and listed here:

Our Christmas card list is pretty long, and I am not an extremely patient person - so rather than address all of our envelopes with pens in Cricut, I use Avery Labels and Mail Merge.  Once I've printed my labels, they work as a sort of "to do list" - I now know I need a card for each of those labels.  :-)
Here's a step by step for using Avery Labels and Mail Merge - including links to the free templates to make it even easier


I gave up on using home made envelopes awhile back - too many of my cards were returned as "undeliverable" by our post office.  Instead, I purchase these.  They are not the most inexpensive, but they are so pretty!  A pack of 50 costs around $14.  They come in a multitude of colors - from dark blue and dark green, to Ivory and White, with either silver, or gold, accents.

============================
I make saying inserts, for the inside of my Christmas cards.  I like to have a variety cut ahead, that I can just quickly glue on the inside of my cards when finished.  Here's how I make them in Design Space, using Print Then Cut

===================
CHRISTMAS CARD SVGS & INSPIRATION
===================

A Look at some of the Christmas Cards I made in 2021

See a photo album of Christmas Cards I made in 2022, plus tips & tricks,  here:

Where To Find Free SVGS For Making Christmas Cards


Here's a step by step for making printable, customized, "Mix & Match" Family Illustrations

=======================
The Christmas In July Index:


Making "Saying Inserts" For Christmas Cards

 
Christmas Card Inserts
On my desk this afternoon - inserts for some of my Christmas cards.  These get glued into the inside of my cards.

Addressing A Pre-Made Envelope With Cricut

 Addressing A Pre-Made Envelope With Cricut

To address a premade envelope, simply type your address in a text box, choose a "writing font" [one that works with the pens ] and set the line type to draw.  


Choosing Your Font:
When using pens in cricut, the pen follows the path of the blade - giving most text an "outline", or bubbled look.  Most will tell you to use an official Cricut Writing Font - and for those of you who pay the monthly fee to rent images and fonts from Cricut, that's a good idea.   

But for those of us who do not rent our images and text...  there are HUNDREDS of free options you can download and install..  Hairline fonts that will appear single line, and true single line fonts (which actually, often do not work as well as the hairline fonts, in Design Space).

I've already tested hundreds of fonts, in a variety of pen sizes, and included links on where to download the fonts.  You can find all of my samples, sorted by pen size, here:


But for addressing Christmas cards, I recommend sticking to the list of fonts that write well with the super fine tip pens.  Find that list here:
I have 48 fonts tested, and listed there, that I think work extremely well.  Links to download each of the fonts can be found on that site as well.

But for me - my two "go to" favorites are AlwaysHere, and Montepetrum.  

Click Make it.  But do not actually Make it yet!

Place your envelope on your mat.  Look at the grid and decide where you would like the machine to write.  For my envelope, I decided on 2.5  inches in, 2 inches down.


Look at the screen, click on the mat, then click on the address, and drag the address to the spot on the grid where you want it to draw.  See the image above?  I've moved the address down.  

Now click make it.

This time I used a plain old bic pen to write.  I use these a lot!


That's it!  Addressing envelopes with cricut is time consuming.  It is MUCH faster to use a program like word, and a printer, to print labels for on envelopes, or print right on envelopes with your printer.  But it's still nice to know how to do it with cricut too.

This is how I actually address my Christmas Cards - Using Mail Merge and Avery Labels.
Here's a step by step how to:

I gave up on using home made envelopes awhile back - too many of my cards were returned as "undeliverable" by our post office.  Instead, I purchase these.  They are not the most inexpensive, but they are so pretty!  A pack of 50 costs around $14.  They come in a multitude of colors - from dark blue and dark green, to Ivory and White, with either silver, or gold, accents.


Christmas In July - Week One


=============================
Week One - Organizing My Christmas SVGS
================================

I know many of you are just anxious to get started on a project.  I'd be the last to discourage that.  Pick something, send it to cut, and while it is cutting, start thinking about organizing all of the svgs and supplies you already own. 

For week one, my emphasis is on finding all of my Christmas SVGS, organizing them, setting up a folder to store some  inspiration and projects to make in (a visual to do list) and then checking  supplies and attempting to be realistic about what I can actually get done this year.

This Weeks Goals:
Step one for me is to see what I already have.  It's always more than I think.

=====================
Sorting & Organizing Christmas SVGS
======================

As I say over and over, what works for me may not work for you, and what works for you may not work for me.  AND, what works for me is always "in progress", I'm constantly making changes.  But here's a look at how I keep my Christmas svgs sorted:


Christmas has a WHOLE LOT of subfolders - more than any other category of svgs on my hard drive.  All of these are stored on an external hard drive. 

If you use Windows  and you do not see thumbnail views of your svgs, it's MUCH easier to sort them if you can see what they are!  Here's how to enable thumbnail views of svgs:
https://fieldsofhether.blogspot.com/2018/01/how-to-see-thumbnails-of-svg-files.html

I use the windows power toys option. 

=================
STEP TWO
Checking My Purchases

Now that my files are all organized and I can see where everything is, it's a good time to check the sites I buy svgs from, and make sure there isn't anything I forgot to move over to these folders.   In most cases, you can just go to your account, and look for your purchase history.  Here are screenshots and more detailed instructions for the sites I purchase from most: https://fieldsofhether.blogspot.com/2023/06/tip-search-your-purchase-history.html

Design Bundles, as of August 2026, is going to subscription only - so just to be safe, this may be a good time to download ALL of your purchases...

And with the Creative Fabrica taking over all of the Dreaming Tree files, and Leo leaving DT,  if you have a CF Membership, you may want to download all of the DT Christmas files too.  I don't know what will happen with all of that.  (See what little we do know here )

Although the thumbnail viewing option I covered above is helpful for many svgs, when it comes to complex 3d paper svgs, I always try to save the photo of the completed project into the folder with the svgs too.  Sometimes it is included in the download, sometimes it is not - I right click and "save as" on the project photos, just to be safe.

===================
STEP THREE
CHRISTMAS   "WORK" FOLDERS
I always keep a "Cut Now" folder in dropbox [one of my cloud storage options] , with the projects I want to make soon.
In that folder, I added a  Cmas folder.

Inside, I stuck preview photos of the projects I'd like to make this July.  In a folder labeled "2 upload", I have all of the files I need to add to Design Space.  This is a visual to do list for me.  I'll add more files as I decide exactly what I am doing this month, but this shows me some of the things I didn't get to last year.  

========================
Now to find my stash of "Not completed" projects, and decide what I want to finish this week-end.  

Next week, Week two, will be all about Christmas Cards.
Getting my list organized, my supplies ready, and deciding on a few designs to make.  I won't make TOO many ahead - maybe half?  Because I know there will be so many new designs I'll want to make later this year.  I never make just one card design - I'm not cut out to be a factory worker.   I make many different designs each year.  

========================

The Christmas In July Posts Index
=====================

The Christmas In July Planner Index
=====================

An Index Of Where To Find Free Christmas SVGS


My Christmas Planner

 
Free Printable Christmas Planner  Sheets - 
With Special Emphasis on Christmas Crafting

Christmas In July - Planning Christmas Ornaments


Christmas In July - Planning The Christmas Ornaments