

Christmas Count Down Santa -
Add a cotton ball each day, building Santa's beard and hat.
For the numbers you will either have to add them yourself [to use the pens] or I included pngs that work for Print Then Cut.

After uploading the svg, resize the group to 11.5 tall

Next, change the colors, so you can easier see which pieces are which.
Now - would you like to use the pens to draw the numbers, or print then cut the numbers?
If you want to draw the numbers with a pen, you will need to add them, using text boxes, and it is a little time consuming. I used the always here font, and here is how I spaced them:

The Always Here Font is FREE on Dafont, and it's one of my favorite fonts to use with the pens with Cricut.
To PRINT THEN CUT :
There are two additional files, pngs, to upload for the print then cut option. Once uploaded, they will need resized.
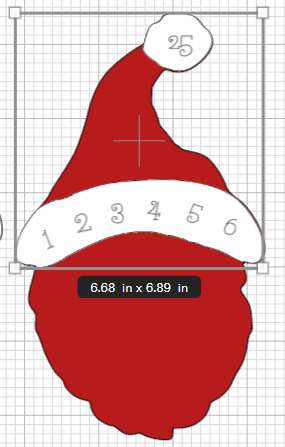
Resize the top section to 6.68 x 6.89
Then you can delete the matching pieces in the original upload - those will not be needed.

Next, resize the beard to 6.71 x 6.13
And delete the original beard.

Make sure the white pieces are set to print then cut (they should be, by default) and all of the other images are set to cut.
OPTIONAL - Add Paper Eyes

We used googly eyes for ours, but it's simple to add paper eyes if you do not have a 3 year old insisting on the googly version. :-)
Using the shape menu in Design Space:
2 white ovals, .819 W x .579 H
2 black circles .45 in diameter
Assembly:

Layer the white beard and white hat ball on the red, then add the face, with the top of the oval at the top of the beard.

Then the mustache and nose, and finally the eyes.

Last year we added a magnet to the back, to hang this on the fridge. Each day, a new cotton ball gets glued onto Santa.
No comments:
Post a Comment