
 |
| Layering Vinyl With Registration Marks - Christmas Countdown Boards |
Are you ready for week three of the 12 Week Christmas Craft Challenge? Last week we tackled a simple vinyl transfer on a candle holder. This week we're layering vinyl colors, using registration marks, to make a Christmas Countdown Board, in our step by step walk through.
Then, for the "Choose Your Own Adventure" section this week, there's a section of additional count down project ideas and free svgs.
And I'd love to see what you make! Join the group for this page to share your progress, ask questions, and be absolutely inundated with free svgs, posted by themes. :-) Join The FB Group For This Blog By Clicking Here
==================
Step By Step -
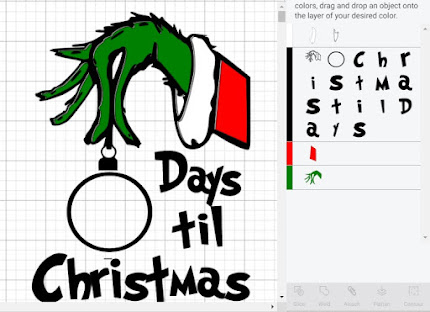
Grinch Hand Christmas Countdown On A Dry Erase Board,
Using Registration Marks To Layer The Vinyl
=====================
1. Download a Free Grinch Hand Countdown SVG
There are a variety of free versions of this svg. I used the one from here:For this site, click on the circle with DL SVG in it The svg will download as an svg - there will not be any extra files, and you will not need to unzip anything. Upload the svg to Design Space.
 Click on the image, then on the top right, click "Ungroup"
If you are putting this image on a dry erase board, you can delete all of the white pieces. Since the image is going on a white background, they are not needed. And we'll be writing the numbers on the dry erase board, no no need for that white center in the ornament.
If you are using a different surface, such as a Dollar Tree Charger Plate, keep the white circle. You can use dry erase markers on vinyl. Use glossy vinyl, not matte, for the best results.
 In my example here, I deleted the white circle (Correction - Specifically, I sliced a circle out of the circle, leaving an outline, which I changed to black. In some svgs there will already be a black outline. In the free one from Svgs For Geeks, I had to slice) in the ornament, but I kept the white cuff. I used the cuff on one board, and not on another, to compare - I like it slightly better with the white cuff, but it made VERY little difference either way.
Now we are going to create our registration marks. From your options, Choose Add A Shape, and add a square. Then make it very small. Mine is 0.3, for reference. The exact size is unimportant. large enough to see well, small enough to not waste too much vinyl.

Now duplicate that square so you have one for each color of your design. If you look at your layers panel, at the top is "color sync". Choose that, and you can see your design by colors.
Once you have 4 squares, in that color sync panel, drag one square into each of the colors. So drag one black square into the box with the red piece, one into the area with the green pieces, etc. Important - We are NOT clicking on the squares over on the canvas (area with the grid) but rather in the grey panel to the right.  Now we have one square for each color of the design.This time, click on the squares on the canvas - the left. Select all 4 of them at the same time, then choose Align, Center. The squares will all be lined up perfectly, you will only see the top one.

Next we need to attach the squares to our design.Again, we'll be selecting images in the Layers panel on the right, not on the canvas. Because we don't want to accidentally move anything, it will be easier to select the objects there. On a computer, you hold down the shift key, and click on each white image. In the layers panel.
 See how all of the white pieces above are dark grey? That's because they are selected. Once all of one color is selected, choose attach.You can only attach one color at a time. If you choose black and white pieces at the same time, they will all change to the same color - typically black. Select all of one color, attach. Then select all of the next color, and attach.
Once all of your colors are attached, if you click on the little arrows to the left of attach to collapse them, you will see just lines of "Attach". If you see any images in that row after clicking the arrows, you missed them, and they are not attached. Click on them, and click on the other items of that color, and attach.
 Now each color of your design will cut exactly in place. Click make it to send your design to cut.
 Now we're going to put all of the design pieces onto our transfer tape, using the squares to line up our design. Put the black outline on the transfer tape (I use Dollar Tree Contact paper for my transfer tape) first, because that is the "top" of your design.
 Then add the rest of the design to the transfer tape, one color at a time, lining up those squares each time to perfectly align the design.
Once the design is completely on your transfer tape, remove the squares, you don't want to transfer them, they were only there to help you line up your layers on the transfer tape.
Now transfer the entire design all at once from your transfer tape onto your dry erase board.
 All done!
1. Download a Free Grinch Hand Countdown SVG
There are a variety of free versions of this svg. I used the one from here:
For this site, click on the circle with DL SVG in it

The svg will download as an svg - there will not be any extra files, and you will not need to unzip anything. Upload the svg to Design Space.

Click on the image, then on the top right, click "Ungroup"
If you are putting this image on a dry erase board, you can delete all of the white pieces. Since the image is going on a white background, they are not needed. And we'll be writing the numbers on the dry erase board, no no need for that white center in the ornament.
If you are using a different surface, such as a Dollar Tree Charger Plate, keep the white circle. You can use dry erase markers on vinyl. Use glossy vinyl, not matte, for the best results.


See how all of the white pieces above are dark grey? That's because they are selected. Once all of one color is selected, choose attach.
You can only attach one color at a time. If you choose black and white pieces at the same time, they will all change to the same color - typically black. Select all of one color, attach. Then select all of the next color, and attach.
Once all of your colors are attached, if you click on the little arrows to the left of attach to collapse them, you will see just lines of "Attach". If you see any images in that row after clicking the arrows, you missed them, and they are not attached. Click on them, and click on the other items of that color, and attach.


Now we're going to put all of the design pieces onto our transfer tape, using the squares to line up our design. Put the black outline on the transfer tape (I use Dollar Tree Contact paper for my transfer tape) first, because that is the "top" of your design.

Then add the rest of the design to the transfer tape, one color at a time, lining up those squares each time to perfectly align the design.
Once the design is completely on your transfer tape, remove the squares, you don't want to transfer them, they were only there to help you line up your layers on the transfer tape.
Now transfer the entire design all at once from your transfer tape onto your dry erase board.

All done!
===========Choose Your Own Adventure -Free Christmas Countdown SVGS & Projects
==============
==============
 Here's another version - I sliced a circle from the tree for this one, and added text.You can find dozens of free red truck svgs in the facebook group for this page, under the Little Red Truck thread.
 Find more free Grinch SVGS, and the Grinch Font, Here:

Here's another version - I sliced a circle from the tree for this one, and added text.
You can find dozens of free red truck svgs in the facebook group for this page, under the Little Red Truck thread.

Find more free Grinch SVGS, and the Grinch Font, Here:

A different free grinch hand - no black outline


This is just an idea, not a free svg - but you can find the free elf legs monogram svg here:
And more elf legs here - https://cutthatdesign.com/?s=elf+legs&id=26513
And another one here: https://freesvgplanet.com/?s=elf


==========
NOT FREE
===========

This was made using the perpetual calendar svg found here
Preparing For Next Week - Christmas Ornaments
Next week for the step by step work along, we'll be making print then cut floating Christmas Ornaments. For this project you'll need a clear Christmas Ornament and printable acetate. I like the flat disk ornaments, and graffix film, best.
- Graffix brand inkjet film - You can buy this at most office supply stores, it's the transparency film used in overhead projectors
- Flat Disc Ornaments - These are usually cheaper at Michaels, but the link will show you what they look like, for reference.
=====================

The Christmas Craft Challenge Index
how do you change the circle that you sliced to black? I have it sliced out but can not figure out how to change the outline to black.
ReplyDeletethanks