Christmas In July Week Two
Getting Ready For The Christmas Card Making & Addressing
I keep a basket just for Christmas Cards. In the back is a printed version of our card list, all of the printed Avery labels to address this years cards, return address labels, card saying inserts, and completed cards. Read more about all of those things, here:
Find my Christmas Card Planning Sheet here:
And there's an index to all of my Christmas in July printable planning sheets, here:
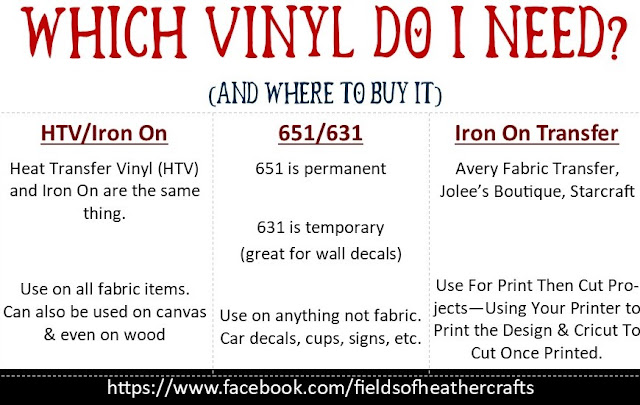
This is taken from one of my Christmas In July Planner printables - find the entire page here:
On My Christmas In July To Do List This Week:
- Look at my Christmas Card svgs—which did I not get to make last year that I’d like to try this year?
- What were my favorite cards to make last year? Check those designers websites and see what else they have I may love.
- Do I have enough envelopes? Mailing labels? When do I want to buy stamps? Put it on the calendar as a reminder.
- Revise my Christmas Card list—update addresses, as needed, add and delete, how many cards do I need this year? How many can be hand delivered?
- Where will I be storing finished cards?
- Get started on the card “saying inserts”.
- What is my target date for mailing my cards this year?
- Am I doing a newsletter this year? If so, start making notes. Keep those notes with the finished cards.
Christmas newsletters went out of fashion back when facebook became more popular - but for years, I wrote one each year strictly for my Grandmother. Then I made a copy and kept it in our Christmas binder, so our newsletters are a snapshot of our years, always including photos... My grandmother has passed away, and I can't imagine I'll be mailing a newsletter this year, but I think I will continue writing one, for our Christmas binder. My grandkids may enjoy them some day. :-)
===================
HOW TO ADDRESS CHRISTMAS CARDS WITH CRICUT
===================

How to Use Cricut To Address An Envelope
(And a list of FREE fonts that work well with the pens)
FREE fonts that work great (no bubbling) with the pens in Cricut
These were all tested with super fine tip pens - like a simple Bic pen. See the samples here, along with links on where to download the fonts. There are two pages - 48 fonts - tested and listed here:
Our Christmas card list is pretty long, and I am not an extremely patient person - so rather than address all of our envelopes with pens in Cricut, I use Avery Labels and Mail Merge. Once I've printed my labels, they work as a sort of "to do list" - I now know I need a card for each of those labels. :-)
Here's a step by step for using Avery Labels and Mail Merge - including links to the free templates to make it even easier
I gave up on using home made envelopes awhile back - too many of my cards were returned as "undeliverable" by our post office. Instead, I purchase these. They are not the most inexpensive, but they are so pretty! A pack of 50 costs around $14. They come in a multitude of colors - from dark blue and dark green, to Ivory and White, with either silver, or gold, accents.
============================
I make saying inserts, for the inside of my Christmas cards. I like to have a variety cut ahead, that I can just quickly glue on the inside of my cards when finished. Here's how I make them in Design Space, using Print Then Cut
===================
CHRISTMAS CARD SVGS & INSPIRATION
===================
A Look at some of the Christmas Cards I made in 2021
See a photo album of Christmas Cards I made in 2022, plus tips & tricks, here:
Where To Find Free SVGS For Making Christmas Cards
Here's a step by step for making printable, customized, "Mix & Match" Family Illustrations
=======================
The Christmas In July Index:


.png)


