Print Then Cut EOS Easter Cards


The Cliff Notes:
First, download the free files from http://caluyadesign.com/free-bunny-faces-svg.html
Normally you want the svg files, but it's faster to use the PNG files for this project, since it is print then cut.


Create a 5.58x7 rectangle in Design space.
Upload the Bunny PNG File
Add your text.  Change your text to Print.
Select all, choose Center horizontally


If you have already added the circle (1.46 in diameter) hide it.
Select all, Flatten.


Add a 1.46 inch in diameter circle, right over the nose.
(You can set the size in the toolbar across the top, beside "flip".  Just type the size into the box)

Select All, Attach.  (That will keep the circle in the right spot when it cuts)

Choose Make it, send to your printer. It will print a black box around your design.  It needs to do that, that is how cricut will know where to cut.

Place on the blue mat (or a well used green mat)
Cut.  Your machine will scan the image, then begin cutting.

Remove from the mat, unscrew the EOS container, place the back through the hole, attach the front.


=====================================

Where To Find Loads Of Free Easter SVGS
https://fieldsofhether.blogspot.com/2019/02/free-svgs-for-easter-projects.html

Stocking Stuffer Reindeer EOS:


Cricut & The Dollar Tree


The Dollar Tree is one of my favorite places for "blanks" - items to put cricut vinyl designs on - but it's also where I find some of my basic supplies and tools.  These are the the items I buy there, followed by some of my projects with Dollar Tree blanks. 

 If there is a link with the project, it usually includes the svgs and fonts I used, along with step by step instructions.  

Supplies To Buy At Dollar Tree
 
These are the two items I suggest everyone with a cricut buys first thing.  
The clear contact paper ($1 a roll!) is the only transfer tape I use for transfering vinyl.  It also works for stencils.
The fabric tape measure I use for every single project.  It's my most used tool.  That is what I use to figure out how large my design should be.  (I found the tape measure in the check out aisle)

 
These items are a little more craft related than specifically cricut - but I still recommend them!  I use those hooks to hold my cricut mats on the wall (storage) and the jute is nice for so many of my projects - either to hang them, decorate them, or wrap them.

Blanks from Dollar Tree Decorated With Vinyl

Dollar Tree Chargers Decorated With Cricut


Metal Flowers From Dollar Tree Foil Cookie Sheets

Layered Paper Shadow Box (Light Box)


Dollar Tree Lanterns

Roll A Doodle Game

Decorating Dollar Tree Cake Carriers

Dollar Tree Cosmetic Bags Decorated with Cricut (With Free SVGS)


Dollar Tree Soap Dispensers
http://fieldsofhether.blogspot.com/2017/12/decorating-soap-dispensers-with-cricut.html


Dollar Tree Night Lights Redone With  Cricut
https://fieldsofhether.blogspot.com/2019/01/personalizing-dollar-tree-night-lights.html

Tooth Fairy Luminaries from Dollar Tree Tart Warmers
https://fieldsofhether.blogspot.com/2019/01/tooth-fairy-luminary-with-free-svgs.html

Step By Step (With Links to The Free Font & SVG)
Travel "Lego" (Building Blocks From The Dollar Tree)
https://fieldsofhether.blogspot.com/2019/03/dollar-tree-travel-lego-building-blocks.html


Pot Holders 
These are one of my favorite items!
They are:  Home Collection Cotton/Neoprene Pot Holders 
I use a silicone baking sheet in the pocket before ironing on my design.
(The dish towels are from JoAnns)


Split Monogram On A Dollar Tree Tote


Copycat Starbucks Logo on a Dollar Tree Travel Mug

Easter Baskets


Cricut Easter Baskets


Cliff Notes:
  • Baskets are from the Dollar Tree, Target, & DH Gate.  Details are below, for each.
  • Designs are from all over.  I've started this post with a list of places to find free bunny faces, then later in the post I describe each design I used and where I got the elements for it.
  • I used a regular iron for all of these.  It's what I always use, I never have any problem using an iron.  I use a silicone baking sheet inside (or behind) items when Ironing on my designs, I think it helps.  
  • Siser Easyweed HTV.  I buy it on Amazon, with prime free shipping, it's always the cheapest that way, for me.

Free Bunny Face SVG Files:

Fonts I liked for the names: Pharmacy, Twinable, Messy Marker, Moonlight, Chuck Noon


The Bags & Baskets:


Burlap Bunny Bags:
 
On Amazon, these are around $30 for 6.  Free Shipping with Prime, and a variety of additional colors, shapes, and designs are available. 

DH Gate has these at a lower price, but you have to buy a larger amount, and shipping may  take weeks - but it is also free.  


Ironing  on them:


I used the silicone baking sheet inside the bags, as I do with most items, but because of the way the burlap and fabric are layered here, I'm not sure how much it helped.  I used it anyway.  :-)

The seams and layers at the bottom made it a little more difficult to get the good pressure on the letters, but they have held up well.

Dollar Tree Baskets:
Find them online on the Dollar Tree Site Here -
 https://www.dollartree.com/easter-bunny-shaped-baskets/302822
  For $1.25 each, these are by far the quickest and easiest and cheapest to make!  Big Lots has similar baskets, but not nearly as cheap.

Ironing Them On - 

You have 4 inches in length to work with on these ears.
I chose the font Moonlight - one of my current faves.  As much as I love beautiful scripty fonts, when making things for young children, I like to keep the letters clear and readable so they easily recognize their own name.


Target Baskets
In 208 these were inside the door, in the "Dollar Spot" aisles.  (Why is this called Dollar Spot?  Almost nothing there is just $1....)  They cost $3, and are sturdy - with a plastic bucket inside the layers of canvas material.  The ears have wire in them.

Five Below has similar buckets, just a bit larger, with a bunny silhouette already on them, for $5 each.  They are 3 for $18 on amazon here - https://amzn.to/30OKGeP

Ironing On Them:
This is the only time I have used my iron more like an iron than a "press" for htv.  Because of the curve of the bucket, I kind of ran the iron around over the design.  It attached quickly and easily - the htv seems to like this material!   I didn't put anything inside of the buckets, just my hand. I kind of held the bucket in the air with one hand, and moved the iron around the design with my other hand.  It sounds difficult, I know, but this was actually much easier than the burlap bags. 

The Designs:


For the Bunny with the sunglasses:
I used the llama face with sunglasses from Caluya design, ungrouped, deleted the ears.
Selected both areas on the glasses, and sliced, so the cut outs are cut out, not layered.
Changed the circle behind the nose to pale blue
I added the whiskers from the printable cuttable creatables face
Font is chuck noon.

Because I have a LOT of black scraps, rather than fuss with how to place everything to use up scraps, I just changed the whiskers & nose, sunglasses, and letters all to different colors and cut each one.  I put black on the mat each time, but because the software thought I was using different colors, it automatically prompted me to put in a new mat for each item.  It was a little more (but not much!) time consuming to do it this way, but I did almost all of these with just my scraps - and I found it quicker to put in a new mat than any other option.


This is the face I used for the girls burlap bags.  It was in my svg files names BunnyFace.svg - but there is no information in the properties for me to know where i downloaded it from.  I downloaded it in November of 2017...  The links above give similar faces, but if anyone knows where I got this particular svg (I'm positive it was free) I'd love to link to it.

The font I used for the girls burlap bags was DK Jambo.


Molly's basket was made with a photo of her.  I used graphics software to convert it to an svg, for Christmas ornaments last year.  For this, I simply had to make the graphic larger.  Font is Moonlight.  Here's a variety of software that will convert a photo to svg - 
https://fieldsofhether.blogspot.com/2019/02/programs-sites-for-converting-to-svg.html


Travel Tissue Cover Keychains - Decorated With HTV

Travel Tissue Holder Keychains

If you are a beginner sewer, this is another great project to start with.  It's just a few straight seams, quick and easy!  And then you can add designs with your cricut and some htv.

The ones above were made for my BSF group back in 2018.  The keychains are a nice addition when clipping to tote bags.

Using Gedmatch to Better Analyze My Raw DNA from Ancestry.com

This is my Ethnicity Estimate, as given by Ancestry
For a basic explanation of what is shown here, read this: More Than A Pie Chart

I keep telling you all to download your raw DNA from your ancestry.com DNA tests, upload it to gedmatch, and run some of the algorithms there.  It can be a little overwhelming, there is so much to learn with our DNA, so today I'm just going to run a few quick projects to show you some of the things Gedmatch can do. 

 Gedmatch is a very barebones site  - it does a lot, but it does not explain a lot.  If you want to learn a lot more than what I am showing you here, go to this amazing site that breaks down what each option is, and why you should, or should not run it.  For instance, if you are not Jewish and you run the "Eurogenes Jtest" you may get false Ashkenazi (Jewish) results.  So you don't really just want to blindly run each test and believe the answers you see.  

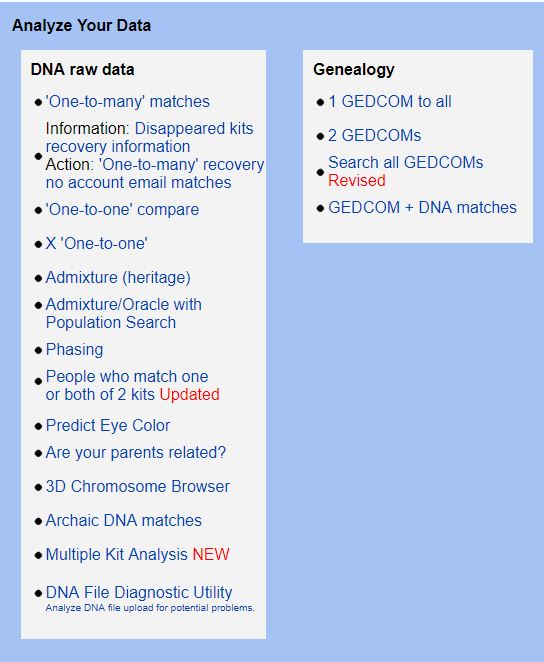
First you have to download your raw DNA.  If you did an Ancestry test, I know this is easy, because I have done it myself.  I explain how to do that here: http://heathersgen.blogspot.com/2017/07/ive-done-dna-test-now-what.html  If you have taken a test through another company, google "how to download my raw DNA from ----------" and I'm sure you will find your answer.  :-)  Upload your results to Gedmatch, (also explained at the link  I gave for downloading the raw dna) and you will receive a kit number.  Once you have a kit number, lets Analyze Some Data.


One to Many and One to One comparisons are such great tools for genealogists - but for this post, I'm just going to concentrate on the ethnicity estimates, as that seems to be what most of you are most interested in.

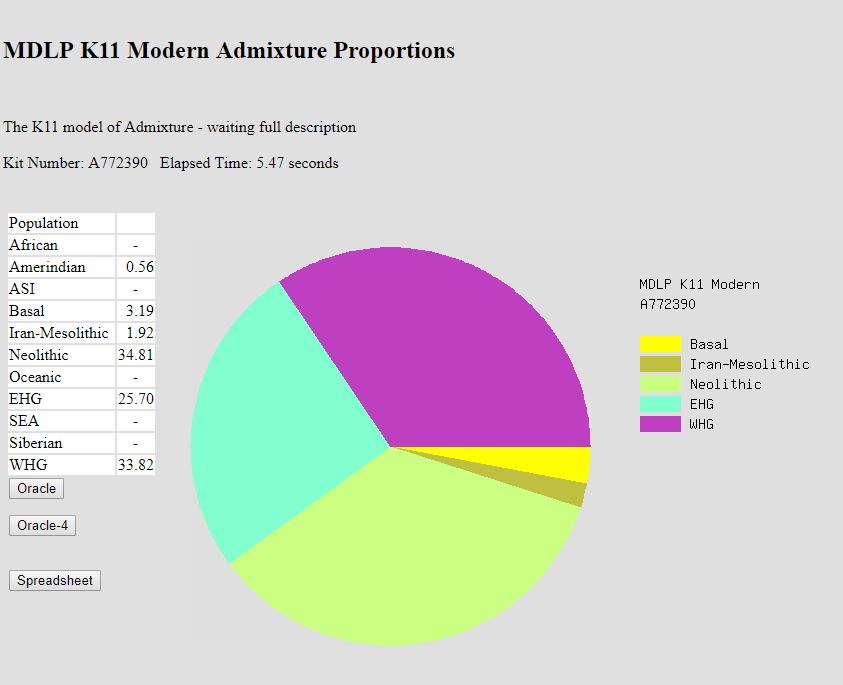
Click on Admixture (heritage), and choose MDLP.  Enter your kit number, and leave the default option - MDLP K11 Modern.  This is the VERY basic overview, and shouldn't really tell you anything that your ancestry results didn't already show, and in my opinion, it just makes the results look more confusing -   Mine gives me this result:
Although our family is believed to have native american ancestry, a .56% Amerindian result on this calculator is not enough to confirm this trace ancestry, as an amount this low could amount to what some call statistical “noise”.  My great great grandfather was born in Indian Territory, reportedly to Cherokee parents, although I cannot find any evidence or records of his parents anywhere.  I would need my grandmother to take a DNA test to get a better percentage here, as an indicator.  
WHG = Western Hunter-Gatherers, the most indigenous modern humans of Western/Central Europe
EHG = Eastern Hunter-Gatherers

So now let choose The Eurogenes Project (because most of you who have asked me about this are going to have a lot of European roots.  If your results at Ancestry do NOT show a lot of European roots, then you will want to go here, scroll down and find the descriptions of the options and choose one that better fits your results).  Choose the Eurogenes K13, which is the default, to start - because that will be the broadest option for most of us with European roots.  It just takes a minute or so to run, and then you will see something like this:


Admix Results (sorted):

# Population Percent
1 North_Atlantic 43.85
2 Baltic 23.54
3 West_Med 17.81
4 West_Asian 7.33
5 East_Med 5.18
6 South_Asian 1.38
7 Oceanian 0.92


You an actually map your admixture by chromosome.  This will show you what percentages of each of your 22 chromosomes are most commonly found in which populations/ethnicity.  For more information, I'm sending you back to my favorite site  for this stuff - http://genealogical-musings.blogspot.com/2017/09/a-gedmatch-admixture-guide-parts-3-and-4.html


The next admixture project I ran was the Eurogene/ Hunter Gatherer.  I could not find much information on this, but after running it, then looking at the map here, it's essentially the same break down as above, just with different labels.


And because I am now bored with this (there are absolutely no surprises here for me, I already knew what my results would be), I tried the eye color option.
My eyes are Hazel, so this was pretty accurate, but not exact.  They state that the results should be better from the 23andMe test - mine is from Ancestry.


Predicted Eye Color for Kit A772390 (F2)

/opt/gedmatch/databases/kits/V0A772390.bin Resource id #5
1323980
Read rules from top to bottom. In some cases, a rule cancels out results from rules above it.

CT at: rs17762363 - Increased melanin production. Adds yellow, amber, or brown. Some darkening. Contributes to brown.
AG at: rs4778138 - Adds melanin. Adds yellow, amber, or brown. Some darkening. Contributes to brown.
CT at: rs1800407 - Penetrance Modifier - Blue
CT at: rs3947367 - Contrasting sphincter around pupil.
CT at: rs1129038 - Adds Yellow.
AA at: rs4778241 - Medium melanin on Anterior Epithelium. Brown.
GT at: rs1470608 - Medium melanin on Anterior Epithelium. Gives dark eyes.
CT at: rs1667394 - Medium melanin production on Anterior Epithelium. Adds yellow, amber, or brown. Some darkening.
CT at: rs916977 - Adds melanin. Adds yellow, amber, or brown.
AG at: rs7174027 - Adds Yellow.
CC at: rs12203592 - No pigmented Collarette.
AG at: rs11634406 - Flecks (Nevi).
GT at: rs1448485 - Inhibits weak amber gradient.


And then the "Are Your Parents Related"- 
No shared DNA segments found
No indication that your parents are related.
(I know I'd get different results if I ran this on some of the grandparents in our lines...)


There is a lot more you can do with gedmatch, but that's a quick overview.

==========================================================

I have two blogs for my genealogy - Heathers Genealogy Notes for direct relatives of myself and Dan, and NOT Heathers Genealogy, for indirect ancestors, research I have done for others, and research that I did to rule out ancestors.