My Cricut Craft Space

I keep promising myself I'll get better pics of this area, but I never do, so this is what I already had, in answer to a popular question on facebook groups about small space craft organization.  This is my space, how I organize it, and the tools I use.

This area is part of my laundry room.  I'm standing with my back against the washer and dryer to take this photo.  

The ironing board is where I iron on all of my htv, and I often use this as a table/work space for other projects as well.  Yes, I know everyone says you cannot use an ironing board.   I don't know what to tell them - I do.  No problems.  I use that iron sitting there, a silicone baking sheet inside/or under the item, parchment paper on top of the transfer sheet, and I iron.  I've done at least 100 projects this way now - and none of them have peeled.  I don't wash them special either - everything goes right in the regular laundry here, washer & dryer, unless it's nice enough to hang the laundry outside.

Before I got a cricut, I had a much larger sewing desk here.  I had this old sewing machine cabinet (there's a sewing machine IN that stand, that I never use, as well as the one on top that I do use often) in the attic, and it replaced the desk so I had room to add the dresser for my cricut craft supplies.  I use my sewing machine so much more now that I have a cricut!  Pillow cases, curtains, tissue covers, key fobs...  


The cabinet over the sewing machine is full of blanks.  I do not sell - we just have a large family.  On the inside of the door are sticky notes with project notes.  Usually lists of things I am currently making, with measurements.  I now have two command strip hooks under the cabinet, holding all of my cricut mats.  (only one hook is shown here)

See that yellow fabric tape measure with the scissors, under the cabinet?  Hands down, my most used tool with the cricut.  I measure everything before designing, there's never a project where I don't use that tape measure!


The dresser was a facebook marketplace find.  A little paint was all it needed.  This is perfect for me.  This is great storage for me - there's room for my phone on it's dock, my laptop, and my cricut.  The drawers hold vinyl, projects, paper, and other supplies...
To the left is the counter where we have always kept the cats food dish.  It keeps the dogs out of the catfood, but it also means that the cat jumps on this dresser, then on to the counter, to eat.  He likes to sleep here a lot, so cat fur and cat foot prints are constantly an issue here.  :-)


The top two drawers - on the left are extra tools, projects in progress, and mistake cuts - things that I cut the wrong size, or didn't mirror, and keep thinking I might be able to use some how, so I haven't thrown them out yet....  On the right is cardstock.  (there's a basket of patterned paper off to the right, on top of the heater)

I never use the bluetooth option on my cricut.  It's so convenient to just plug it in, I just haven't bothered.  We use Bluetooth a lot here - Bluetooth speakers, and data transfers..  I notice the connection sometimes drops, especially in this room, so I just don't risk it not working well when using the cord is so convenient.

The middle drawers are my vinyl storage.  These are 2-3 rolls deep.  651 & 631 on the left, htv on the right.  Baskets for the scraps.  I bought large bundles of colors off amazon when I first started.  I don't really regret that, but if I had it to do over, I'd buy a LOT of black, white, Navy, and maybe two accent colors.  I use so much black and white, I order that at least once a month.  (LOVE amazon prime!  free shipping!)  The other color I have loved is that teal siser glitter htv.  I never use much of it, I've only ever bought the one roll, it's an accent color, but it's one of my favorites!  I don't really use cricut vinyl.  I don't think the htv adheres as well, and I can buy Orcal 651 cheaply on amazon.  Siser htv and Orcal 651 are what I use.


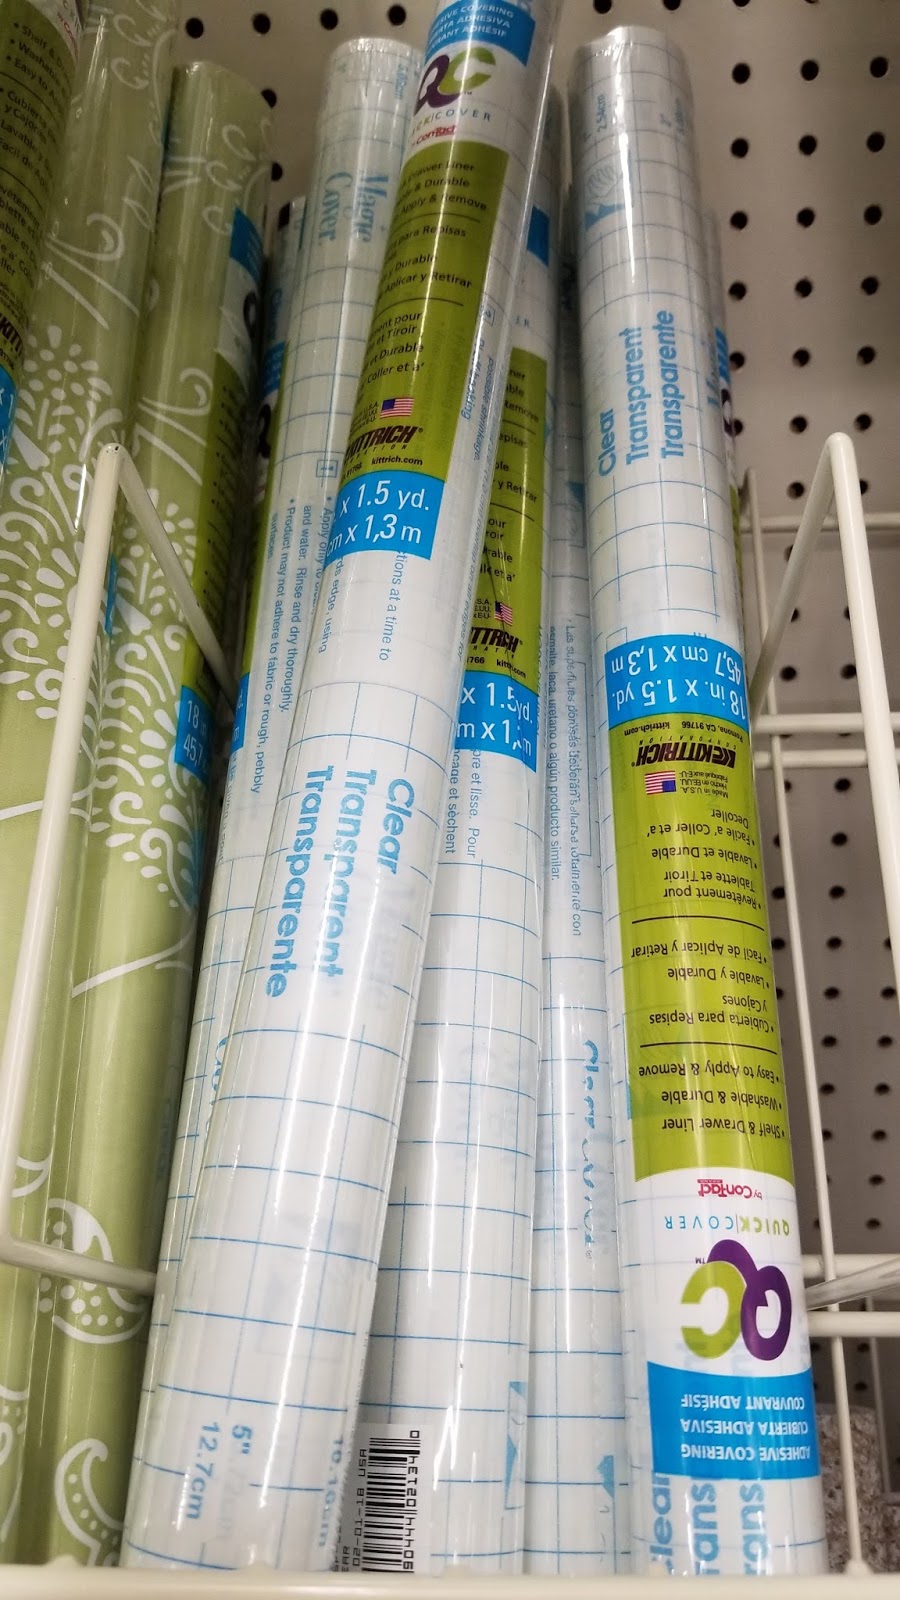
On the left is fabric for current or near future projects.  Here currently is fabric for dog bandannas, pillow cases, and capes.  I have more fabric in a closet in the downstairs bathroom.  On the right is the contact paper (for transferring designs), freezer paper (for stencils), wax paper (for storing htv designs that are cut but nor ironed on) and some contact paper and fabric paper that I bought to play with but haven't actually used yet...

This room does not have great lighting.  I found a shop light at Sam's club - it is easy to hang, plugs in, and is a great work light.  It cost me around $30.  
https://www.samsclub.com/sams/linkable-shop-light-honeywell-led/prod20590154.ip

The shelves over the windows hold more blanks and supplies.

To the right of the heater here, are my soap shelves.  I use my cricut to make the labels for my soaps now, one of my favorite uses for this machine.

That's my space!  I do keep a weeding tool, small scissors, and small garbage can beside my favorite chair in the living room. I do most of my weeding in front of the tv.  I tried one of the light tracing pads for weeding, but it really isn't much help for me, I prefer overhead light. I think I'd like an ott overhead light, but I haven't purchased one yet..

================================================================

My cricut Projects by type (with tutorials)

My Cricut Cheat Sheets

More Cricut Resources:

About Me & My Cricut

Print Then Cut EOS Easter Cards


The Cliff Notes:
First, download the free files from http://caluyadesign.com/free-bunny-faces-svg.html
Normally you want the svg files, but it's faster to use the PNG files for this project, since it is print then cut.


Create a 5.58x7 rectangle in Design space.
Upload the Bunny PNG File
Add your text.  Change your text to Print.
Select all, choose Center horizontally


If you have already added the circle (1.46 in diameter) hide it.
Select all, Flatten.


Add a 1.46 inch in diameter circle, right over the nose.
(You can set the size in the toolbar across the top, beside "flip".  Just type the size into the box)

Select All, Attach.  (That will keep the circle in the right spot when it cuts)

Choose Make it, send to your printer. It will print a black box around your design.  It needs to do that, that is how cricut will know where to cut.

Place on the blue mat (or a well used green mat)
Cut.  Your machine will scan the image, then begin cutting.

Remove from the mat, unscrew the EOS container, place the back through the hole, attach the front.


=====================================

Where To Find Loads Of Free Easter SVGS
https://fieldsofhether.blogspot.com/2019/02/free-svgs-for-easter-projects.html

Stocking Stuffer Reindeer EOS:


Cricut & The Dollar Tree


The Dollar Tree is one of my favorite places for "blanks" - items to put cricut vinyl designs on - but it's also where I find some of my basic supplies and tools.  These are the the items I buy there, followed by some of my projects with Dollar Tree blanks. 

 If there is a link with the project, it usually includes the svgs and fonts I used, along with step by step instructions.  

Supplies To Buy At Dollar Tree
 
These are the two items I suggest everyone with a cricut buys first thing.  
The clear contact paper ($1 a roll!) is the only transfer tape I use for transfering vinyl.  It also works for stencils.
The fabric tape measure I use for every single project.  It's my most used tool.  That is what I use to figure out how large my design should be.  (I found the tape measure in the check out aisle)

 
These items are a little more craft related than specifically cricut - but I still recommend them!  I use those hooks to hold my cricut mats on the wall (storage) and the jute is nice for so many of my projects - either to hang them, decorate them, or wrap them.

Blanks from Dollar Tree Decorated With Vinyl

Dollar Tree Chargers Decorated With Cricut


Metal Flowers From Dollar Tree Foil Cookie Sheets

Layered Paper Shadow Box (Light Box)


Dollar Tree Lanterns

Roll A Doodle Game

Decorating Dollar Tree Cake Carriers

Dollar Tree Cosmetic Bags Decorated with Cricut (With Free SVGS)


Dollar Tree Soap Dispensers
http://fieldsofhether.blogspot.com/2017/12/decorating-soap-dispensers-with-cricut.html


Dollar Tree Night Lights Redone With  Cricut
https://fieldsofhether.blogspot.com/2019/01/personalizing-dollar-tree-night-lights.html

Tooth Fairy Luminaries from Dollar Tree Tart Warmers
https://fieldsofhether.blogspot.com/2019/01/tooth-fairy-luminary-with-free-svgs.html

Step By Step (With Links to The Free Font & SVG)
Travel "Lego" (Building Blocks From The Dollar Tree)
https://fieldsofhether.blogspot.com/2019/03/dollar-tree-travel-lego-building-blocks.html


Pot Holders 
These are one of my favorite items!
They are:  Home Collection Cotton/Neoprene Pot Holders 
I use a silicone baking sheet in the pocket before ironing on my design.
(The dish towels are from JoAnns)


Split Monogram On A Dollar Tree Tote


Copycat Starbucks Logo on a Dollar Tree Travel Mug

Easter Baskets


Cricut Easter Baskets


Cliff Notes:
  • Baskets are from the Dollar Tree, Target, & DH Gate.  Details are below, for each.
  • Designs are from all over.  I've started this post with a list of places to find free bunny faces, then later in the post I describe each design I used and where I got the elements for it.
  • I used a regular iron for all of these.  It's what I always use, I never have any problem using an iron.  I use a silicone baking sheet inside (or behind) items when Ironing on my designs, I think it helps.  
  • Siser Easyweed HTV.  I buy it on Amazon, with prime free shipping, it's always the cheapest that way, for me.

Free Bunny Face SVG Files:

Fonts I liked for the names: Pharmacy, Twinable, Messy Marker, Moonlight, Chuck Noon


The Bags & Baskets:


Burlap Bunny Bags:
 
On Amazon, these are around $30 for 6.  Free Shipping with Prime, and a variety of additional colors, shapes, and designs are available. 

DH Gate has these at a lower price, but you have to buy a larger amount, and shipping may  take weeks - but it is also free.  


Ironing  on them:


I used the silicone baking sheet inside the bags, as I do with most items, but because of the way the burlap and fabric are layered here, I'm not sure how much it helped.  I used it anyway.  :-)

The seams and layers at the bottom made it a little more difficult to get the good pressure on the letters, but they have held up well.

Dollar Tree Baskets:
Find them online on the Dollar Tree Site Here -
 https://www.dollartree.com/easter-bunny-shaped-baskets/302822
  For $1.25 each, these are by far the quickest and easiest and cheapest to make!  Big Lots has similar baskets, but not nearly as cheap.

Ironing Them On - 

You have 4 inches in length to work with on these ears.
I chose the font Moonlight - one of my current faves.  As much as I love beautiful scripty fonts, when making things for young children, I like to keep the letters clear and readable so they easily recognize their own name.


Target Baskets
In 208 these were inside the door, in the "Dollar Spot" aisles.  (Why is this called Dollar Spot?  Almost nothing there is just $1....)  They cost $3, and are sturdy - with a plastic bucket inside the layers of canvas material.  The ears have wire in them.

Five Below has similar buckets, just a bit larger, with a bunny silhouette already on them, for $5 each.  They are 3 for $18 on amazon here - https://amzn.to/30OKGeP

Ironing On Them:
This is the only time I have used my iron more like an iron than a "press" for htv.  Because of the curve of the bucket, I kind of ran the iron around over the design.  It attached quickly and easily - the htv seems to like this material!   I didn't put anything inside of the buckets, just my hand. I kind of held the bucket in the air with one hand, and moved the iron around the design with my other hand.  It sounds difficult, I know, but this was actually much easier than the burlap bags. 

The Designs:


For the Bunny with the sunglasses:
I used the llama face with sunglasses from Caluya design, ungrouped, deleted the ears.
Selected both areas on the glasses, and sliced, so the cut outs are cut out, not layered.
Changed the circle behind the nose to pale blue
I added the whiskers from the printable cuttable creatables face
Font is chuck noon.

Because I have a LOT of black scraps, rather than fuss with how to place everything to use up scraps, I just changed the whiskers & nose, sunglasses, and letters all to different colors and cut each one.  I put black on the mat each time, but because the software thought I was using different colors, it automatically prompted me to put in a new mat for each item.  It was a little more (but not much!) time consuming to do it this way, but I did almost all of these with just my scraps - and I found it quicker to put in a new mat than any other option.


This is the face I used for the girls burlap bags.  It was in my svg files names BunnyFace.svg - but there is no information in the properties for me to know where i downloaded it from.  I downloaded it in November of 2017...  The links above give similar faces, but if anyone knows where I got this particular svg (I'm positive it was free) I'd love to link to it.

The font I used for the girls burlap bags was DK Jambo.


Molly's basket was made with a photo of her.  I used graphics software to convert it to an svg, for Christmas ornaments last year.  For this, I simply had to make the graphic larger.  Font is Moonlight.  Here's a variety of software that will convert a photo to svg - 
https://fieldsofhether.blogspot.com/2019/02/programs-sites-for-converting-to-svg.html