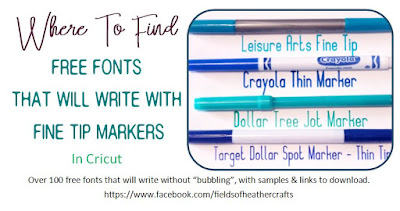
Using The Draw Feature In Cricut


Quick Links
Quick Tips:
  • You can use "fast mode" to write, and sometimes that will give you a smoother writing result.  I've tried it a few times, but usually forget to turn it on when I am making things.  :-)
  • You can weld cursive text, again, for a smoother writing result.  I do that sometimes, other times I do not bother, it doesn't seem to make a huge difference, but it does depend on the project!
  • If the cricut is skipping letters, try clearing your internet cache and restarting your computer.  Almost every time this has happened to me, it was because my computer was low on memory.  (Once I think it was because the cat walked across the paper as the cricut was writing..  it really is a zoo here.) 
Projects I've Made With The Draw Feature:
I started learning about writing with cricut to make labels for my homemade soaps.  I like the draw then cut option so much better for this than Print Then Cut, because of the Print Then Cut size limitations.  It's more time consuming to use the pens to write these, but I love the way they look, and it does not waste as much paper.


And then I became obsessed with finding free fonts that would work for writing for these - that's how all of those posts about "Free Fonts That Write" began.  I started out with 6 free fonts, and was really excited about that!  Now I have samples of over 200 fonts, separated by which pens they work with.

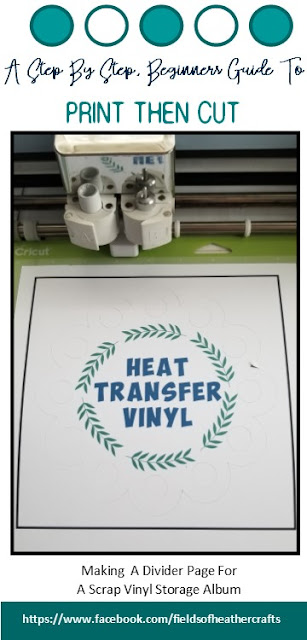
I made a tab/divider for my vinyl scraps album - and when I made it, I wrote it up as a very simple step by step for someone nervous avout trying the writing featuer for the first time.

When I started making earrings last year, I automatically used the write feature to make the display cards as well. Print then cut also works for this, but again, draw is often a more efficient use of the paper, because of the size limitations in print then cut.


This was my largest writing project, and I would never recommend using the draw feature for this.  I thought it would give it a more old fashioned handwriting feel, but honestly, print then cut would have looked very near identical, and would have been SOOOOOOO much faster and easier!  


Simple Candy filled Valentines, with writing done with the cricut


I use the write feature (now called Draw, since the update) a lot on cards!

Find LOTS of free cardmaking svgs here:


I've never actually used any of these fonts for a poster, but my kids are grown and I don't have much need for posters anymore either.  I love these - and I am always watching out for a reason to "need" to do this!

More Writing Tips


Pin This:


An Index Of Cricut Resources & How To's


Quick Tip: You can search any website using the "find" or search feature.  In google chrome, click on the 3 dots at the top right of the page, choose "find" and you can search this post.

Getting Started With Cricut 

Comparing Programs & Sites For Converting Images To SVG

I took two images, one a colorful png and one a photograph of my dog, and ran them through a variety of SVG conversion sites and software - scroll down to see the results from each option.

So which is the best?  It will completely depend on the photo, and what results you are looking for.  My favorite for converting the photo was Adobe Capture.  My favorite for converting the flag svg was PNGTOSVG.  

At the bottom of this post is a list of additional links to try, and more information about the difference between pngs and svgs.

Organizing My Vinyl Scraps

Storing Vinyl, And The Scraps
This post is so old that it's actually an evolution of how I sort my scraps.  From a basket in a drawer, to a 12x12 album & a basket in a drawer, to two separate 12x12 albums, and still a basket on a shelf.  

Quick Links:
When I first started with cricut, I stored  vinyl in drawers in a desk  It's worked well...  for awhile.   My vinyl scraps, which were supposed to go in the basket you can barely see on the left of the drawer, were getting out of hand.

Since then, my craft room, which is also my laundry room, flooded, and I ended up with an entirely new space.  Now my vinyl is in an old dynamite crate, in an  an office armoire. 
Here's a MUCH More in depth look at my current craft space:

I saw this awesome post on pinterest, where she used an artists portfolio for storing scraps.  It was REALLY pretty.  And it costs $60.  SIXTY DOLLARS?  Do you know how much vinyl I can buy with $60?  I know, they go on sale, you can use a coupon..  but $60.  And I'm impatient.

So I decided I could make do with a binder.  It's not ideal, they are 8.5 x 11, a lot of my scraps are 12 inches long...  but I can make it work until I find a good sale on an artists portfolio.  And then...  I opened the cabinet where I have a stack of empty binders (for a cookbook project...  I bought a binding machine instead and have never used the binders) and there, under the binders, was an old, empty, 12x12 scrapbook.  I can't believe I didn't think of this sooner!  I even have empty 12x12 scrapbooks that are 3 ring binder style, somewhere in the attic...  but this was handy, and works perfectly.


The white paper, which came in the scrapbook, is perfect for diving the pages so I can store one color in front, and one color on the back, in each page.  For most scraps, I mixed shades - such as the blues on the left.  But if it's a specific color I know i use a lot, like the teal blue on the right, I gave it it's own page.

I made a divider page, and all of my "regular" vinyl - Orcal 651 - is in the front, and all of my htv is in the back.  I don't really buy 631 vinyl, so for now, I don't need a section for that.

I thought the divider page would be the perfect beginners Print Then Cut Project, so I did a quick tutorial here.  Quick and simple, it will walk you through how to use the Pint then Cut feature on your cricut.

Then I made the tab to make it even easier to see where the book is divided, and I made that a super simple beginners Draw Then Cut project.  Step by Step Tutorial here - a great first project to use your pens in cricut.

How you group your vinyl will depend on what you use most.  I use a LOT of black htv.  Black, White, Navy Blue, and Yellow are my most used colors.  Yellow, because I have grandsons and make a lot of construction equipment designs.  :-)  Here I separated my black into matte & gloss.  This is the only color I separated this way, but it's the color I have the most scraps of, and the color I most often care if it is matte or gloss.

The paperclip you see here is to hold a piece on the back "flat".  I have a few scraps left of cricut vinyl, from when I first got my machine and didn't know about orcal - and once that is rolled, it is hard to get it to lay flat again.  I paper clipped it at the top to flatten it, and storing the book flat should flatten it back out. Hopefully.  

I'm still keeping the basket in my vinyl drawer, for little scraps - and as a place to toss scraps quickly.  Realistically, I am not going to get my scraps all put into this album at the end of every quick project.  But it's a great way to sort them!


Fast Forward a few years, I found those three ring binder scrapbooks in my attic, and I use one for htv and one for vinyl.  


Super Simple Print Then Cut Project - Divider For Scrap Vinyl Storage


Today I wanted to make a divider for my new vinyl scrap storage scrapbook.  Then I wanted to add a divider page, to separate my 651 vinyl from my htv vinyl.
This is a super simple print then cut project, using plain old cardstock, just to go through the steps of how to use the Print Then Cut feature in Cricut Design Space, and to create a divider Page for My new Scrap Vinyl Storage Album.


See more about my scrap vinyl storage album, here:


Quick Links:

First, The Shape - Uploading An SVG - 


It will download as a zip file - you will need to unzip the file, and locate the svg file.  Here's a quick overview:
How to See Thumbnails of SVG files:


Open Design Space, on the far left, at the bottom, choose "Upload"


Now at the top of the screen, you can change the size:

Print then Cut size is limited to 9.25 x 6.75.  So the largest we can cut a circle is 6.75. 


 I'm using an Air 2, so I can only use white paper for print then cut projects.  The Maker can read the registration marks on some other colors of paper, but on any machine prior to the Maker you are limited to white.  (There are some work arounds, but I've never needed to print on anything but white paper or clear acetate - clear acetate works fine in the Air 2 as well. )  You can change the color of our object at the top of the screen, by clicking on the box beside linetype.

Next, Add Text


On the far left, choose the text option, type your text.
Change your font to whatever you would like, I use Obelix Pro here.

Keep in mind that Design Space does not properly read system font kerning.  So if choose a script style font, it will space the letters all weird.  You can read more about that, and how to get around it, here: https://fieldsofhether.blogspot.com/2018/01/using-fontlabpad-with-cricut-design.html

For this project, to keep it simple, I chose a simple font.

Then I decided it needed something, so I uploaded a laurel wreath svg - you can find that for free here: 

Select All & Flatten
Here's the important step - select all, and flatten.

Flatten is for Print Then Cut Projects, so as soon as you select all and flatten, you will see in your layers panel to the right that it is now ONE image, and it changed itself to Print Then Cut.


Send To Printer

Now you can click "make it", and a screen will appear to send your item to the printer.

You can leave the bleed option alone.  Bleed is meant for images that have color around the cur area.  "Bleed" will bleed the color over the cut line, assuring that there is no white edge around your image.  All of our colors here are well inside the cut lines, and our image is flattened, so no bleed will be visible.  If you click make it, and on this screen all of your text is fuzzy - that is because you did not flatten your image.  Every letter that is "fuzzy" - shows bleed - will cut out individually.


Lastly, Cut - 

Place the paper that came out of your punter onto a mat, and insert it into the cricut.  The machine will scan the image, looking for that black box, then it will cut.


That's it!  One super simple print then cut decoration for on my divider page.  I placed it on top of a piece of scrapbook paper, and added a tab to make it easier to find the division in my album.


A Super Simple Draw Then Cut Tutorial - Planner Tabs

A Super Simple Beginners Tutorial
For Using the Draw Feature [Pens] In Cricut
How To Make A Page Divider Tab

Free Fonts For Writing With Cricut - With Super Fine Tip Pens


Free Writing Fonts For Cricut 
The Cricut machine, when writing, will follow the same path it would if it was cutting.  So most text will appear "hollow", or as a "bubble"  You can avoid this by using a writing font in Cricut Design Space (Most cost around $5) OR, by choosing a free font thin enough that the lines "collapse on themselves"  (Those are the fonts listed here).  Although these are not truly free writing fonts, they are free fonts that will write without bubbling.

The Names under each sample are linked to the sites to download the font.  Simply click on the font name under the sample, to download.
Samples are written with a plain old Bic Round Stic Pen. at .5 inches tall
(To write in 1 inch height, try a thicker pen - the samples for the thicker pens are all 1 inch tall)

  1. Baby Lexi
  2. Lyrics Movement
  3. Advertising Script Monoline
  4. kaleidescope
  5. Argentina Script
  6. Montepetrum
  7. Long Night
  8. Belta Light
  9. Encina Script
  10. Lovesick
  11. Gatsby
  12. Always Here
  13. HSF Skinny Towers
  14. Matilde
  15. English Essay
  16. Rose Water
  17. Mikelis Light
  18. Indesign Signature
  19. Lilypen
  20. Flamenco Light
  21. Lamiar
  22. Europe Underground
  23. Mathanifo Script
  24. Memories
  25. Milton One

Samples are at half an inch tall, with the Precise V5 Pen.  If you look at the S in Stymie hairline, and shopping script, you will see they are missing a bit of the s - this is because I was pushing the limits of the margins.  I have found that if my text is right up along the edge of the paper, it does better if I weld the text, but I did not do that here.  It's really best to not put your text right up against the edge of the page - leave a little margin. 

  1. Reading
  2. Brotherhood Script
  3. Monday Line
  4. Beautiful Friends
  5. Poor Weekdays
  6. Prescriptivism
  7. Prince Charming
  8. Shopping Script
  9. Question Of Science
  10. Romantically
  11. Something Blue
  12. Slim Extreme
  13. Single Line
  14. Stymie Hairline
  15. Stylish Charm
  16. Stymie Stylus
  17. Sunny Winter
  18. Thin Fingers
  19. Sweetly Broken
  20. Thinnyness
  21. Tiffany Script
  22. The Artist
  23. The Age
These are in the sample above, but did not work with this pen.  They work with the fine line pens

Autumn Chant
Moon Flower
Print Clearly
Penelope Anne


Commercial Use Fonts That Will Work As Writing Fonts

=================================


Pin This:

Painting & Decorating Dollar Tree Chargers

Seasonal Signs made from painted Dollar Tree Chargers