

A look at where I craft, and how I store and organize my supplies
This photo is the very bare bones - it was right after we finished the space. You can see the one ceiling tile is not even replaced yet. :-)
Our laundry room was originally the porch on our very old farmhouse, the room being enclosed sometime in the 1970s. This space serves as our mudroom, pantry, laundry room, and my craft space. There's also a closet on the other side of the room for my husbands 3D printer, and my grandson has a basket of toys in here too. We pack a lot of use into this space.
The Before - My Old Craft Area. In the 2021 redo, we tore out the cabinets, and the built in counter under the window. That counter/cabinet was originally built to store a card table and chairs, and for us, was wasted space. For a look at my old space - the Before - https://fieldsofhether.blogspot.com/2018/04/my-cricut-craft-space.html

I do have an extra bedroom here, that could be my craft room. It would be a LOT more space.
But its upstairs, out of the way. Here, right off the main living areas of our home, I can work for a few minutes here and there - with projects cutting while I am cooking dinner, folding laundry, etc.
For me, having my craft area more accessible is more important than having a larger area. We have three "dining room" tables in our home. One round one in our living room, one that seats 6 in our kitchen, and one that seats 8 in our living room. So I have accessible, larger, spaces to work, all near my craft desk, if needed. I'll frequently take projects into the living room and work while watching tv, or while my grandson watches tv. But this area is plenty large enough for me most of the time.
==============
The Armoire
=========

This is an old office armoire that I picked up at our local thrift store, for $60. It looks like it probably came out of a hotel room. It's a little old and beat up, but most of my house is, so it fits right in. :-) In some photos you'll see it looks better than in others. Old English makes a "scratch cover" that does a great job. I use it a couple of times a year, and it really does make this look so much nicer.
I know this may seem like a rare find, but I've seen several on facebook marketplace, and in our local thrift stores. Recently I even saw one for free! They may not always be easy to find, but there are a lot of them out there.

The very top of this is used for storage (more photos below) with whatever seasons projects I am currently working on displayed in front. The projects up here are typically "extras", that frequently get sent home with friends and family, or get packed into a zip lock bag to be brought back out the following year.
The top shelf holds my cricut Air 2. This machine was blue when I bought it, it's now a pale green. It used to sit near a window in my craft area, before I redid the space and added this armoire, and the sun bleached the machine. It's also old - I've had that machine for 5 of 6 years now! (my newer maker, which I almost never use, is on a lower shelf)
In the middle is a cup with my scoring pen, and a bunch of black pens. The majority of my pens and markers are stored in a shoe rack hanging on the wall, but the black ones that I use all the time I keep right here beside the machine.
To the right are 3 12x12 plastic storage boxes.
1. "Specialty Papers" - sticker papers, photo paper, printable acetate, shrinky dink film - etc.
2. "Unfinished projects". In zip lock bags, I have a variety of projects that I started and did not finish. Typically these are seasonal, and I am holding on to the belief that maybe next year when that season rolls around, I will complete the project.
3. "Seasonal" . This is 12x12 seasonal cardstock. I don't have enough space to have all of my 12x12 papers down beside my machine, so I rotate out the seasonal paper. Right now, since it's January, I have the Spring and Summer paper down , and the fall and Christmas prints are packed up in this box.

Here's a better look at my paper storage. The bulk of my 12x12 paper is in cardboard holders. My 8.5x11 cardstock is in the bottom file drawer of the armoire.

To sort my cardstock, I use accordion style file folders - the type with enclosed sides. I glued cardstock to the top of each to color coordinate. Cardstock scraps go inside the folders, full pages behind the folder. (I used to store my sticker and iron on paper here, but as I got more and more into paper crafting, those moved up to the 12x12 storage box, so that I have more room in this drawer)

I keep a tray on the pull out drawer under my maker, where I toss all of my scraps
.jpg)
Every few weeks, I pull out my paper trimmer and trim up all of my scraps - both paper and vinyl - then I sort them and put them away.

On top of the Armoire
There are a variety of things on top of this armoire. A thread holder, my grandmothers large hand painted metal tin of buttons , a basket holding some basic sewing supplies... and of course, a variety of recently completed seasonal projects.

In one large basket, I store the completed seasonal paper items, in plastic folders by season. Only the ones that can be folded flat - the larger paper projects are packed away with the rest of our seasonal decorations.

In another large basket are Christmas ornaments - often many of them are "in progress".
The idea is that I will bring the basket down and make some ornaments each month, to alleviate the Christmas rush. The reality is, I dust the basket off in late September and do not finish half the ornaments I have planned that year. :-)
===============
Middle Section

There's a large hole in the back of this cabinet. One of those "pop out" type holes, to make room for a thicker tv or monitor to poke out the back, I think? Anyway, I had a decorative metal sign, thin metal, that I just painted off white and hung over the hole. Since it's a metal sign, it works as a magnet board.
The dinosaur lollipop holders don't live there - they are just waiting to have vinyl names added to them. :-) On the shelf is a jar of "extra" rolled flowers, leftover from a variety of projects. In a jar on the right are extra flower centers. I typically cut more centers than the project calls for, I often add extras - and if you are cutting 3/4 of a sheet of paper, might as well fill the entire paper while I am at it...
On the shelf over my paper are a variety of binders. My planner, my soap making binder, my Christmas binder, a binder with the livestock shot and medical records... I use this area as my office, not just my craft space. On the side hangs a holder for sd cards, and a hook for usb drives - mostly photos and genealogy back ups that I really need to get sorted and added to our external hard drive. I thought I would have so much more free time to organize these things once the kids were grown - but that has not been the case at all.

Here's a view showing both machines. I use both machines, sometimes at the same time, but very strongly prefer my Air 2.

Here's a view of the bottom of the armoire.
The pull out shelf under my Maker holds a tray where I toss all of my scraps. Theoretically, I sort them out once a week. Realistically, they pile up until overflowing before I finally deal with them...
The pull out shelf to the right holds a laptop.
The printer is on a pull out shelf under the laptop, and with it pulled out like this, you can't see the tiny space left under it, where I store copier paper.
On the left is my vinyl - stored in an old dymomite crate, and the two scrapbooks I use to hold sheets of vinyl, and vinyl scraps.
On the right is a pull out file drawer that holds my 8.5x11 papers.
================
Vinyl Storage

This is an old dynamite crate that belonged to my grandfather. It is divided in half - I'm not sure why the dynamite had to be separated, but it makes this perfect for me. Htv is stored in the back section of the crate, "regular" vinyl is in the front. two 12 x 12 albums (old stampin up albums) hold my vinyl scraps.
=============
Mat Rotation

On the inside of the doors, I have 3M hooks.
When you start with cricut, you will be told that blue mats are for paper, green for vinyl, and pink/purple for fabric. That's great for the first few weeks. After a few months, the color of the mat means absolutely nothing. It's how sticky the mat is that matters.
So, for me, on the top right are my stickiest mats. When they have been used a few times and are no longer as sticky, they move to the hook on the top left, and are used for paper projects. When they are no longer sticky at all, they move to the bottom right - those are the "needs cleaned" mats. The hook on the bottom left is for my 12x24 mats, and my silicone mats and parchment paper that I use for htv projects.

The mats hanging on the wall here are washed and drying. The ones on the table had been washed the day before - along with about 6 others. These 4, out of the 10, were no longer sticky, even after being washed. So I used Tack It Again on them. I do this a couple of times a year. It's rare that I throw out a mat.
Here's a more detailed post on cleaning and resticking mats
======================
The Hanging Shoe Rack

These are meant to go over a door, but that won't work in this space. I hung it from 2 screws, on the wall behind my sewing machine, after labeling the pockets with htv.

The "Desk"
My husband called this an "old table top", but I don't think that is what it was. Who knows - he may be right. It was one of those things in a shed here, with neither of us having any real idea where it came from. It may have been here when we moved in. Whatever it is, wherever it came from, it's perfect for this space. I sanded it, stained, it, and my husband attached it to the wall under the window.
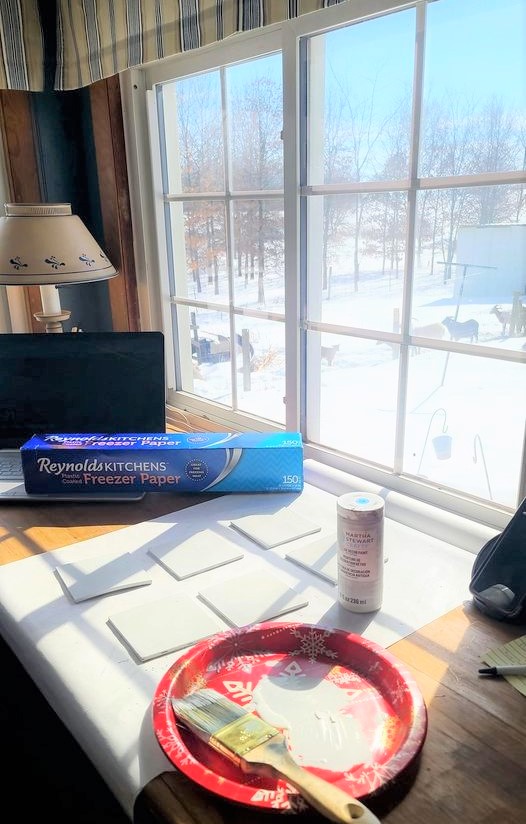
On my desk, I keep a roll of Reynolds freezer paper sits in the window sill. The other end is tacked- with a thumbtack- under the edge of my desk. Its coated thick enough that I can paint on the paper & it does not bleed through. Waxy enough that vinyl doesn't easily stick to it, and glue wipes off with a diaper wipe. When it becomes too messy, I tear off the end & tack the clean end under.
Others have told me they use a teflon sheet on their workspace for the same reason.
A 3 pk of Teflon Sheets is $7 on Amazon
The sheets are 16x20, so not quite as large as my freezer paper.
Reynolds Freezer Paper On Amazon
The Dresser
==============
"On My Desk" Views
I frequently post, on my facebook page, "On My Desk Today" posts. Here are some of the views:
=========

I do get a lot of natural light here, with views of the goat pasture, and usually the sunrise, as well. There's a "baby goat playground" that we built right outside this window, so I can often watch the baby goats playing while I work.

That design literally took me MONTHS to weed. But I would only work on it a few minutes here and there. When it was completed, I ironed it onto a dust cover for my sewing machine. My eventual plan is to add embroidery over and around the htv...


==================
In The Dresser Drawers
What is in these drawers does tend to change from time to time - and I haven't taken the time to add photos of each drawer yet, but I will do that soon!
- Drawer 1. - Ribbon, flower tape and flower wire
- Drawer 2 - Christmas Ornament Making Supplies - glitter, various ornament fillers, and flat blank ornaments. (The round fillable ornaments are in a basket on top of the armoire)
- Drawer 3 - Faux leather and felt
- Drawer 4 - My grandson's craft supplies - googly eyes, pom pom balls, a box of scrap shapes from my projects, glue, paint, safetly scissors, a washable mat he puts on my desk to do his gluing on...
- Drawer 5 - paints
- Drawer 6- contact paper (transfer paper) parchment paper, freezer paper, two gallon zip lock bags...
==================
Awesome
ReplyDeletelove it! thanks.
ReplyDeletelove it! thanks.
ReplyDelete