How To Convert Simple Free Clipart To Cut Instead Of Print In Design Space


I chose a simple image to demonstrate this, I found it at 


Open design space, open your project or open a new project, then on the bottom right, choose upload/  It will upload the image, and give you three options  - Simple, Moderate, Or Complex.


For a simple image like this, Simple is perfect.  All of your white areas will turn light grey - don't panic, that's ok!

On the top right, the wand is usually selected by default.  That's what you want.  Click on the light grey parts.

See how you get a "grid" where you clicked?  That's now transparent and will not be part of your image.  Notice how I left the head unselected?  If I do not select that piece, it will "fill in" and not cut.  Choose preview at the bottom of the screen, and you'll see your new image:


I could use the image like this, but if I want the trunk piece to cut out, I need to select that too.  Don't worry if you make a mistake and click the wrong area, there's an undo arrow in the top right- you an undo and redo!


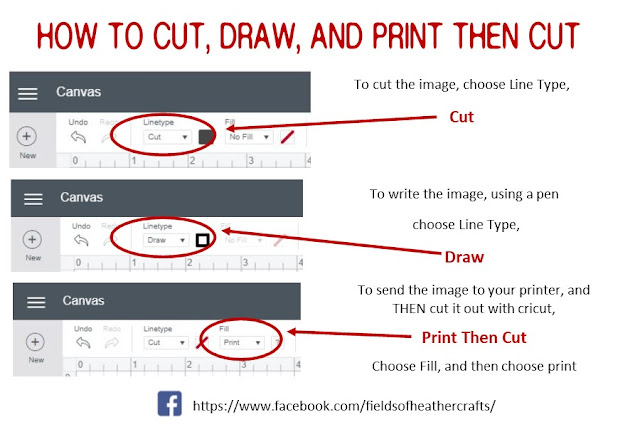
By default, the image on the left, save as print then cut, is usually selected.  Go ahead and click on the one on the right, save as a cut image.
This is not critical.  If you accidentally save it as a print then cut, simply switch it to cut in the layers panel once you have it inserted.


That;s all there is to it!  But what if you are putting this on a red shirt, and you want the white parts on the elephants head to be white, or a lighter grey?  That's easy too.  Follow the steps above, and insert that image.

Then start from the beginning, repeating all the steps, but this time, erase the dark grey parts and leave the head parts - like this:

This time you will be left with a jagged outline after using the erasing wand, to get rid of that, click on the eraser tool that is right beside the wand.  You can adjust the size of your eraser...
If you are having trouble working on the design because it is small, on the top right you can use the magnifying glass to zoom in.

After erasing the outline of the elephant, you are left with this.  Click on preview to see how it will look on the next page.
Now insert both of your new images into your project.

Make sure there is a scissor icon beside each piece.  Then you can click on the colors to change them, making the insert cut out of cream, and the body in grey, here.

That's all there is to it!  Make sure it is set to cut, instead of print then cut, when you go to make it:

If you are looking to convert something a little more complex, I did a comparison of 10 different apps and websites that will convert a photo to an svg - 


===========================

Facebook Page - For Tips, Tricks, & Free SVGS
 https://www.facebook.com/fieldsofheathercrafts/

Facebook Group- For Questions, Support, Sharing Projects, 
and LOADS More Free SVGS in themed posts with links in the comments
https://www.facebook.com/groups/1121399284857845
==================

My Cricut Projects In 2018


Year In Review - My 2018 Cricut Projects
(Most have the how to, or a link to the tutorial or step by step, in the descriptions)


One of my biggest projects this year, and also my favorite.  I asked the kids what their favorite books were while growing up here, and then added my husband and my favorites, and used them to decorate our steps.  This looks so much better in person...  it makes me smile every night as I head upstairs!  


Faux Leather Earrings
I was excited to find that the Air2 does a great job cutting faux leather, and the regular blade that comes in the machine really did the best job for the detailed cuts in the fancier patterns.  I made SO many pairs of these this year  - definitely one of my favorites!


Birth Announcement Elephants
I made a couple of these for friends and family this year - I LOVE them!  They are pretty easy too!

Umbrellas
I've been using htv on umbrellas - and I love it!  They hold up great.  Keep your temp low, and press in very short bursts.

Pillows!  
I made a LOT of pillows this year!
How to sew the super simple envelope covers - 

Patriotic American Flower
Paper flowers are really not my thing. I struggle with most paper crafts...  but this flower I REALLY loved, and it is one of the few paper projects I'm pretty proud of.


Wedding Things
My niece got married this year - I had fun making things for her shower and wedding!


Thrift Store Redo's
Basically, I love to find items at the thrift store, paint them with smokey beige rustoleum spray paint, and add viny;  :-)
https://fieldsofhether.blogspot.com/2018/01/thrift-store-redo-simple-vinyl-transfer.html

Lampshades
Vinyl inside the lampshade - so the design only shows when the light is on.  Use 651, mirror the image.  I LOVE doing this!


So many t-shirts....
Mostly for my grandsons, but in general, I just make a LOT of shirts!
Truck & Tractor Shirts
https://fieldsofhether.blogspot.com/2018/11/truck-tractor-and-construction.html
RED Friday Shirts
With two boys in the Air Force, and one deployed part of the year...  I made more of these than anything else.


Print Then Cut Sticker Coloring Book


Reverse Canvas
A reverse canvas is when you buy a cheap canvas, and take it apart, staining or painting the wood frame inside, and using the vinyl on the inside, rather than on the outside
Step By Step:

A quick Dollar Tree Project
Three foam pumpkins, spray painted and stacked, 651 vinyl

Travel Tissue Cover Keychains
A VERY simple sewing project, enhanced with htv
https://fieldsofhether.blogspot.com/2018/02/travel-tissue-cover-keychains-decorated.html

Key Fobs
The fabric was cut with the Air 2 - you have to bond it first, but that works well for this project.  Still, I think a rotary cutter is SO much faster - cutting fabric on the cricut is not really worthwhile for me.  I was just experimenting with these, to see if I could do it.
https://fieldsofhether.blogspot.com/2018/01/making-key-fobs.html


The Bag Lady In my laundry room


On This Day, Under These Stars Ornament
How to make floating Christmas ornaments with customized star maps
I didn't get too many Christmas ornaments made this year - but I did get to these, and I love them! 

Pot Holders

Red Truck Snow Globe
Valentines


Family Trees
There are two of these, and they are not quite done..  but I do still have a couple of days left in this year to finish them!

A Quick Christmas card holder for our hallway

====================================================

The Projects I made In 2017


Cricut & The Dollar Tree

====================

https://www.facebook.com/fieldsofheathercrafts

==========================

Find More Cricut Project Tutorials Here:

https://fieldsofhether.blogspot.com/2019/04/cricut-step-by-step-project-tutorials.html

==========================