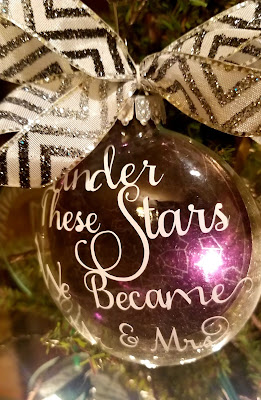
Last year I saw star maps made as signs for weddings. I love them, but I don't have much empty wall space here. As I was making Christmas ornaments this year, I realized I could easily convert this idea into a Christmas ornament - and there's always room for more Christmas ornaments here. :-)
Affiliate Disclosure - As an Amazon affiliate, if you click on my links here and then make a purchase, I may earn a small commission. This in no way effects the price you pay.
==================
- Star map from here: https://www.fourmilab.ch/cgi-bin/Yoursky
- Printable Transparency paper from here: Grafix brand
- 4 inch plastic disk ornaments, from Michaels (although you can use a variety of sizes!)
- Floating Ornament Svgs - FREE svgs here
- This is a print and cut project, you will need a printer
- I use a Cricut Air 2, and I set it to cut on Custom, Foil Acetate for these
- Samantha is the font on the outside. Free Alternatives To Samantha
- Write & Cut for the tag - I used the Matilde Font. More free writing fonts here
Step By Step:
To Get Your Star Map
Start at this link:
https://www.fourmilab.ch/cgi-bin/Yoursky
Use this link to get the longitude and latitude for the address you want.
https://www.latlong.net/convert-address-to-lat-long.html
(In this case, I used the address of the church where we were married)
IMPORTANT NOTE - when I updated the longitude and latitude defaulted back to North and East. I wanted WEST. I changed it, and update again and it stayed - but this has happened every time I have made a map now, so watch those boxes and make sure they are correct.
Then use this link to convert the time of day
https://www.timeanddate.com/worldclock/converter.html
For time of day, I used the closest large city to us (Philadelphia) and converted to UTC - universal time, which is what the star map uses.
There are a variety of options you can play with here, but I found I liked just the constellation outlines, and the color scheme that worked best was the "white on black" option - that removed the grey shown around the map, and made it black as well.
Right click on your finished map and choose save as.
Making The Floating Insert
If you need more details on how to make the clear acetate "floating" ornaments, there is a detailed post here - http://fieldsofhether.blogspot.com/2017/11/making-printable-acetate-christmas.html, with free svgs.
The quick version -
- upload the floating ornament shape svg (FREE svgs here) to design space
- upload the star map to design space.
- Resize, and slice the star map, so it is now the shape of the floating ornament.
- Make sure it is set to print and cut (flattened if need be) and print on transparency paper. I use the Grafix brand. Make sure you have the right paper for your printer - if you have an inkjet printer (that's what most home printers are) make sure you have transparency paper for an inkjet printer.
- Once printed, I let it sit for a few minutes to make sure it is dry. Five minutes seems to be plenty.
- Then place on a mat and put in the cricut to cut. Set your machine to Custom, Foil Acetate - that setting works perfectly for me.
If you are using the free svgs from the link above, the 4 inch ornament inserts are sized perfectly. The 3 inch insert loaded into cricut at 10 inches wide - which obviously is too large. I resized to 3 wide, which was the perfect width, but not as tall as I would like.
UPDATE - the measurements for the insert for the 3.15 ornaments from Michaels should be: 3.249" High x 3.10" Wide.
I rotated my star map so that the ornament shape better fit on it.
After the slice. See how the tab sliced out with the star map, because of the way I had it rotated?
You can always stack the images on top of the ornament shape and choose "flatten" when you only have a circle, and not the extra space for the tab.
But with this map, it was simple to rotate the image so that the tab and circle sliced as one piece.
Once cut, roll, and insert into the ornament. Replace the top. You can trim the wires in the cap if they bother you - but I don't really notice them once the ornament is all put together. Just make sure the wires go behind your transparency.
For The Text
I love to put text on the outside of the floating ornaments. My go to font for this is Samantha. For the 4 inch ornaments, ALL text will be a pain to weed. I've found that cursive fonts (don't forget to weld!) are a little easier to weed than plain fonts, but everything I've used has been.. tedious.
All about the Samantha font & how to use it in design space
A few great FREE alternatives to the Samantha font:
For The Tag
The ornaments are not large enough for great amounts of text, so I added tags with the details.
Add a circle at the top, select the circle and the tag shape, then slice. Remove the extras.
=====================================

Find me On Facebook At Crafting With Fields Of Heather
Where I post LOTS Of Free svgs each day, and more tips and tutorials
https://www.facebook.com/fieldsofheathercrafts/posts/


Oh, my gosh, Heather! Thank you for such detailed instructions with pictures! I can't wait to make these ornaments for my whole family! You're truly a gift to all of us. ~MaryLee
ReplyDelete