

Scroll past the "Step By Step" to get to the LONG list of free svgs for making pot holders.
These are one of my favorite quick and easy things to make! They are great wedding gifts, teacher gifts, housewarming gifts, and Christmas gifts. You can add a spatula or whisk, and a cake or cookie mix in the pocket... and you have an inexpensive hostess gift ready in minutes.

- Pot holders from the dollar tree (at the bottom of this post is a link to a pattern to sew your own )
- HTV , also sometimes called "Iron On" Vinyl. Read more about which brands I prefer, and a price comparison, here.
- Free svgs (long list at the bottom of this post)
- 6x6 pocket, I prefer designs to be 5.5 x5.5 or less to avoid the seams
- I used a regular iron, set between cotton & wool, silicone baking sheet inside, pressed for 15 seconds.

STEP BY STEP:
You can order the pot holders and have them shipped to your local Dollar Tree store, if your local store does not have them in stock. Find them here:
https://www.dollartree.com/home-collection-red-cotton-neoprene-pot-holders/
They come in a variety of colors, search neoprene pot holders to find them.
Further down I have LOTS of links and suggestions for free designs, so I am going to skip right to how to make them for now -
Sizing The Design

The pot holders I buy at the Dollar Tree (silicone backed, with a pocket) have a roughly 6x6 pocket. It's larger than that, something like 6.5 by 6.3 or something like that... 6x6 is easy to remember, and I don't want to go near those edges anyway.
You can order the pot holders and have them shipped to your local Dollar Tree store, if your local store does not have them in stock. Find them here:
https://www.dollartree.com/home-collection-red-cotton-neoprene-pot-holders/
They come in a variety of colors, search neoprene pot holders to find them.
Further down I have LOTS of links and suggestions for free designs, so I am going to skip right to how to make them for now -
Sizing The Design

I keep most of my designs for pot holders at 5.5 x 5.5 or less.
Remember that this is htv - so you want to mirror your image. You can do that once you send the design to cut, but I am likely to forget it I wait. Whenever I am working with htv, I select all and flip horizontally, before I click "make it".
(if you do this, flip your design horizontally, do NOT mirror it on the next screen!)
When you place your htv on the mat, you'll see it has two sides - one side being "shinier" than the other. That shiny side is the transfer paper. Place the htv on the mat shiny side down, and your cricut will cut through the top layer only, cutting the vinyl, but leaving the clear plastic transfer sheet intact. When you weed your design, you'll be left with just your design on a clear plastic sheet.
Once cut, weed your design, and iron it on. You can buy all sorts of things to use as weeding tools. A dental pick from the dollar tree, a set of picks from Harobor Freight... but my favorite is actually the cricut weeding tool.

Ironing the Design On To The Pot Holder


This is my only "trick" I place a silicone baking sheet (it's folded in half here, so that it fits) inside the pocket. Someone messaged me awhile back and we were talking about this - I can't tell you why I started doing this. I would guess that someone suggested using something I did not have, I had these, and I used one.. and it works great. I use them for all of my htv projects. (for shirts, I place one inside the shirt). Anyway, the woman I was taking to via messenger did not have a silicone baking sheet, so I suggested she wrap a piece of cardboard (she had a cereal box) in aluminum foil. It served the same purpose - creating a bit of a flat surface, that reflects heat, and it worked well for her.
The other tip is to not get too close to the seams - make your design smaller so it does not go to the edge. It's hard to get even pressure over a design near the seams. (the same is often a problem when putting designs on onesies)
I place parchment paper on top of the carrier sheet, press for 15 seconds, then remove the carrier sheet, replace the parchment paper, and press again for another 15 seconds.
If when you try to remove the carrier sheet any of the vinyl starts to lift with the carrier sheet, put the clear carrier sheet right back down and press again!
That's it! Quick and easy and cheap! My favorite type of project! :-)

Ironing the Design On To The Pot Holder

I use an old iron I bought at the thrift store for $2. It's heavier than the cheap plastic irons you'd typically find cheap at Wal-mart, but it is really nothing special. Do not use steam.
I work right on my ironing board, because it's always set up here by my craft area (which happens to be in my laundry room) and it's the perfect height for me to press. When I say press, I mean press - but nothing herculean. I'm never "standing on my iron" or even putting much effort into it.
Just hold the iron down firmly in one area, do not "iron" back and forth.
You could certainly use an Easy Press or a heat press if you prefer! But an iron always works great for me.

The other tip is to not get too close to the seams - make your design smaller so it does not go to the edge. It's hard to get even pressure over a design near the seams. (the same is often a problem when putting designs on onesies)
I place parchment paper on top of the carrier sheet, press for 15 seconds, then remove the carrier sheet, replace the parchment paper, and press again for another 15 seconds.
If when you try to remove the carrier sheet any of the vinyl starts to lift with the carrier sheet, put the clear carrier sheet right back down and press again!
That's it! Quick and easy and cheap! My favorite type of project! :-)
Where To Find FREE SVG's for potholders:
A list of kitchen & baking themed svgs - http://fieldsofhether.blogspot.com/2018/10/free-kitchen-baking-themed-svgs.html

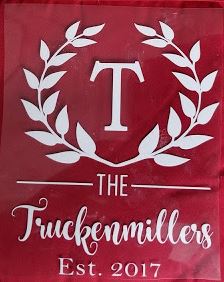
For these potholders, I used the free monogram svg from here -
Just delete the split monogram in the middle of the wreath, and add a letter in the same font. I added all the text under the wreath - to make the thin lines beside the THE, just add a square in design space, click on the lock to unlock it, and resize to a thin long rectangle)

http://fieldsofhether.blogspot.com/2017/11/free-monograms-split-monograms-for.html
 All homemade gifts for a wedding shower - including pot holders

Thanksgiving Themed:


Touchdowns Turkeys Thanks Truckenmillers
I can't remember where I found that turkey svg! Here are some free turkey svgs that you could use instead:

Christmas Themed:

I did a BUNCH of the little red truck design pot holders last year..

I did a BUNCH of the little red truck design pot holders last year..
Find a list of free little red truck svgs here:

https://cutthatdesign.com/2018/10/tis-the-season-for-baking/
 https://caluyadesign.com/free-lets-get-baked-svg-png-eps-dxf/


https://cutthatdesign.com/2018/10/joy-love-peace-believe-christmas-tree/

https://caluyadesign.com/free-eat-drink-and-be-merry-svg/

 https://lovesvg.com/2018/10/eat_drink_and_be_merry_7952/
https://lovesvg.com/2017/12/its-the-moose-wonderful-time-of-the-year-4951/

 https://lovesvg.com/2017/11/milk-cookies-served-nightly-through-christmas-4747/
https://lovesvg.com/2017/11/working-christmas-body-4737/

https://caluyadesign.com/free-eat-drink-and-be-merry-svg/


https://lovesvg.com/2017/12/its-the-moose-wonderful-time-of-the-year-4951/


https://lovesvg.com/2017/11/working-christmas-body-4737/

https://apexembdesigns.com/cuttables/product/believe-christmas-cuttable-design

 https://lovesvg.com/2017/10/warm-wishes-4508/
https://lovesvg.com/2016/12/life-is-short-eat-christmas-cookies/


https://lovesvg.com/2016/12/i-just-want-to-bake-stuff-and-watch-christmas-movies/
https://lovesvg.com/2016/12/christmas-calories-dont-count-2/


https://lovesvg.com/2016/12/oh-deer-3/
https://lovesvg.com/2016/11/eat-drink-and-be-merry/
Basic Holiday Sayings
(use your own fun fonts to make your own designs with these sayings!)
- Bakers Gonna Bake
- "Name"'s Kitchen
- The Holidays Are What You Bake Them
- Tis the Season For Baking
- We Whisk You A Merry Christmas
- Baking Spirits Bright
- Tis The Season To Get Baking
- It's Beginning To Taste A Lot Like Christmas
NOT FREE - Christmas Themed:
But if you want to pay for designs, or are looking for more inspiration...


Sew Your Own Pot Holders:

yours blog is so cute and very simple.
ReplyDelete