

A Knock Out Name Tile
These are so much easier to make now that cricut has added the offset feature in Design Space!
1. Ceramic Floor tiles from Lowes - Heavy. But cheap. Often on clearance for $1 or less each. 651 VInyl.
2. They are 6x24 and weigh 5lbs.
3. Fonts are Chuck Noon , MF I love Glitter, Lemonade Stand
4. Most people are using twine to wrap heavily, and tie to hang them. Some are using Loctite Silicone glue and picture hangers. I put mine on a shelf. Did I mention they are HEAVY? There are metal plate holders that hold these well for display.
6. Flowers from the free template here.
===================

The first thing I did was type our last name, change the font to Chuck Noon, and then in the center of the toolbar, click the lock to unlock it, and change the size to 11.5 x 3. How tall you want your name may depend on how long your last name is - you can play with sizes a bit. A long last name actually works better for these tiles.

Next I created a new text box, typed [Dan|Heather] and changed the font to I Love Glitter.
If you have a short last name, you might want to skip the [ ] around the first names. That will eliminate the "swooshes" at the beginning and end. We have a long last name, and Dan is a short first name, the swooshes added some balance for me.
Welding Without Losing The Centers

For cursive lettering, you will still want to weld before cutting, so that there are no cut lines between your letters.
Shadowing Text - Using Offset
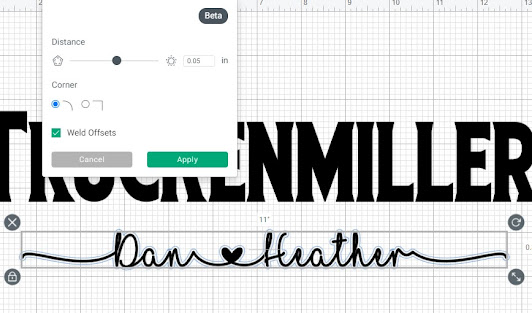
Select your first name text, and choose the offset button at the top of the screen in design space.
The exact size that works best will depend on your names. I set the offset size to .05 for our names here.

Here's a look at a larger offset - it removed too much of the letters and hid too much of our last name.

Once the offset, or shadow, was a size I was happy with, I sliced it from our last name. Keep in mind that you may have to weld the last name text to be able to slice. Slice typically (there have been exceptions in recent updates) only works with TWO items, and each letter counts as one item. Welding text makes it one item, and allows the slice button to appear.

Once I sliced out the offset, there were just a few little dots - see there in the C, and in the E? I used contour (look for the option near the slice and weld buttons, at the bottom right of the screen if you are using a computer) to quickly remove those. See more about using contour in design space here:

Adding Hearts & Flowers -
To make the hearts, I simply added two hearts from the shapes option in design space, and sliced one heart out of the other. I sized the hearts at 2.39 x 2.26. The text inside the hearts is the lemonade stand font.

The flowers I added are from this free template:
I have a list of free flower templates here:
How To Hang The Finished Tile
There are lots of ways to hang these. I happened to have a shelf with a plate rack, the tile fits beautifully into the plate rack.
You can buy plate easels https://amzn.to/3wX2P9N to sit these on, or I have hung them on my wall using two 3m Strips.

The Home Sign here is a painted ceramic tile. The "O" pieces are adhered with velcro so I can change them for each season. It's held the the wall with two velcro 3M strips.
Read more about how to make this tile, and where to find the free seasonal svgs, here:
More Methods:
You an use a silicone glue - Loctite reportedly works very well for this- and attach a photo hanging bracket. Just make sure the tile is room temperature - not cold, when applying the glue. I've read that some have used E600 glue as well.
A lot of people are wrapping twine at each end of the tile - thickly. Wrap 6 or so strands at each end (like where I have the ribbon on this one, but on both ends) and then tie two strands of twine from each end, to hang in the middle.

==================

==========================
No comments:
Post a Comment