A Halloween Banner


A Halloween Banner

On My Desk, 2022 -   I wanted something a little "cuter" for this project, not too scary.

Cricut Kids Craft - Making A Bird With Moving Wings

 
Pull The Birds Feet & His Wings Move
(Assembled by my 3 year old grandson)

On the drive from my grandsons house to the farm, he announced "We need to make a bird craft today Grandma.".  Well, that certainly sounds do-able.  So we tried a couple of options.  The first one I tried, I got the sizes all wrong, and it wasn't nearly as much fun to make as I had envisioned.  The second one, which I almost didn't even attempt to create, was a huge hit.

Christmas In July Week 3 - Count Downs & Advent Calendars

 
Christmas In July - Count Downs & Advent Calendars

This is probably the #1 Christmas item I SHOULD be starting in July.  For the grandkids in England, I need to mail these at the end of October.  For the local kids, I should send them home with them after Thanksgiving dinner.  That way they all have them for December 1st.

Zucchini in Peanut Sauce

Chicken over Zucchini in Peanut Sauce
(I'm currently in love with mid century modern glassware and dishes...)
This is never a pretty dish - that brown sauce is not overly appetizing in appearance.
But this is one of our favorite summer meals.  Even my husband, very much a meat and potatoes man, surprisingly looks forward to zucchini season when I make this.   I've been making this for a few years, slowly tweaking the recipe.  This year I sautéed the zucchini noodles rather than boiling them, and I like that so much better!

How To Merge SVG Files Into ONE File For Upload

 
In Cricuts Design Space, you can only upload one file at a time.  That can be time consuming for some projects - including the Dreaming Tree projects.  There are ways to combine svgs into one file, so that it is only one upload.  Some options work better than others, some are free, some are not.  Here are three that worked for me:

===========
SVG Merge Software  
==============
This is the option Dreaming Tree recommends
I believe that is also because it was created by Leo, from Dreaming Tree.  :-)
It is NOT free.  But you CAN try it out for free, in demo mode.
In July it was on sale for $15.

This is software, and will only work on computers - not on your phone.

It's quick and easy to use - just add your files, then at the bottom choose "Export All"
Name the file, and choose where it is saved.

=============
FREE Website
This is a free website, and I've had good luck with it for most files.  There are a few I have tried that just didn't work.  Quick and easy - and there's an app for this site in google play, so you may be able to use this on mobile devices too.

Choose your files, then click Merge.

===========
Free Inkscape Software
============


This was so tedious and time consuming that I find it faster to just upload the files to Design Space one at a time - but that's typical for me and inkspace.  I do know it's a GREAT free program.  It just doesn't work well with my brain.  :-)  

To Set Inkscape Workspace As 12x12
File/Document Properties
Display Units - Choose Inches
Page Size - Custom / Units changed to Inches / set to 12x12

File/Save Template / Name Template as 12x12 Mat - Set As Default

Then try to use the "drag and drop" method to add your svgs to the mat.

Option Two in Inkscape:
If you use "Open" instead of Import, Inkscape will open all of the files in separate windows.

So you create your master workspace, 12x12.
Open all of the files, all in seperate windows.  Minimize each of the windows, except the master workspace.
Open the minimized windows one at a time, and copy them into the master work space.

Once you have copied them all to your master workspace, "Save As"

I don't see how any of this was any faster than just uploading the files one at a time to DS - but I could be wrong.  :-)

====================
Find An Index Of Cricut How Tos & Free SVGS


What To Download With A CF Free Trial -


Creative Fabrica is offering a FREE TRIAL of their Subscription Program.
You can download 9 items completely free.  After that, the price is $9 a month for unlimited downloads.   

Find the deal here:

But where to start?  What should you download as your 9 free items?  Here are some of my  recommendations:

Christmas In July Week Two - Getting Ready For Christmas Card Making

Christmas In July Week Two
Getting Ready For The Christmas Card Making & Addressing

I keep a basket just for Christmas Cards.  In the back is a printed version of our card list, all of the printed Avery labels to address this years cards, return address labels, card saying inserts, and completed cards. Read more about all of those things, here:

Making "Saying Inserts" For Christmas Cards

 
Christmas Card Inserts
On my desk this afternoon - inserts for some of my Christmas cards.  These get glued into the inside of my cards.

Addressing A Pre-Made Envelope With Cricut

 Addressing A Pre-Made Envelope With Cricut

To address a premade envelope, simply type your address in a text box, choose a "writing font" [one that works with the pens ] and set the line type to draw.  


Choosing Your Font:
When using pens in cricut, the pen follows the path of the blade - giving most text an "outline", or bubbled look.  Most will tell you to use an official Cricut Writing Font - and for those of you who pay the monthly fee to rent images and fonts from Cricut, that's a good idea.   

But for those of us who do not rent our images and text...  there are HUNDREDS of free options you can download and install..  Hairline fonts that will appear single line, and true single line fonts (which actually, often do not work as well as the hairline fonts, in Design Space).

I've already tested hundreds of fonts, in a variety of pen sizes, and included links on where to download the fonts.  You can find all of my samples, sorted by pen size, here:


But for addressing Christmas cards, I recommend sticking to the list of fonts that write well with the super fine tip pens.  Find that list here:
I have 48 fonts tested, and listed there, that I think work extremely well.  Links to download each of the fonts can be found on that site as well.

But for me - my two "go to" favorites are AlwaysHere, and Montepetrum.  

Click Make it.  But do not actually Make it yet!

Place your envelope on your mat.  Look at the grid and decide where you would like the machine to write.  For my envelope, I decided on 2.5  inches in, 2 inches down.


Look at the screen, click on the mat, then click on the address, and drag the address to the spot on the grid where you want it to draw.  See the image above?  I've moved the address down.  

Now click make it.

This time I used a plain old bic pen to write.  I use these a lot!


That's it!  Addressing envelopes with cricut is time consuming.  It is MUCH faster to use a program like word, and a printer, to print labels for on envelopes, or print right on envelopes with your printer.  But it's still nice to know how to do it with cricut too.

This is how I actually address my Christmas Cards - Using Mail Merge and Avery Labels.
Here's a step by step how to:

I gave up on using home made envelopes awhile back - too many of my cards were returned as "undeliverable" by our post office.  Instead, I purchase these.  They are not the most inexpensive, but they are so pretty!  A pack of 50 costs around $14.  They come in a multitude of colors - from dark blue and dark green, to Ivory and White, with either silver, or gold, accents.



Sunflower & Bee Banner

 
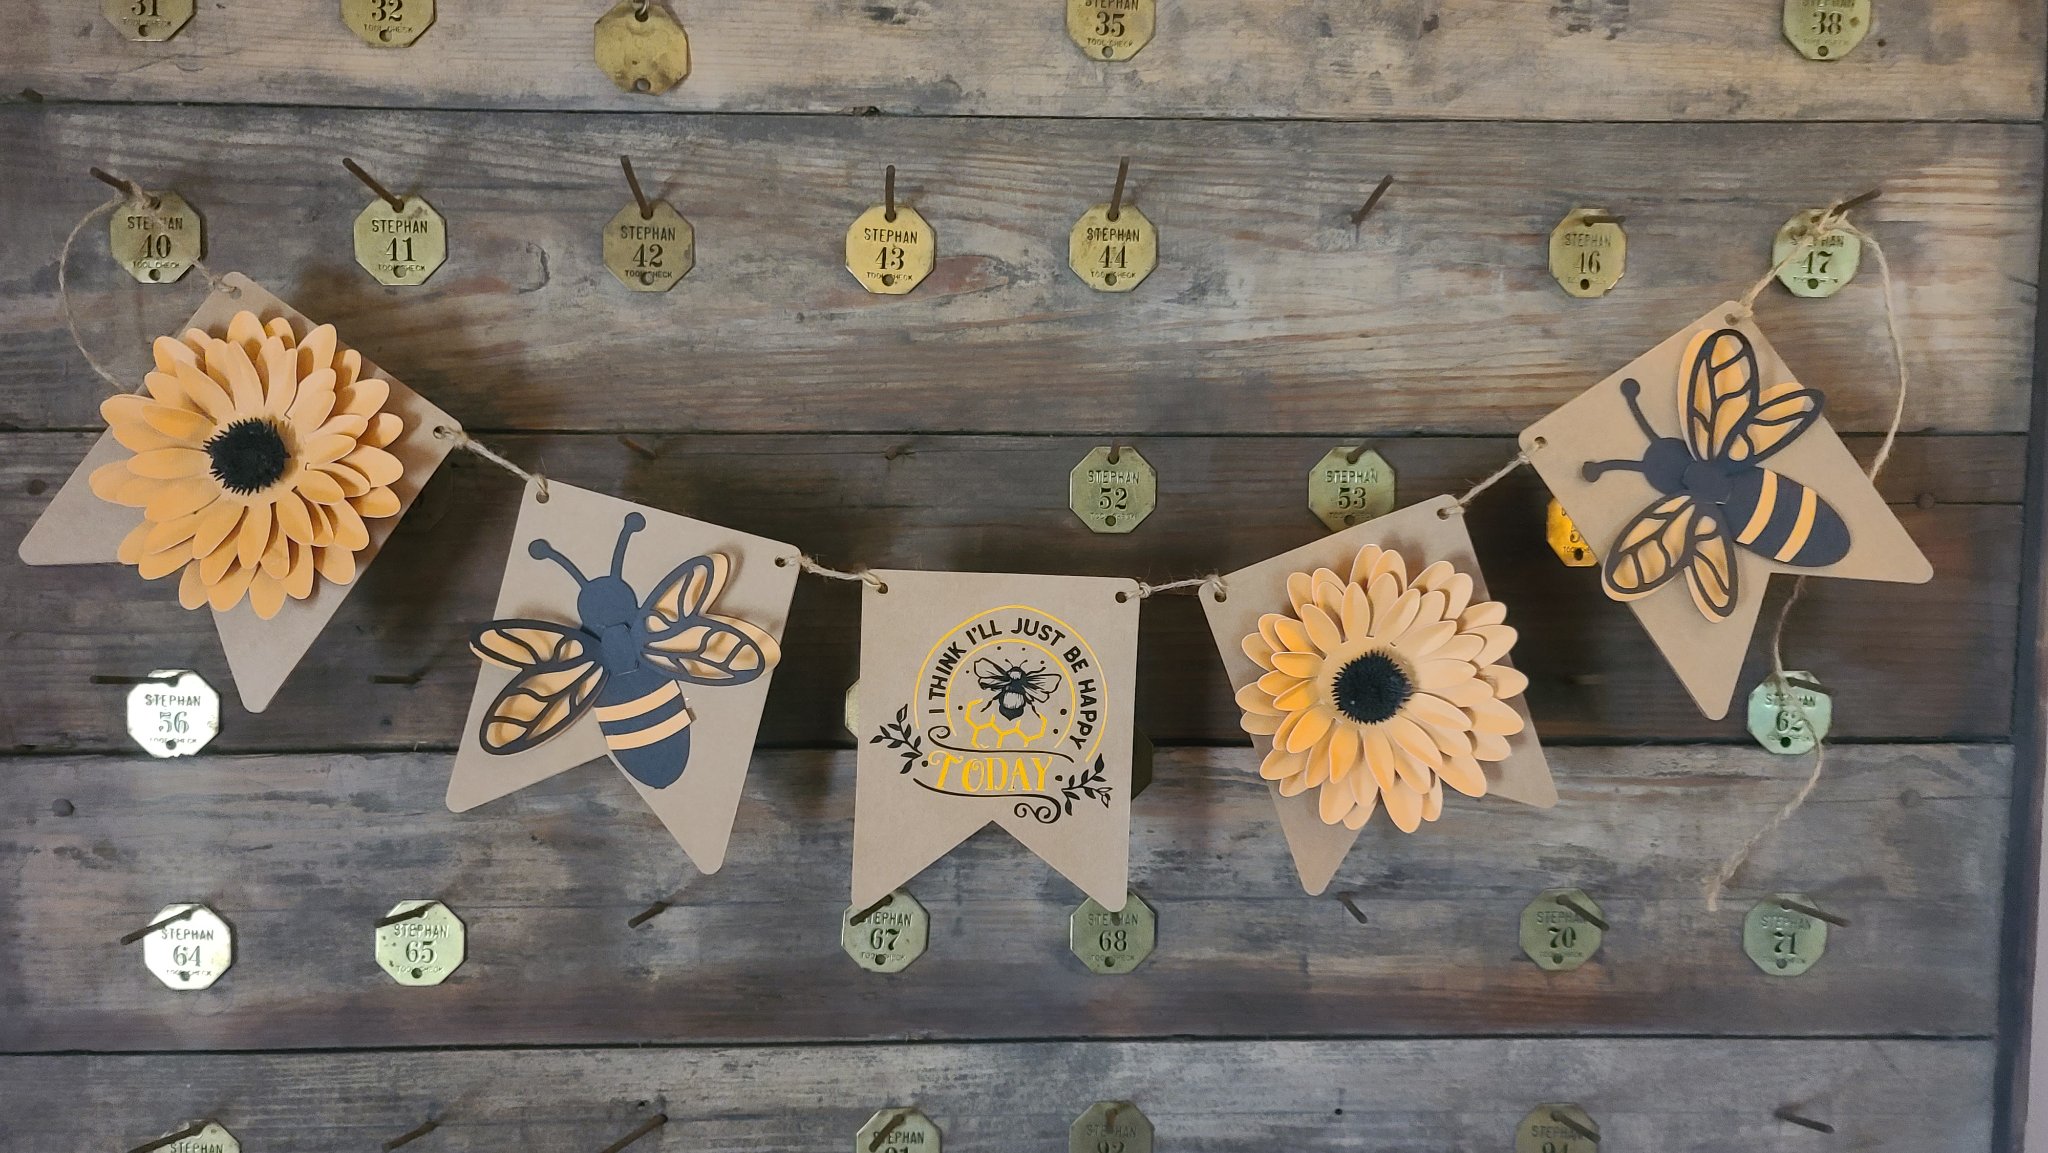
A Sunflower & Bee Banner, made with a variety of svgs
Here's what I used:

These are the same bee and flower svgs I used to make the magnets. 

 Unfortunately, the bundle, from Canada Crafts, is no longer available.  CC is no longer on Creative Fabrica at all, although they do have a store on Design Bundles - this particular bundle is not on there.

However, there's  a FREE, similar svg from:


Daily Dose of DIY has a free bee svg that I like a bit better than the bearly art version:

And there's an entire selection of free sunflower svgs here

The banner I used is my favorite banner base - it's from Special Hearts Studio.

Just use the base - skip the flag and star tops for this.  I cut 10 of the base, then glued them together in sets, so I have 5 pieces two pieces thick.  That's not necessary with heavier cardstock, but I always find my kraft brown cardstock to be a little thinner than a lot of my other 12x12 papers.  

The svg in the center is from a bundle I got in the Dollar Deals ages ago.  It's 40 bee designs, and I've used a lot of them on wine pouches and garden flags.  

A garden flag made from the same svg bundle

============================