Showing posts with label Paper Flowers. Show all posts

Bee & Flower Magnets


On my desk today - sunflower and bee magnets, using the 3d bee and flower svg set from Canada Crafts Studio.

Materials:

  • Pack of Magnets from the Dollar Tree
  • SVG NO LONGEE AVAILABLE (BUT there are free options below)
  • Hot Glue Gun

I downloaded the svg for this years ago, from CF. Canada Crafts Studio files are no longer on CF, and I can't find this bundle anywhere else anymore either. [They still have some files on Design Bundles] I'll include some free options below, in case you don't already own this, or it's not on sale right now.

Anyway - this is the file I started with:

As with most of the Canada Craft svgs I've used, I couldn't find any real instructions.  They aren't really necessary for this, but I can tell you that the center on that flower shown above is definitely more than one piece.  I duplicated it 3 times for the ones I made.


Sizing:
  • Flower center 3 wide by .327 high   [cut 3 per a flower]
  • Flower Petals, group of 4, 10.596 wide by 2.778 high
  • Bee - Grouped as Uploaded 3.503 wide by 2.357 tall. ACTUAL WIDTH, if the wings are centered on the bee, 2.608.
When unzipped, there are 3 svgs to upload.  The Bee, the flower petals, and the flower center.  The flower center I duplicated so that I had 3 of them, per a flower.  The bee uploaded with his wings slightly off to the side - that effected the sizing so I gave you the size for both options - one if you leave the group as is when uploaded, and one for the actual finished bee, in case you want to ungroup and line those wings up before making it.

Resizing and ungrouping is such a pain in DS right now.  Often items will go missing from the layers panel on the right as you work.  If you click select all, they should re-appear.  It's a glitch.  

This svg uploads in 4 colors.  I used color sync to match the yellows and change the flower center to black.  


That's it - these are super quick and simple to make, and cut really well at that small size.  (the design is meant to be much larger than I made it for these magnets)

Flowers are typical small flower construction - fold all the petals in half long ways, then place it in the palm of your hand and "scrunch" them so that the petals stand up a bit from the base.

===========
FREE SVG OPTIONS
=============
Daily Dose Of DIY has a layered bee that should work really well for this

There's  a FREE, similar svg from:

FREE TEMPLATE & SVG FILES:
Sunflower video tutorial:  https://bit.ly/3Kb8O1M
SVG File (Folder "SVG-Sunflower"): https://bit.ly/37sIg9C

Dozens of Free Small & Rolled Paper Flower SVGS,


Remembrance Day Poppy Pins With Cricut

On my desk this morning - Poppy Pins for Memorial Day. I used the svg from Abbi Kirsten, with a few minor modifications. 1. After all the pieces are uploaded, select all, align center. Then resize to 6.5 wide. I may even go to 6 wide next time - but 6.5 worked, and the centers still cut well, I cut on cardstock plus for the centers - just to make sure they cut well. 2. I deleted 3 of the 3 petal pieces - making each flower just 3 layers. The 4th layer is nice for bouquets, but for the pins, I wanted a little less fluff.

I just used regular straight pins, stuck through the base layer and then we wear them like we would any corsage pin.
The svg from Abbi Kirsten (no longer free) https://www.creativefabrica.com/product/small-poppy-flower-templates/ref/89681/

For the history of wearing Poppies for Memorial Day - https://susquehannavalley.blogspot.com/2019/11/in-flanders-field-poppys-grow-wearing.html


Canada Crafts Studio Elephant Canvas

 
This design was in the 90% off sale in February 2022 - Making it $1.30.  

I've made other projects from this designer, and although I love them - they never have instructions, or even sizes - so it can take a little work to figure them out.  I think this is because many of the designs are made to be wall art - so the sizes would vary based on the space.


I wanted this to fit on a canvas that could be hung on a wall.  The canvas I used is 16x20.  I wouldn't want to make this much smaller - the smallest petals on the flowers here were about as small as I'd want to work with, personally.  

SUPPLIES USED:
  • 1 sheet black 12x12 cardstock
  • 1 sheet pink 12x12 cardstock
  • 1 sheet white 8.5x11 cardstock
  • 1 piece black vinyl (I used frisco matte black - it's my favorite)
  • String or ribbon.  I used grey bakers twine
  • The SVG, from Canada Crafts Studio.  Check both sites to see where it is cheapest this week - this one frequently goes on Sale.  Design Bundles   Creative Fabrica
The svg for this project will upload in two parts.  One part will be the elephant, the second part will be everything you need for one flower. (You will need 7 flowers to recreate this.)

ORIGINAL UPLOAD SIZE
Elephant 10.823 x 11.002
Flower pieces 11.686 x 10.829
If you cut it as is, the elephant will, obviously, be 10.823 x 11.002, and the flowers, when assembled, will be about 5 inches in diameter.

This is what my Design Space screen looked like once I had everything resized and duplicated.
To replicate this design in this color scheme, you'll duplicate the flower group 6 times - then change the color of 3 groups to black, 3 groups to pink, and one group to white.  Step By Step Details below:

RESIZED FOR 16x20 CANVAS

Select all of the flower group - petals, leaves, etc - all of it.
Resize to 6.006 x 5.565


There are 7 flowers for this canvas.  Duplicate the flower group 6 times.
Change the petals to Pink on 3 groups
Change the petals to Black on 3 groups
Change the petals to White on one group

All the black pieces cut from one 12x12 piece of cardstock, all of the pink from one 12x12 piece of pink.
For the White, you can easily use 8.5 x 11 cardstock - it didn't use much.

A closer look at how the petals are staggered on the flowers.

If you have never assembled flowers like this before, you may want to cut an extra one for practice.  They are super simple to assemble.
Fold all of the petals in half long ways, to add dimension.
Then apply one large petal to each side of the octagon base.  
Next, apply one medium petal, staggered over top.
Then apply the smallest petals last, again staggering them.  
Place the center of the flower in the palm of your hand, and curl your hand, so the sides of the center fold up.
Glue in the center.

On the white group, be sure to change the flower center to black.


I resized the elephant to 5.562 x 5.654
Then I changed the color of the elephant to grey, even though I cut it out of black vinyl.
Cricut will automatically send everything that is the same color to one mat - if the elephant is the same color as the flower, it will put them all on one mat.
Since I was cutting the flower from paper, and the elephant from vinyl, that wouldn't work for me.  A quick work around is to change the color of the elephant.  It doesn't matter what color you change it to, as long as you put black vinyl on the mat and load it into the machine, it will be black vinyl that cuts.  :-)

Painters tape helped to pick up all of the little pieces off the elephant when weeding it.

I looked at a variety of ways to add the string.  I considered painting fabric covered floral wire black.  I considered using a marker to draw the strings.  I considered waiting until I went to the store and looked for black ribbon.

In the end, I decided on grey bakers string that I had in my craft drawer.  I attached it to the back of each flower before I attached the flower to the canvas, leaving a very long tail.  Then I tied a knot and glued the knot to the elephants trunk.


The original design just uses 4 pieces of ribbon, on the four bottom flowers.

=================
As an affiliate for Design Bundles, Creative Fabrica, and Amazon, I may earn a small commission if you purchase items through the links on this page.  This will in no way effect your cost, but is a nice incentive for me to keep writing tutorials.  :-) 


Making The Canada Crafts Studio Flower Owl

 
Making the Canada Crafts Studio Flower Owl.
The Sizes &  number of each svg I used

It does say right in the description that this svg does not come with instructions...  but it still surprised me.  Because although all the pieces are here, they are not the right sizes, and there is nothing telling you how many of each you need.  I purchased the file when it was on sale for $1 - but it is normally a pretty pricey svg - costing as much as $15 - so no instructions is a bit disappointing.  

So since I had  to figure out how to make this for myself, I'll share the sizes and amounts I used, and hopefully save some of you some work and frustration.

Painting Paper Flowers - A Cricut Project

 
A little paint on paper flower petals, before they are assembled, gives depth and  dimension to plain cardstock flowers

Making 3D Paper Daisies With Cricut

Testing The Free 3D Paper Daisy Flower Files Available From A Variety Of Sites


In the photo above, from left to right: Dreamy Posy svg, Lia Griffith svg, Jennifer Maker svg

Misc:

A few early  construction notes:
- The paper from Hobby Lobby is Hollow Core  - giving my cuts a white edge.  I may like this for some things.  I do not like it for others.
- I should really read instructions.  Eventually I probably will - at least for the flowers that don't look right.  For now, I'm just cutting them and putting them together using basic logic.  Sometimes that works great, other times...  I still don't know why I have a black square of cardstock with the Jennifer Maker file, and apparently I was supposed to change the color from black to yellow on the long strip.  Ooops.

===========
FREE PAPER DAISY SVGS
============

This is one of my favorite sites for paper flowers. There are 19 freebies here - you add them to the card and "check out", no credit card information required.

Free SVG From Lia Griffith
Enter your email address and the download will begin automatically, and immediately


This site is so full of ads that it loads very slowly for me (the joys of rural internet)
The sign up for her free archives is near the top of the post. Once you sign up, you will receive an email with the password.  The password is in tiny print at the bottom of some of her emails, but the majority of the emails will be for her premium svg membership. 
The paper flowers in her freebie vault can be found here:

This is yet another freebie vault. Go to this page:
Go all the way to the bottom on the right to sign up.
Confirm you are not a robot. Wait for the email.
It went right to my spam folder.  Search "Jennifer Carroll" to find it.
Then go here to enter the password and download the files:


Jennifer Maker has a free version that is rolled, instead of stacked.

This is another freebie vault site, with a lot of free resources.  
The flower section of her freebie vault can be found here:
Then hold down the control and the f key on your computer and a search box will pop up - type daisy, and it till take you right to this file.

I downloaded this one from Kin+Tonic, but the link now gives a 404 error
A closer look at the site says they are rebranding as Petal And Finch and says "See Ya Soon"
I can only find an instagram, not a new webpage, for Petal and Finch - I'll check back later.

Rolled Paper Flowers & A Dollar Tree Pumpkin

Rolled Paper Flowers On A Dollar Tree Foam Pumpkin

Supplies Used:


============
Step By Step:
=============
I was using white flowers, so I painted the pumpkin first.  That's probably not necessary if you are using orange flowers, but these pumpkins are awfully bright orange, so a light coat of paint to tone them down a bit and make them closer to your cardstock color is never a bad idea.  Use a cheap paint!  I only used the Martha Stewart Chalk paint because I bought a LOT of it at 80% off, so I use it for pretty much everything right now.

While the paint dries, start cutting flowers.
I used the free svg found here:
(Scroll down, under the pink banner you will see the download button)
I sized the svg at 3.7 - exact numbers shown above

That allows me to fit 5 on a sheet of regular card stock.
I placed them on there, and attached, because Design Space does not always use the space as efficiently as I would like, if I allow it to decide where to place them.

You'll need approximately 60 flowers, so 12 sheets of card stock.   Once you click make it, tell cricut you want to make 12 copies of your project.

I also cut the vine
Free SVG Found here
Sized 4.94 x 2.615

If you have never rolled paper flowers before, it's not hard, but remember to roll from the outside in.  I am not very precise in my rolling, mine are rarely the exact same size, some are rolled tighter than others.  I roll tight, then allow them to loosen just a little before gluing them in place.

Then I stuck them into the pumpkin using a straight pin.  I could have glued them in place, but it's easier to move them around to fill the spaces better if you use the pins.  You could use pretty pins with pearl heads, too.

View of the bottom of my pumpkin
I worked from the top down.
It took me 57 flowers to cover my pumpkin.

I used a wine cork for the stem, it's hot glued to the pumpkin.  You could paint a wine cork too, cover it in fabric, or just a stick in it's place.

When I made this rolled paper flower wreath, I used tacky glue.  It worked - but hot glue works so much better, it's much faster with hot glue, because it dries so much faster.


=======================

Find More Cricut Project Tutorials Here:

https://fieldsofhether.blogspot.com/2019/04/cricut-step-by-step-project-tutorials.html

==========================


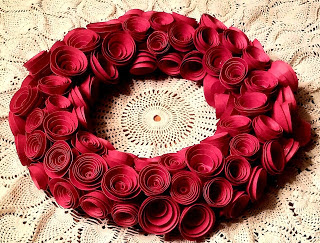
Making A Rolled Paper Flower Wreath

How to make a rolled paper flower wreath
Quick Tips:
  • 10 Inch Foam Wreath Form from The Dollar Tree
  • I used the free rolled flower svg found here.  
  • 17 Sheets of  8.5 x11 paper .
  • Roughly 85 flowers. (It will vary based on how tightly you roll the flowers  - and although it sounds like an insane amount, they come together really quickly!)
  • Quick Dry Tacky Glue (although hot glue would work too!)
  • It took me three days to complete - but I worked on it VERY sporadically while watching tv, or having the flowers cut while I folded laundry.  Really, it didn't take nearly as long as I expected.

I used the free rolled flower svg found here.   I used the one that is shown in blue here. It's named "Simple Flower"   There are SOOOOOO many free svgs for rolled paper flowers.

Find a list here:

These packs of paper are frequently around $3, or less,  on sale at Michaels.
Construction paper does not work well in cricut - it's too fibrous.  But most cardstock works just fine.  Recollections from Michaels and Paper Studio from Hobby Lobby are my go to favorites, because those stores are my closest craft store options.  :-)

3.749 W by 3.71 H
I left the flower template sized exactly as it uploaded - which is 3.749 wide.  I'm confident you could make them just a bit smaller to fit 6 on a page, but the paper from Michaels is so cheap, I didn't mind a little waste to make them the larger size.

Once cut, you roll starting with the outside edge.

Start twisting it on to itself starting at the outside edge. When you get to the inside end, wrap the last little bit underneath the bottom of the flower and put a big dot of glue on it.

Press the rest of the flower down on to it and pinch the flower together, holding both the top and the bottom, until it becomes "stable"  - meaning it holds together and all the layers do not pop up

Because I was unsure how many flowers I would need, I made 25 at a time.  I ended up using about 85 flowers, which sounds like so impossibly many, but it really went fairly quickly!  I rolled them while watching tv.


I used a quick dry tacky glue - because I had it on hand, and I didn't want to plug the hot glue gun in in my living room.  It worked really well.  The glue dried clear.
https://amzn.to/3awykfI

Since I made this a couple of years ago, I have tried Art Glitter Glue, which, along with Bearly Art Glue, are recommended by most paper crafters.  I love how easy it is to apply with the fine tip, but I was soon frustrated by how often the tip clogged up.  For most of my paper crafting these days, I use a cordless hot glue gun, or Elmers Precision Craft Tip glue.  It comes in little tubes, is very inexpensive, can be purchased in almost every store, and almost  never clogs up for me.  I don't know if it would dry quick enough for this project though - hot glue would definitely be my preferred choice if I were to make this again.

I used a 10 inch foam "floral ring" wreath form.
If I had thought of it when at the store, I would have purchased red ribbon to wrap around it.  Since I did not think of it, I instead took some red fabric from my sewing stash and ripped it into strips, which I then wrapped around the wreath form.

I was not extremely consistent in how tightly I rolled my flowers.  Paper crafts are never my strong point, and yet although not perfect, I found this project to be pretty easy.  In other words, if I can do it, I'm pretty sure anyone can.  :-)


==========================

Free svgs & Templates for Rolled & Other Small Paper Flowers
======================