Showing posts with label Cricut Quick Tip Cards. Show all posts

Quick Tip- Make Multiple Copies Of An Item In Design Space

 
There are two ways to make multiple copies of items for a project in Design Space.

One is to use the Duplicate option.  Select your item, choose duplicate.  If you are creating a lot of copies, make sure to select all between duplicating - so you duplicate, then select the two items, duplicate, then select the 4 items, duplicate, select the 8 items, etc.

OR - much faster and easier, hide all but the item you want to make multiple copies of.

Now click make it.

On the top of the screen, look for the "project copies" area.  Change the number to the number you need cut.  Make sure to click Apply once you change the number, and you will see the number of items change on the mat - 

======================


Quick Tip - Use Your Machine Before The Warranty Runs Out


I hear from a lot of people who have purchased a machine, but months later still not have taken it out of the box, because it's too intimidating.

The machine comes with a 1 year warranty from the date of purchase.  If you wait  6 months to start using it, you will already be 6 months into your warranty.  Get it out now, make sure it works, and USE it, while the company is still obligated to fix any problems it may have.  :-)

Here's a SUPER simple vinyl project to get you started:

======================

Quick Tip - Using the Align Features In Design Space


The Align features in Design space will automatically center, align, or equally space your design items.

======================


Quick Tip - How To Use A Character Map

How To Use A Character Map

Open your font in your character map
Find the glyph you want to use.  
Copy it
Paste it.

IMPORTANT - The program you paste into must be set to the exact same font.
So if you are pasting into design space, make sure your text box is set to the exact font you copied from.  

If you copy from Samantha Upright, and the text box in Design Space is set to Samantha Craft, the glyph will not appear.

For fonts with glyphs, I always recommend using fontlab pad, then saving as an svg and uploading to Design Space.  FLP is free, and it will properly space your fonts.

That's the quick version. For a step by step with screenshots, go here:
(That also tells you about fonts with "easy glyphs" that do not require a character map)

In Maintype Logic (My favorite free character map) you can paste all of the glyphs into the sample panel and then copy and paste all of the text at once, once you have a design you like.

======================

Quick Tip - What To Try When Cricut Can't Read The Registration Marks

What To Try When Cricut Can't Read The Registration Marks On Your Print Then Cut Project

Additional things to try:
Sometimes matte scotch tape over the black registration marks helps.
Make sure your mat is about 1/8 of an inch inside the lines on your mat.
Trying taking a black marker over the registration marks

For more Tips For Solving Simple Print Then Cut Problems:

=======================


Quick Tip - How To Remove The Grid In Cricut Design Space


There is no way to save a design from Design Space to share outside of Design Space.
You can not download your designs, and you cannot share your designs if you have uploaded any images to them.

If you are making a design for someone else, and want to send it to them so they can see it, the easiest way is to take a screenshot of the design.  And before you do that, you may want to remove the grid, so the design is not cluttered up with those extra lines.

You can remove the grid by clicking in the top left corner of the canvas.  Click twice.  To bring it back, simply click there again.

======================

Quick Tip - Why Is My Text "Bubbling" (Or Writing As An Outline)


Quick Tip - Most fonts, when switched to "draw" in design space, will write as an outline, or bubble - because the pen will follow the same path as the blade would to cut the text. 

To draw "single line" text, without the words outlining, you need either a font made specifically for drawing ($) OR you need a font that will "collapse on itself" and appear to be single line.

There are a lot of free fonts that will work as writing fonts, without bubbling, in cricut design space - I have hundreds of them sorted by pen size, with samples, here:
https://fieldsofhether.blogspot.com/2017/11/6-single-line-fonts-that-will-write.html


======================


Quick Tip - Copy & Paste All Chosen Glyphs At Once


Did you know that you can use the sample panel in maintype logic to put glyph options together, then once you have a combination you like, you can select everything in the sample panel and paste it all at once into fontlab pad (or right into design space) ?

How To Find & Use Font Glyphs

For more on how to sort and manage fonts in Maintype Logic - https://fieldsofhether.blogspot.com/2019/05/how-to-manage-organize-all-of-those.html

===============


Quick Tip - Use Wordmark.it To See Text In Every Font Installed On Your Device

Use the website 

To See  Text In Every Font Installed On Your Device
Helpful for choosing fonts, if you are using fonts you have installed!

Personally, I use a much more complex system, because I have 6 gazillion fonts, and I do not install most of them. Fontlab Pad will use fonts right from their zip files, no need to install.  I use the free version of Maintype Logic (it is also a character map) to organize my fonts.  But it's a lot of work to set up the organizational system!  

Wordmark.it is a great place to start.

======================

Quick Tip - Enable Printer Dialog Box To Set "Best Quality"

Set Your Printer To "Best Quality"

When you click "Make It" on your print then cut project, the project will first be sent to you printer.  On the box that pops up for you to choose your printer, System Dialog is often disabled by default.  

Enable it, and then you can change your printer settings.

You will almost always want to choose "Best Quality" in the print options.

For more Tips For Solving Simple Print Then Cut Problems:


If you have an HP Printer, check out instant Ink.
It's SO much cheaper.  You pay by the page, not the ink cartridge.
So you can always print in best quality, for the same price as draft.
See the details here:

==================


Quick Tip - Recover Your Password Without Having To Reset It

How To Find Your Saved Passwords

If you use google to remember your logins to websites you do not need to reset your password each time you forget it.

This works for all sites, not just Design Space, but it's most handy in Design Space, where google cannot automatically fill in the password for you when you open the app.

Go to :

Find the website on the list, click on the eye to the right.

Tip - CNTRL F will bring up a box allowing you to search, to find the site faster than browsing through the list.

Security settings will vary—for me, google sends a code to my phone, and once I enter it  on my laptop, I can view, or copy,  my passwords.


======================

Quick Tip - Why Does My Image Have A Black Box Around It?

Why Does My Project Have a Black Box Around it when I click Make it? Because it is a print then cut image. If you do not want to Print then Cut, change it to a cut image. If you want to Print, Then Cut, you want the black box [currently it's 4 brackets, previously a box surrounded the entire image] to be there.

The black box is the "registration marks".  Cricut will scan the image, then line up the design to cut based on where those black lines are.

Sometimes if your machine is not reading the registration marks, and closing the lid didn't help, nor did changing the lighting, you can go over the black box with a black marker, to make it darker, and that may help the machine to cut.

For more Tips For Solving Simple Print Then Cut Problems:

If you did not want to print the image, but only cut it, you can switch the operation to Cut/Basic


HOWEVER, that could just give you an outline shape to cut, if you uploaded an image that is not an svg file.  When uploading the svg, look for the image that looks like a website, or html file:

Read More Here:


If you have an HP Printer, check out instant Ink.
It's SO much cheaper.  You pay by the page, not the ink cartridge.
So you can always print in best quality, for the same price as draft.
See the details here:

Quick Tip - How To Move Items To Another Mat After Clicking "Make It"

Cricut does a terrible job of conserving paper.
   Often it will put pieces on two mats, when they easily fit on one.  

Sometimes it's worth it to arrange things in DS and attach them, so that they go to the mat just the way you placed them. But often that's not practical.  

You can move designs from one mat to another, after clicking make it, by clicking on the image, then clicking on the 3 dots and choosing "Move To Another Mat"

===================


Quick Tip- Layer On The Transfer Paper


For some designs, it's easier to layer the design on the transfer paper, then transfer it all at once.

More Tips:
================


Quick Tip - Flatten Text To A Shape For Print Then Cut


If your print then cut project is cutting out every letter individually, your text is not flattened to a shape.

You cannot just flatten text in Design Space.   It must be flattened to a shape.

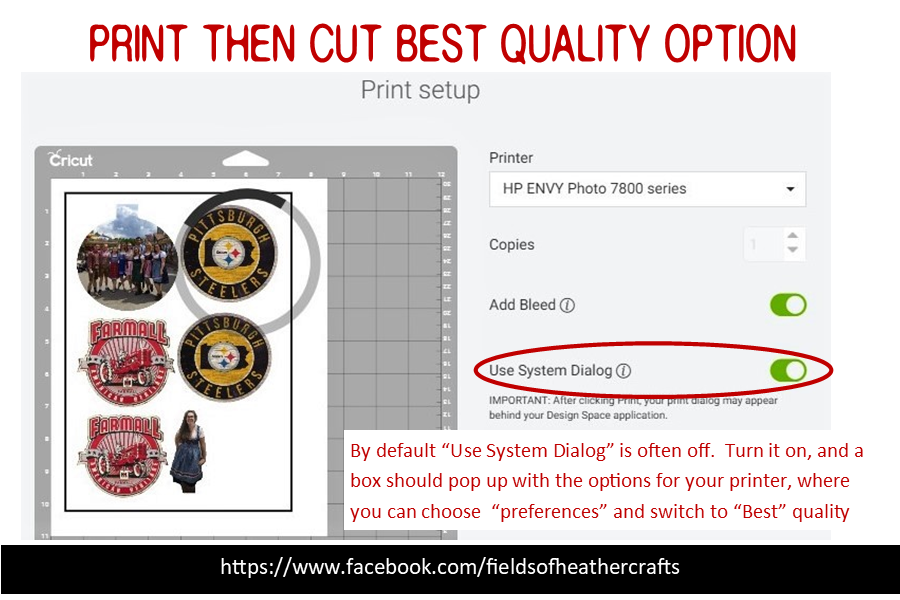
If you click "make it" and your text suddenly looks very blurry, that is most likely because "Bleed" is on, and cricut plans to cut every letter individually.  (Bleed is only applied to cuts, so anywhere you see that fuzzy bleed, the machine plans to cut)

Unless you want cricut to cut out very letter of your print then cut project individually, you must flatten to a shape.   Check your layers panel, every item in that list is going to cut.  If you want just one shape cut, with the letters printed on that shape, there should only be ONE item in your layers panel.  If not, choose select all and flatten.

For a quick shape behind your text, you can use the offset option, then flatten your text to the offset shape.


About Bleed
Many cricut users  have very strong opinions one way or the other on "bleed".  It's purpose is to make sure there is no white outside of your cut.  It gives the machine a little extra margin when making the cut, just to make sure it doesn't cut too close and end up with white on the outside of your design.  I've used bleed, and I've shut it off - with no noticeable difference.  How much difference you see may vary by machine and how well your machine has calibrated itself.  I think it's always safest to leave bleed on.

For more Tips For Solving Simple Print Then Cut Problems:


If you have an HP Printer, check out instant Ink.
It's SO much cheaper.  You pay by the page, not the ink cartridge.
So you can always print in best quality, for the same price as draft.
See the details here:
====================


Quick Tip - What To Do If Your Text "Fills In" When Welded

Quick Tip Card - What to do if our text "fills in" when you weld

You CAN attempt to manually space your fonts, or change the spacing between letters - but why choose a beautiful font and then ruin it by not spacing it properly? 

Instead, make the font ridiculously large.  200 wide, 400 wide - whatever it takes.  Weld it, then size it back to "normal".  

 For more tips on using text in design space - How to curve, weld, add swirls and tails, use writing fonts and more - 


Quick Tip - How To Use The Draw (pens) Feature In Cricut

Set your text, to "Draw"
Set your shape to "Cut"
Then select both and attach, so that the machine knows to write your text exactly where you placed it on the design screen.

NOTE - the Menu at the top will now read "Operations" instead of Line Type.  Design Space frequently changes this menu - but you will still be looking for "Draw", and "Cut".

When writing with cricut, if you are using a system font, the pen will follow the path of the blade, causing an outline, or “bubble text”. There are more than 100 FREE fonts that will “collapse on themselves” and appear single line. Find a list, with examples by pen size, at:

Find an index of Tips, Tricks, and Project Ideas using the pens in cricut here:


For a list of markers that fit right in the machine, no adapter needed:

================
Find an index of all of my quick tip cards here:


Quick Tip - Switch From Cut, To Draw, Or To Print Then Cut

How to change from cut, to draw, to print then cut - a quick look at the Operation Menu in Cricut Design Space 

Quick Tip - Open More Than One Window In Design Space

You can have more than one window open at a time, so you can work on one design while another is cutting, in the new Design Space.

Quick Tip - Reverse Weeding


For small text, reverse weeding sometimes works much better! 
Instead of weeding the design first, you apply the transfer tape to the entire piece, then pull back the design slowly.  Then you weed the extras off of the transfer tape.

If you are brand new to using a cricut machine, here's a very simple first project, step by step, with Dollar Tree supplies, to get you started - https://fieldsofhether.blogspot.com/2019/11/cricut-for-newbies-lesson-2-vinyl-on.html