

Quick Tips:
- Select All, Flatten.
- Be SURE you are flattening to a shape - you can't flatten text to empty space.
- There needs to be a black box [black corners at least] around your project. That's how cricut knows where to cut.
- If it is not cutting exactly around your shape (the cut is offset) - Calibrate your machine
- If your machine cannot read the registration marks, make sure your project is on the mat in the same direction as shown on the screen - and make sure it is slightly inside the grid lines. Trying moving it 1/4 of an inch in and 1/4 inch down, from the outside grid line on the mat.
The most common issue with print then cut is that your text is not flattened to a shape. It cannot just be flattened, it needs to be flattened TO something. I cover that in detail below, along with that black registration box, cricut not detecting the project to cut it, and what to do if the machine is cutting in the wrong spots.
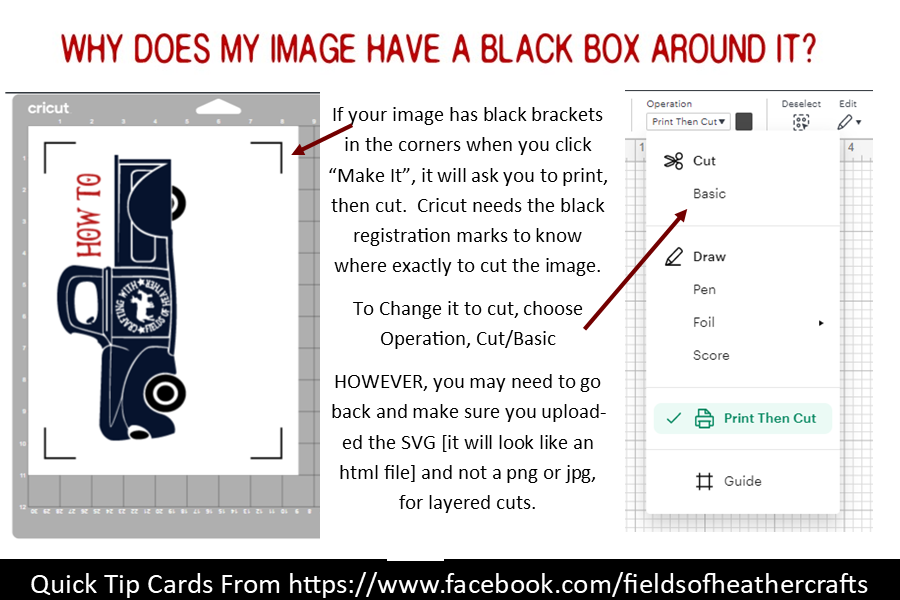
Cricut needs the black box [these days it's 4 brackets in the corners, previously it was a full box around the image] to know exactly where to cut. When you place the printed paper onto a mat and load it into the machine, cricut will "scan" the mat, and locate exactly where the black box is. That tells the machine exactly where to cut your image.

Print Then Cut Quick Tip Card
I explain this in more detail below, but here's the quick version. You have to flatten to a shape. You cannot just flatten, it has to be flattened to a solid shape that it will cut.
How To Tell Cricut To Print Then Cut
For Cut, and Draw, you choose from the drop down box under Operation
For Print Then Cut, you go to the next box, over and choose "print" from the fill options.

How To Keep Cricut From Cutting Out Each Letter Of Text
Flatten To A Shape

If your Layer Panel Looks Like This, It WILL cut every letter.
See in the layers panel, there are two items here - Text, and a shape.
This is telling cricut to print the text and print the yellow star, then to cut around the star and around the text. Because this is not attached, it will not even cut the text on the star.
If I select all and attach, it will now cut the text out of the middle of the star, as it appears on the left.
To fix this, select all, and flatten.

Flatten can be found in the bottom right of the screen in design space. You need to have at least two items selected to flatten.

A Correct Example For Print Then Cut
Look to the right in the layers panel - see how it is just one item? This is what you want to see. This is telling cricut to print a yellow star with writing in it, and then to cut around the star.

Make sure your shape has a "back"
In this example, the layers panel is one image, but this will still cut every letter - because text is "floating" on a transparent background. If you can see the grid behind your text, the machine is going to cut each letter individually.
To solve this, create a rectangle shape, slice your frame out of the rectangle. Delete all but your frame and the new "center" piece you have created. Make your background shape white, your fame whatever color you would like, Select all and flatten, and now you should have one shape - a colored frame around a white background with your text.
Bleed Or No Bleed?
Leave It On

See how fuzzy & thick the letters are?
This tells me right away that my text is not flattened to a shape, and it will cut out each letter.
If your letters are all "fuzzy" or extra wide when you print, that is an indication that the bleed is on - but it also tells you right away that cricut is going to cut every letter. You will only see the "bleed" where Cricut is going to cut. Bleed can be important on some designs, usually it's best to leave it on. It "bleeds" the image over the cut line, so that when cricut cuts, there is no white left around the image.

With the bleed on, there is no white edge showing around my cut out shape.
If The Machine Won't Read The Registration Marks
Use White Paper, Close The Lid, and/or Change the lighting.

I've sometimes has to turn more lights on, and sometimes had to turn lights off. A glare, or too little light, can keep the machine from reading the registration marks (that black box around your design) that tells the machine where to cut.
More Tips, From Cricuts Help Section:
- Verify your Cricut machine mat has been placed under the mat guides, and ensure the mat is positioned snugly against the machine's rollers before pressing the Load button on the machine.
- Is the mat bent? A bend or crease in the mat can cause a failure to read the cut sensor marks. Press down on the bend if possible as your machine scans cut sensor marks, or remove sheet, rotate mat 180-degrees, reapply sheet to the opposite end of the mat and reattempt the cut.
- For best results, use a machine mat with few or no marks or smudges. A mat with smudges near the cut sensor marks may cause your Cricut machine to mistake the smudges for cut sensor marks.
- Verify that the Print Then Cut sensor light is clean. To clean the cut sensor light on your Cricut Explore or Cricut Maker machine, sweep gently with a small, clean, dry watercolor paintbrush.
- Verify that the Print Then Cut sensor light comes on when scanning for Print Then Cut sensor markings. It is located on the underside of the carriage. If that light does not come on when scanning the Print Then Cut sensor marks, contact Member Care for assistance.
- Print your image again, making sure the paper size is set to Letter and that you have unselected any page scaling options such as Fit to Page or Shrink to Fit. The page needs to print at actual size.

Close the lid on your machine.
Make sure your project is loaded on the mat in the same direction as it is shown on the screen. If it is upside down, the machine will not find the registration marks.
The Air Machines can only do print then cut on white paper, although there is a hack to help work around that. The maker can print then cut on colored paper. It involves printing your design twice, once on colored paper and once on white - there's a good tutorial here, from Too Much Love:

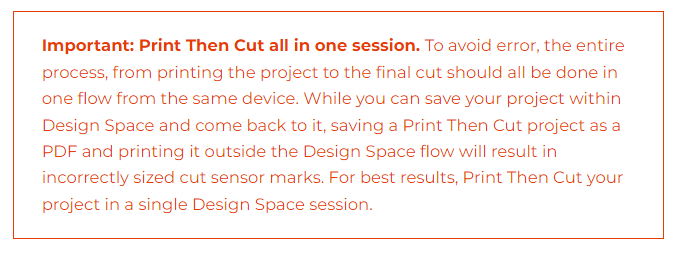
Although I know it's possible, or at least was possible, to print your item elsewhere, and then cut it out when you got home to your machine, Cricut now says you can NOT do that, and that print then cut must be done "all in one session". In other words, do not print unless you are ready to immediately cut, from the same device, without closing the program.
CAN you still print elsewhere? Maybe, sometimes.
If The Machine Is Not cutting In The Right Spots
Calibrate
If your machine is cutting "offset" of the design, you may need to calibrate your machine.
For more information on how to calibrate your machine:

Quick tip - how to switch from cut, to draw, to print then cut
=======================================
Facebook Page - For Tips, Tricks, & Free SVGS
Facebook Group- For Questions, Support, Sharing Projects,
and LOADS More Free SVGS in themed posts with links in the comments
==================
An Index Of All Of My Cricut Related Blog Posts
can you put design space on 2 different computers
ReplyDeleteyes! My daughter often designs things on her computer at college, then when she comes home to visit, cuts them out on my cricut here at home. :-) It's a web based program - think of it as logging into gmail, you can do it from any computer.
DeleteGreat advise! Thank you so much.
ReplyDeleteHi! I tried your tips. I turned off the bleed but when I set it at my machine, it still started to cut out the letters.
ReplyDeleteTurning off bleed will not change what cuts - you need to flatten the letters to a shape. If the letters are not flattened to a shape, each one will cut out.
DeleteHi I turned my font into a sticker using pic art and then saved then into cricut grouped and flatten them they cut out nicely but only I can print half a page the senior makes only read half a page
DeleteI have been trying to print and cut but once I get the print onto the mat I load the mat and it scans but once done scanning the machine ejects/unloads mat without cutting
ReplyDeleteIf there is no error message telling you it cannot be detected, I think it may be a machine error? I'm not certain, but unfortunately, I think you may have to contact Cricut for that one. Wait times are especially long right now, but phone is the best chance of getting an answer.
DeleteThe same thing is happening to me, did you figure it out?
DeleteI'm having the same issue as this, did you figure out the issue???
DeleteI'm also having the same issue did anyone get a hold of Cricut and get an answer? I've tried all tips. Same project cut last week and now I can't get to cut again... scans and just says scanning after it ejects the mat. Never get an error that I've seen... although I'm not very patient, I cancel the cut after a minute or so...
DeleteThank you! No error msg comes up at all I have done print and cut before so not sure why this is happening have emailed cricut
ReplyDeleteI am getting the same thing & have tried ALL the hacks nothing works. This didn't happen last year. I called Cricut and since my machine was in warranty then I received a new machine. Hooked it up and tried to cut my print to cut transparencies and have the same problem. Evidently the machines are not able to print then cut the beautiful floating ornaments that I made last year. I am still trying to find a work around. Very frustrating. FYI my old Cricut Maker still did a great just printing on printer paper and cutting. Not sure what is going on.
DeleteHello, I heard on a video from Kayla's Cricut Creations on YouTube that you may be able to scotch tape the black border and it will help the light read the entire box better.
DeleteI callibrate my Cricut, and it looks perfect. Then I print and cut and it's off! Partially... the upper half is off, but the bottom half is bang on. I'm loading the mat in the same orientation as is recommended and paper to the mat also in the same orientation. Frustrating to have it so close, and yet so far. Can you think of any reason this might be happening??
ReplyDeleteSomething in one of the recent updates has messed with the calibration for a lot of people. Not everyone - it's very odd. I know some have said cricut told them to run the calibration repeatedly until it is right. I can't even imagine the frustration that would cause !
DeleteI am having the same issue! So frustrated
ReplyDeleteMy machine is only cutting 12 of my 14 shapes... it's double cutting two of them. I print then cut, 14 copies of one shape. Printed copy looks just like the cricut mockup on screen. Scanning seems to be fine but then during the cut, it double up on 2 of the shapes (bottom Left corner of the box) and doesn't cut the 2 shapes in the bottom right of the box...!? Help?
ReplyDeleteHi, I am using a HP printer to print a picture from my cricut maker. The picture I purchase online keep coming out with lines on it. What is causing that? I contacted the seller and was told it could be my printer. I changed all ink and tried a different picture, but I am still having the issue. Please help!!
ReplyDeleteI was having the same issue and I just needed to change the settings on my printer to print in best quality and since I was printing on waterslides I also changed the paper settings to photo paper. And to change those settings you need to click "use system dialogue" under the add bleed, then change the settings in preferences.
DeleteHello, I have been having trouble with the registration box not fully printing. It will print two sides, the bottom and right side so it looks like a backwards L. My Cricut cannot find the registration marks so it will not cut out. I have tried turning the bleed on and off and making my image smaller but nothing has worked. My images are definitely smaller than the dimensions allowed for print then cut. Am I missing something? I have emailed Cricut a while ago but no response and I need to get these done for Christmas.
ReplyDeleteHi, Anne. Did you get this figured out? I'm having the exact same problem.
DeleteI'm having the same issue. I keep making my design smaller and smaller, and it's half the size of the maximum settings for print then cut. But it still only prints the right side and bottom of the black box. So frustrating!
DeleteDid you ever figure this out? I'm having this issue right now :( It was fine all afternoon and now all of a sudden it only prints 2 sides of the box.
DeleteHi - I am having the same issue - has anyone figured out how to correct this?
DeleteHi did any one figure this out I am currently having this issue?
DeleteMy machine has been calibrated numerous times and still cuts offset since October. Very frustrating. I ended up giving up.
ReplyDeleteThis also happens to me… so frustrated.
DeleteHello, I have a problem with print and cut, everything is ok in colour till print preview screen then it turns to black and white,all items are print and cut I'm using a Epson Workforce printer.
ReplyDeleteI'm not familiar with the settings on you specific printer, but that is almost certainly a printer setting - your printer is set to print in black in white. If you enable the print dialog screen, you should be able to switch it.... https://fieldsofhether.blogspot.com/2020/08/quick-tip-enable-printer-dialog-box-to.html
DeleteHi! I was having trouble with the "print" part of print then cut. Your blog advised my paper may be too thick. It's worked before but in any case, I figured out a hack if the registration marks are printing too close to the top of the page. I cut about an inch off the top of plain white paper, put it at the top of my mat and tape my sticker paper to it, creating a margin so to speak. Worked like a charm!!! Hope this helps anyone else having the same problem.
ReplyDeleteCan anyone tell me why when I do my design and all the color is there but when I hit print and it prints only in black and white. I have yellow flowers I am trying to print around black lettering, but the yellow comes out only in like a gray or white? What am I doing wrong? Trying to print to waterslide.
ReplyDeleteme tooo!! I don't get itt!
DeleteYou may need to tell the printer to print in color. Make sure to turn the dialogue box on so you can set the printer settings before printing.
DeleteThe dialog box won't load for me.
DeleteItloads behind the cricut window. When you select system dialog toggle and then hit print in cricut, move your cricut window down so you can see the print dialog.
DeleteMy print and cut would only cut right on the top part then starts slowly cutting more and more off the lines. My calibration is perfect on the sheet but it’s off on my projects. Any ideas on how to fix it or why it’s happening???
ReplyDeleteUgh!!! I just bought my machine from Cricut 2 weeks ago and I am having the same issue...it is so frustrating. I have been emailing back and forth with the Cricut Support Dept., but everything they tell me to do does not fix the issues with the cutting being off.
DeleteDid anyone ever find a solution for this? My machine does the exact same thing
DeleteI create my own SVGs been doing it for a while, I insert the image it shows up as a print and cut when I click on make it that screen is blank with the black box, I have uninstalled CDS, many time and can not get the image to show on the cut mat.
ReplyDeleteAre you certain you are uploading the svg, and not a png or jpg? If, when you upload, there are two options to save - either as print then cut or a cut file - then what you uploaded is not the svg. If there is no option, it's just a simple svg option - then it may be in the way the file is made. I know there was something about paths in inkscape... I am not fluent in making svgs and can't remember exactly, but you may want to search more on making svgs in the particular software you are using, there may be a simple step that will fix the issue, before you save as an svg.
DeleteWhen I do print and cut on iron-on transfer paper, the Cricut doesn’t cut the “object” out. (A bunny for a pillow). It just cuts a perfect square around it. Am I missing a step?
ReplyDeleteWhen you upload it, you need to erase the white background, so that the transparent grid appears. Usually you can use the magic wand and just click once anywhere on the white background. Here's a step by step - it's meant for making clipart into cut files, but it shows you how to delete the backgrounds. :-) https://fieldsofhether.blogspot.com/2018/12/how-to-convert-simple-free-clipart-to.html
DeleteI cannot cut out exact images instead its just cutting around the the black line. Please assist
ReplyDeleteDid you erase the white background when you uploaded? it should be a transparent "grid" pattern around the design you want to cut. This may help: https://fieldsofhether.blogspot.com/2018/12/how-to-convert-simple-free-clipart-to.html
DeleteFor some reason it’s not giving me the option to print. I don’t know what I’m doing wrong. I’ve print before but now it’s not letting me.
ReplyDeleteDo you happen to have a touchscreen computer? Something in the most recent update is causing a conflict that keeps print then cut from working on touchscreen computers. :-( Currently Cricut's answer is to "use a different device" - but hopefully they will fix this soon!
DeleteWhen I flatten my text onto a shape, the text disappears and the shape shows. I've tried sending the shape backward but not luck. Any suggestions? Thank you.
ReplyDeleteYour tips are wonderful! Cricut should have you on their staff to write their how-to articles. Thank you for explaining print-then-cut!
ReplyDeleteHi, my partner is having trouble with her print then cut on her cricut maker. When she sets it up and loads it to the cricut, the machine will start to position and then just turn itself off inexplicably.
ReplyDeleteIt only happens with print then cut and machine is only a little older than 1yo
I'm having the same problem. Did she ever get it figured out?
DeleteHey! Recently my print then cut projects haven't been printing out with the rectangle around it with the sensor lines. The top and left lines are missing and I don't know how to fix it. I've made sure that it is within the size restrictions and recalibrated my machine and I can't find help anywhere else. Any ideas? Thanks!
ReplyDeleteMine is doing the same thing - were you able to fix it? If so how?
DeleteMy projects are not printing the full black box. I have tried making images smaller though they are already the size needed. I tried drawing the line myself but the cut was off. Help?
ReplyDeleteHaving the same issue is there any help with this?
DeleteThe black box isn't printing in the top left and side corner. How do I fix this? Can I sharpie the line in?
ReplyDeleteHi, while printing my stickers from Cricut design space, I notice that I have tiny colored speckles around my stickers. My sister has printed hers and it is not a problem that happens for her. Is there any tips or ways you know to fix this? Thank you.
ReplyDeleteI had a issue with the print then cut. I printed the image just fine but when I go to cut it is keeps cutting way off. it cuts more to the left and bottom of the image instead of around it. So frustrated because I have wasted so much printable vinyl even though I calibrated the machine. Please help.
ReplyDeleteI've had my Cricut Maker for awhile now. It was cutting my images perfectly for my tumblers. Today, it has the correct image but not my measurements. Example: I wanted to cut a 3" x 4.5" image. When it cuts my vinyl, it's 1.5" x 1.5". Please let me know if anyone has had this issue.
ReplyDeleteThanks!
Chris
These updates have brought a lot of odd things in the past year. Is there any chance your settings got changed to metric instead of imperial? Click on the three lines on the top left of design space, choose settings, to check.
DeleteHello, lots of frustration lately. You seem OBVIOUSLY knowledgeable. I have a print then cut image, It was originally cutting high right. I recalibrated machine. Now it isn't recognizing the image. I've flattened it as well. Any thoughts?
ReplyDeletehelp please. My print is the mirror image. How do I correct?
ReplyDeleteWhen I print, it's the mirror image. How do I correct?
ReplyDeleteI can think of two reasons this might happen... 1, when you click make it, on the design space screen, is mirror turned on? 2. In your printer settings, is your printer set to mirror the design? If you can' t figure it out - a quick fix is to go back to your design and flip it so it is backwards - then when it mirrors it, it will actually be "un mirrored", if that makes sense. :-)
DeleteI am trying to make some jewelry cards on print and cut for my daughter and am Googled out and about to pull my hair out!!!
ReplyDeleteI am using the design space on my computer and when I try to flatten the parts of the image (basic shapes) that I have 'sliced' or 'welded' the FLATTEN button is greyed out!! I can flatten every other part of the image, but I cannot flatten ALL the parts together.
Any insight would be amazing!
Thank you!
The select feature has been wonky all year in Design Space. It may be something where if you save, close, then restart the software it works. Or it may be as simple as choosing select all at the top instead of clicking on each item... or if select all is not working, try selecting each item in the layers panel while holding down the shift key... hopefully one of those options will work for you! It's been a year with Design Space - I sure hope they get their software working correctly soon, but I have a feeling it will always be new issues with every update. They are trying to make one web based program to work on too many different devices and operating systems. It would be so much better if they would create stand alone, fully offline, programs - but they appear unwilling to ever do so.
DeleteI am trying to make a plain white circle label with my logo and some words on it. I flatten the image to a white circle. It prints great! But then the cricut is like it doesn't know to cut the white circle. it just spits the paper back out after it reads the black lines around the edges??
ReplyDeleteMine does the same thing. Stupid machine.
ReplyDeleteOk. I am so confused! I have done everything you mentioned, but my words will NOT print? It looks great until I get to the print preview! The image appears, but not the words. It will only print the image. I'm lost.
ReplyDeleteAre you certain your words are flattened to the image? Are they possibly showing separately on a second mat? Print then cut is having many strange issues after this weeks updates - its possible its something in the program right now too. Sometimes I can bypass text issues by uploading the text as an svg instead of typing it straight into Design Space. It's not a definite work around, especially since I am not sure what exactly is happening for you, but it might work for you. https://fieldsofhether.blogspot.com/2018/01/using-fontlabpad-with-cricut-design.html
DeleteEverything goes fine until I send my project to the printer. All I get is the sensor marks, none of the images are printing, and I just printed them so I know that work, at least sometimes they do.
ReplyDeleteI have an Explore Air2 and an HP Envy 6052
My letters are flatten to my label and the label is flatten. It shows correctly in the print preview, but when it prints I only get the images not the letters.
ReplyDeleteI chose a envelope liner image in DS. I picked out a Print then Cut image that I duplicated twice. I attached those together. I wanted to place this design on the envelope liner. I printed the Print then Cut design. I flattened the design and then attached the liner. But 2 times i got a blinking red start button. Finally it scored the one line but instead of cutting out the shape of the liner it cut the Print then cut design I don't know what I am doing wrong. I cant find anything on the net for help
ReplyDeletein doing this.
Unfortunately, that sounds like there may be an issue with your machine. You probably need to contact Cricut for that one. :-(
Delete