A Beginners Step By Step Guide For Making Tags
Both with Pens, For Draw Then Cut
& with your printer, for Print Then Cut.
A list of free Tag Svgs can be found at the bottom of this post.
Quick Links:- Where To Find Free Tag SVGS (bottom of this post)
- Where To Find Free Fonts That Work As Writing Fonts (without bubbling)
- Solving Common Print Then Cut Problems
- Boilo History & Recipes
Start By Adding Your Shapes
This will be the first step for both processes, whether you choose to draw and cut, or print then cut.
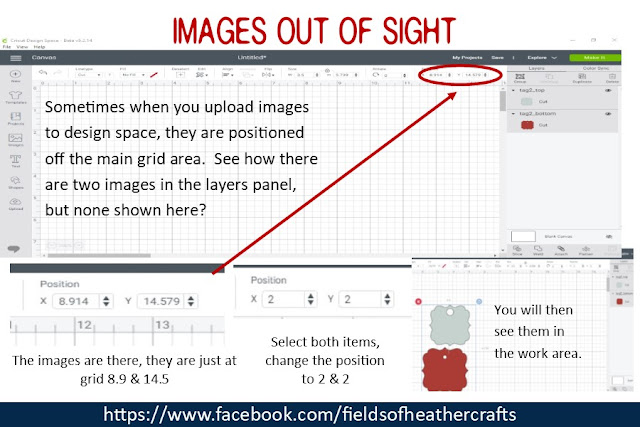
I started with Tag #2 from this collection. You upload two files, the top and the bottom.
 When you upload these, Design Space may place them out of sight. Change the Position (see above photo) to make them appear in your workspace.
Layer the images on top of each other, then select all and you can drag to easily resize both images at once.
For Draw Then Cut
- Use a writing font!
- Attach Your Text!
The next step is to add your text. This is where it will matter if you are using draw, instead of print. When using the draw feature in Cricut Design Space, if you are using a system font, the machine will follow the path of the blade, creating "bubble text". There are hundreds (literally hundreds!) of free fonts that will work without bubbling, because they are thin enough to "collapse on themselves" and appear to be a single line. However, results will vary based on the size of the font, and the size of the marker used. I have samples of well over 100 different fonts, sorted by the marker used, here:
For this project, I used my go to favorite free font for writing - Montepetrum
Once you type your text, change the font, then on the top left of the design space screen, change the box beside linetype to "Draw".
Once your text is added, and set to draw, you need to attach it to the top part of the tag. The easiest way to do this is to hide the bottom part of the tag, select all, choose align/center then making sure you have both items selected (choose select all again) choose attach on the bottom right.
You can attach any color of writing. Unlike when using attach for cuts, the colors will not change, because the machine knows it will use pens, and then cut, all on one mat.
Unhide the bottom part of the tag, and click make it.
My favorite markers to use are the the jot Markers from the Dollar Tree, Markers from the Target Dollar Spot, and a plain old bic round stic pen. See examples, and a longer list, of pens that work in cricut, no adapter needed, here:
The machine will prompt you to put a pen in the machine, and it will write and cut.
Then it will prompt you to load a mat with the second color of cardstock, and it will cut the bottom pieces.
For the jar lids, I sized a circle 2.54, then sliced it from the photo. Delete all the extra pieces, add a new 2.54 inch circle, placed the photo and text on the circle, select all and flatten. Sent to the printer, then cut with the cricut. I did these on plain cardstock. You could use sticker paper, but there's no need, since the jar ring holds the paper in place on top of the lid.
For Print Then Cut
- Flatten To A Shape!
- The maximum print area size for Print Then Cut projects is 9.25" x 6.75"
The most important thing with print then cut is to make sure you flatten all text TO A SHAPE. If you just flatten text, it will cut each letter individually. If you flatten text to a shape (the tag) it will cut only the shape. In the above image, I flattened everything all together, but I changed my mind and decided to print and cut the white, and just cut red backings to layer the tag.
For Print then cut, you can use any font. Print then cut will be MUCH faster than draw then cut. The results will look very similar. But print then cut is limited in size. I originally had the image grouped, I duplicated it to make 4 copies, and then clicked make it - and it put it on two white sheets (and one red). By going back and ungrouping, manually placing the white images together and attaching them, I could get design space to put the white images on one piece of paper. Design space does not always place images well on its own, I often have to manually place, and attach, items to save materials.
Here's a comparison of the print then cut, and draw then cut with two different pens:
The first tag, on the left is print then cut
Middle tag is with a target dollar spot marker
right tag is with a bic pen
Where To Find Free Tag SVGS:
=====================
For more tips, tricks, tutorials and free svgs, find me on facebook:
https://www.facebook.com/fieldsofheathercrafts/
An Index Of Tips, Tricks, Tutorials, & Free SVGS
For Making Christmas Ornaments
https://fieldsofhether.blogspot.com/2019/10/making-christmas-ornaments-index-of.html


No comments:
Post a Comment