Making Perforated Tickets With Cricut
My husband needed 70 tickets for a banquet the Masons are hosting.
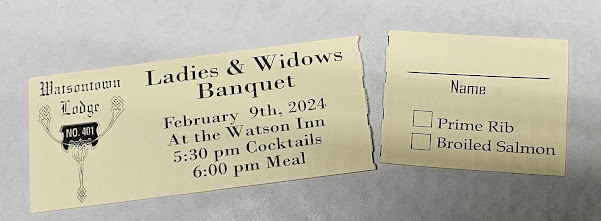
There are two dinner options, and they need to know how many of each dinner is needed.. so the ideal ticket has the information on one side, to be kept by the purchaser, and a tear of section for the name and meal choice.
For just 70 tickets, this was easy to do with cricut. For larger numbers.. I think I'd have called our local printer and placed an order. Doing it myself was MUCH much cheaper. :-) Here's how I did it:
The size that worked best for me was 6.5 wide by 1.75 tall.
That allowed me to print then cut 5 per a sheet, on standard sized 8.5x11 cardstock.
The base of the ticket is two shapes - a rectangle, and a score line.
I shrunk the score line way down, then switched it to cut [instead of score] and duplicated it 3 times.
When you first duplicate the lines, they will be all over the place - but the align feature will quickly fix that:
See the lines on the left? Select all 4 (or 6 - I think I could have used 6 and they would tear just a bit easier, at this size) and then choose "center horizontally"
After they are centered vertically, with them all still selected, choose "distribute vertically"
Then with them all still selected, ATTACH. Do not attach them to the ticket yet - that needs to be your last step. For now, you are just attaching your perforation lines together.
Now place your perforated line on your rectangle, just as a guideline for where to place your text.
For my check boxes, I added a square shape, then gave it a small offset, then sliced the square from it's offset.
I added the logo as a photo - and Design Space constantly, constantly, warns me it is "low resolution". It prints absolutely fine - the warning is just an annoyance.
Once the text and image are all on the ticket,
HIDE THE PERFORATION LINE.
You can hide your perforation line by clicking on the "attach" group in your layers panel, and then clicking on the eye. This does not delete it, it merely hides it, which is what we want for now.
Select all, and flatten. This will make it a print then cut image.
Now unhide your perforation line, make sure it is placed where you want it on your ticket, and attach.
Click make it
Change the project copies to 5
Don't forget to apply
Now, once you choose continue, the page will be sent to your printer. If you have not calibrated recently, you may be prompted to calibrate first - Design Space will tell you what to do step by step if you need to calibrate first. Essentially, you print a page, put it in the machine, the machine will make some cuts, then ask you to look at it (WITHOUT UNLOADING FROM THE MACHINE) and decide where the cuts look most centered. You answer, and it makes another cut, and you tell it whether or not the new cut was good enough.
Back to the tickets:
Print, then load the paper onto a mat and into your machine. It will cut around the ticket, and cut the perforation line. I used a beige paper, although technically you can only use white paper for print then cut in an Air 2 - I've used a variety of light colors with no problems.
=====================


If you ever need to duplicate scorelines or cut lines on top of each other, you can on a Computer in Design Space, press your ALT key and your left mouse key at the same time, when selected the line you want to Duplicate, and it will line up exactly over the line you are duplicating, it works with images or anything you want to duplicate right on top of another image, or line. Then you'd just have to Attach them to the object you are scoring or cutting. If it is a Print then Cut project, be sure you are doing any Attaching Last, after everything you only want Printed and then Cut is FLATTENED to a solid filled shape or another image.
ReplyDelete