Using Offset To Slice - Cut Out Text

Once you type your text, with the text box selected, look for the "offset" button at the top of the screen.

I used an offset of .097.  That seems to be my default for most projects.
Slice the offset from the base text.  

Offset also works on images - and easily creates backgrounds for stickers:


  Now you can simply select your project, create an offset, and flatten your images and text to the offset. 
 Once flattened, print your image, then put it in your cricut machine and it will cut just the offset, not each letter and individual piece.

Here's a project where this new feature will come in handy!
For this, which I made years ago, I used a print then cut hack that no longer exists.  NOW, with offset available, you can simply create the offset , slice that "shadow" layer from the last name, and then delete the offset shadow, leaving an empty space for the first names text to fit in.  I'll update the tutorial soon - here's the original:
=======================

On My Desk 3/16/21 - A New Chapter? Or a Return?

On my desk Tuesday March 16th, 2021 is a Silhouette Cameo 4.

Does this mean I am trading in my cricut?  No.  Absolutely not.  This is an addition, not a replacement.  I don't want to add to the drama of Cricut's decision to continue making us upload out images to their server, and now pay to store them there, but its an elephant in the room, and I can't not address it.

 I don't like that this decision makes me feel like a co-conspirator in a low level con. I have spent three years telling people how to use these machines, and because of that, people have purchased them, with me telling them they did not have to pay for Cricut Access to use them.  Now that that is not true [for the vast majority - some still can use it without paying] I feel like I lied to people.  And that makes me more than a little annoyed with Cricut right now, a company that I have never been fully in love with, even if I do love my machine and what I can do with it.  

Are my feelings rational?  Too soon to tell. 

 For me this is a little different than for most of you.  I live in the middle of nowhere with very pitiful internet.  For two years I have said "I should have bought a Silhouette", because they have stand alone software that truly works offline.  Cricut's version of "offline" is so limited that it's useless to me. 

 When Cricut made their announcement last week, and I knew I would be spending more money one way or another,  it just felt like a good time to finally do what I should have done from the start - buy the machine that does not require me to be online to use it.  

So am I jumping ship and switching to Silhouette?  No.  And yes.  I did buy a Silhouette.  I am not buying a new Cricut machine [at this time] but I am also not getting rid of my old one - as a matter of fact, I'm still using it this morning, and probably will continue to do so.  

I am not paying for Cricut Access, at this time.  Will I change my mind?  Possibly.  I understand that Cricut has to pay their cloud storage fees.  I don't want to use their cloud storage. I should not have to upload my images to their cloud to use them.  I want to use them right from my computer.  Cricut is unlikely to ever offer that option, so  I may eventually cave and do it their way.  But I'm not quite ready to give in yet.  

Please don't tell me to just "give up two coffees a month" and pay the fee.  That's so...  rude.  One, my coffee costs roughly 33 cents a travel sized cup - I drink it black, and brewed in my kitchen. Two, for me, this is not about the ability to pay, but the willingness to do so.  I could spend a little more to use my cricut the way I am accustomed to using it, or I could spend a LOT more on another company.  I chose the latter.  It may end up being the wrong choice, and I may change my mind.  But I have the ability to make the choice, and it felt like a good time to make it.

Snapchat to my BFF

 I could return the Silhouette next week. The learning curve is steep, there's no doubt about that.  I have never really gotten the hang of inkscape, and Silhouette reminds me a lot of inkscape.  But then, I have already found some great features in Silhouette that I love... so maybe I will end up really liking it.  I just don't know.  It's too soon to tell.

So this  is why I currently have two machines - to find out what works best for me.  Because no matter how long the pros and cons lists are for each machine, it comes down to which machine works best for the individual. What works for you may not work for me.  What works for me may not work for anyone else.  

What does this mean for this blog, my facebook page, and my facebook group?  Not much at all.  A few posts on this blog will no longer apply (and a LOT will need updated ) with the positive new updates in Design Space.  Those posts didn't bring enough traffic to my blog to make much difference to me.

I will continue to post all the free fonts and free svgs that I have always posted.  The only real change is that I now have two machines to complain about, instead of one.  :-)  

I do not work for Cricut.  I do not work for Silhouette.  I am not an ambassador for either company.  So unlike many craft bloggers, I can say what I want about both companies.  Ambassadors have signed clauses promising to not say anything disparaging about the company.  I have signed no such agreement. I can be as brutally honest as I wish, about the struggles with both machines.  That's what you can expect - a lot of brutal honesty (also known occasionally as whining) about both machines.  Hopefully I will also be able to teach ways to work around those issues, with both machines.  Only time will tell.  

Today, all I can tell you is that I had to re-arrange my craft space to make room for another machine.  I had just recently created this new space and got it set up exactly the way I wanted, and I loved it!  So changing it...  well, I'm not thrilled.   But it's here, and a spot has been built for it.  Hurdle #1 is cleared. I suspect however, that there's a long field of hurdles yet ahead.  

==========================


==========================

To See All Of My Latest Free SVG Finds, 
Join Cricut Tips, Tutorials, & Free SVGS
There you will find themed posts with all of the latest links in the comments
And you can share your projects, tutorials, and ask questions there too!


On My Desk This Week - March 14th

Here's a look at some of the projects I made this past week - and where I found the [almost always free] cut files to make them.

"Egg-cellent Egg Decorator" Dollar Tree Aprons


HTV applied to a Dollar Tree Apron
Egg Dying Aprons For Kids

 I was very surprised to find that these aprons do not melt when you apply htv!  Quick presses, I didn't press nearly as long as I would for other fabrics.  But I used the same heat setting I always do!  [I use a regular old iron, set between cotton and wool, for all htv projects]

Supplies Used:

Don't forget to mirror your design for htv.  :-)
I always forget to mirror, so before clicking make it, I select all and flip vertical.  That's exactly the same as mirroring, but for some reason, I can remember to do that, and I can't remember to click the mirror button later.  

My design measures 7.2 x5.3 in Design Space


I love those plastic folders from the Dollar Tree for holding all the pieces of a project in process.  Those thin ones are 3 for $1.
See more of how I use the plastic folders to organize my cricut projects - https://fieldsofhether.blogspot.com/2021/01/my-cricut-craft-space-projects-in.html

I've always used a regular old iron for all of my htv projects, with no problems.

==================


On My Desk This Week - March 6th

I have kept my machine busy this week, and I have lots more planned for next week! Here's a look at some of what worked, and what didn't work, for me this past week.

Comparing Sites That Identify Fonts


Comparing Four Different Sites To Help You Identify Fonts

===================

The Cliff Notes on my results - I had the best results from What Font Is (NOT the same as What The Font.)   Fontsquirrel did a terrible job matching the font, however, it's the one app that always recommends FREE alternatives.  Most of the identifiers only show you paid fonts.  

Quick Links:

If you are on any cricut facebook groups, you have seen the daily question - What Is This Font?  In some cases, like I Love Glitter, and Samantha, it can be obvious.  But in most cases...  it's pretty hard to tell!  So many fonts have glyphs - which means the characters may look different.  You can have two completely different versions of one letter in a font, if you use glyphs.  

That said, there are sites that will help identify fonts.  Tonight I took three different fonts from my collection and ran them through each site, to compare their results.  What Font Is was the clear winner - it correctly identified all three fonts.  What The Font came in second.   Font Squirrel was the only site to offer free font suggestions.

And it's important to note that with Herina, the ligatures were not shown in the matched results.  Had I not known that Herina was the correct font, I may not have believed the sites were accurate in their suggestion.

Here's a step by step of the fonts I used, and the results for each:

===============
THE FONTS
=============
These are the samples I started with.  They were typed in fontlab pad and saved as pngs, so these are clearer and better quality than what is often used when trying to identify a font.   I very purposefully chose a paid font, a  font with ligatures, and a FREE font, for this experiment, as I was curious if  paid fonts would have better results.

This font is not free - it's part of a font duo that is typically on sale at Fontbundles for around $6.

This is the free version, found here:

Note - these are not glyphs, this font has "ligatures".  They appear automatically, no need for a character map.  Not all fonts have ligatures, but if a font has them, they appear based on letter combinations.  Design Space cannot read them and will never show them.  

This is the free demo version of Dafont

==================
The Sites
I ran each font image through 4 different sites, so compare the results.
==================

===========
The Results
===========
Test #1
This font is not free - it's part of a font duo that is typically on sale at Fontbundles for around $6.
===================

What Font Is correctly identified Amastery Hand.  Clicking on the download button took me to Creative Market to purchase the font, where it costs twice as much as it would at Fontbundles [It seems to always be on sale at Fontbundles].  So if you are going to purchase the font, be sure to shop around and compare prices.

The other three sites did not have great results.

These are actually the best results I have ever gotten from What The Font.  For some reason, I rarely have any success with this site, personally, even though it is by far the most recommended option.

  It didn't identify the font, but the options it came up with are somewhat similar.


Font Squirrel didn't come close - however, it did offer a couple of free alternatives, which was nice - even if they really don't look much at all like Amastery Hand.  :-) 


This site was the most frustrating to use - I received a variety of errors before it finally worked.  The results were not great, for this font.
============
Test #2

FREE at Fontbundles:

=================

Again, What Font is got it correct on the first try.


But surprisingly, What The Font got it right too!  
However, if I didn't know what this font is, I may not have thought either site got it right.  Neither of these sites show the ligatures in their identifications.  The only reason I am certain they got the identification correct is because I knew the font name before I started.

Also - both of these sites take direct you to a paid version. There's a really nice free version available at Fontbundles, the free version is what I used for my sample text.


Neither Font Squirrel Nor Fontspring came even close.  It may have been helpful to use shorter samples, I could have cropped this down more maybe...


===========
TEST #3
This is a free demo version of the Watermelon Script Font, from Dafont
=========
What Font Is is 3 for 3.  This time the font was on down the list, but the correct font was listed.


What The Font didn't get it - although I will say that Bromello is a fairly close match.  There is a free version of Bromello - it's always worth checking to see if the font listed as a paid font has a free version.


Not even remotely close.

 I completely gave up with this font  on FontSquirrel.  I tried several times but could not isolate any portion of the text  that the site could work with.

=================
Free fonts that write in cricut, free Rae Dunn inspired fonts, free dual layer shadow fonts....
Where To Find Loads Of Free Fonts


Dollar Tree Kissing Booth

A Quick And Easy Dollar Tree "Kissing Booth" Valentine
Supplies Used:

 
The Dowels and box were both in the craft aisle at our local store.
I shortened my dowels a bit, but it's not necessary.  
Then I hot glued one in each corner of the box, gluing the other end to the inside of the lid.

The hearts at the top are just the heart from the shapes tool in design space.
I used the Biosha Sans font for the X & O - just attach the letters, no need to slice, if you attach them to the hearts they will cut out just as if you sliced.

Hugs & Kisses SVG is free from Gina Creates

Super quick and easy to make!


=======================
===================
Find More Free Valentines SVGS Here:
===============

Find More Cricut Project Tutorials Here:

https://fieldsofhether.blogspot.com/2019/04/cricut-step-by-step-project-tutorials.html

==========================


5 Surprising Things I Learned When I Created A Cricut Facebook Group

 
I'm horrible at answering messages.  Really, really horrible.  I could apologize, but it would not be genuine.  There are only 24 hours in a day, and there are SO very many fun and interesting things, in addition to the necessary things, that sorting through the various platforms to find messages and answer them is just never going to be a priority for me.

But I do love answering cricut questions and teaching people how to use their machines.  So about a year ago I got the bright idea to create my own facebook group, where I can more easily answer questions, and compile assorted links and information in what I hoped would be helpful threads. On the whole, it's worked out very well for me.  And along the way, I learned some things.. not important things, just interesting things.


1. Designers will offer their designs for free to a select group, as long as those who receive them make items with their designs and share them on a variety of facebook groups.  This is how they get around the "self promotion" rule in most facebook groups.  Personally, I don't have a problem with this at all.  While my list does not allow you to post items or designs for sale, I do encourage you to share items you make.  So if the designer gave you the design for free to promote their work, I don't mind if you make the item, share it, and tell where you got the design.   But I do prefer you be honest - just say, I received this design for free in exchange for promoting it in facebook groups.  As for how to be one of those who receive the free designs - I'm not certain, but I suspect that if you join the designers facebook group, that will be your best opportunity.  

2. "Dope Logos" is a common term.  Why "dope" logos, I don't know - but at least once a week I have to delete a spammer who goes through all the posts and comments "Do you want a Dope Logo?".  Seriously - at least once a week.  It's multiple people, and it's not unusual for them to post the comment on 10-30 posts in one night, before I get them blocked and removed.  I suspect that although some of these may be legitimate designers, the majority will take your payment and never deliver a design.  If you want an svg created, and are willing to pay, I always suggest you ask one of the many designers who provide the free designs I share.  Many of them have contact information on their sites for custom work.  I recommend supporting the designers who offer us so much for free.  :-) 

3. Spammers sometimes work in teams.  Two or more  spammers will join the same group with the specific intent of asking questions that that other can answer with "their favorite" designer, or shop.  Super common is for someone to ask "which vinyl should I buy?" and then the co-spammer will immediately answer with a rave review for the brand they are being paid to promote.  I always try to ask why someone likes a brand, and ask if they can show you examples of items they made with it.  

4. People will promote items they have never used, telling you it's the "best", even though they have never tried it.    I've had to block quite a few people over the past year for promoting one particular vinyl company that offers $5 for every referral.  Many of these people would admit, when questioned, that they had never used the vinyl, but were promoting it for the $5 incentives.  They will tell you how amazing this company is, without ever having ordered a single thing from them!  This has become so annoying to me that I personally will never purchase from that company.  Which isn't really fair, it's not the companies fault people have misused their promotion.   If I see a great deal, or see something people are raving over, I'll share it.  But if I haven't used it, I am honest about that - "I've never tried this, but I have heard", for instance.

5. People download legitimate free svgs, then upload them to Etsy and sell them as their own design. This I knew before I created my group - it was one of my very first "shocking" (to me) cricut lessons.  I don't mean this happens once in awhile, in rare instances, I mean it's really, really super common.  I am very slow to ever recommend someone purchase a design on Etsy, unless it's very unique, or unless I am familiar with the designers work and integrity.  In many cases, you can find the design for free elsewhere, legitimately.

==============

How To Search A Facebook Group

Find my Cricut Facebook Group here:


Step By Step - Making A Card With Print Then Cut Elements

Making A Card With Print Then Cut Elements

My Cricut Craft Space - Projects In Progress

Organizing all of my cricut "in progress" projects

I know some of you likely only ever work on one project at a time.  I admire that.  But it's not how I work.  :-)

 Very frequently I will sit here at my desk writing about local history while a variety of Cricut Projects cut.  I may design and plan while my husband watches tv in the evenings, and then send them all to cut a day or two later.  Sometimes my daughter will "babysit the cricut" for me, feeding in the various materials & colors to cut.  Other times, she will help weed projects. 

 I have always had a mess of projects in progress. I've recut pieces that were lost, more times than I care to admit.

 Quick Links:

Last week we ripped apart our laundry room to solve a plumbing issue, and in the process, redid my entire craft area.  As I organize my new space, I asked how you all store your transfer tape - those pieces we use over and over again.  I am currently using a clipboard for mine, but someone recommended these plastic folders from the Dollar Tree.  And that solved an entirely different problem for me!

For the last two years, I've had a basket where I tossed pretty much everything.  Projects in progress, stuff that needed weeded, vinyl scraps, transfer tape, even an assortment of tools.  Impractical, and a mess, I was constantly frustrated by it and could never find what I was looking for.


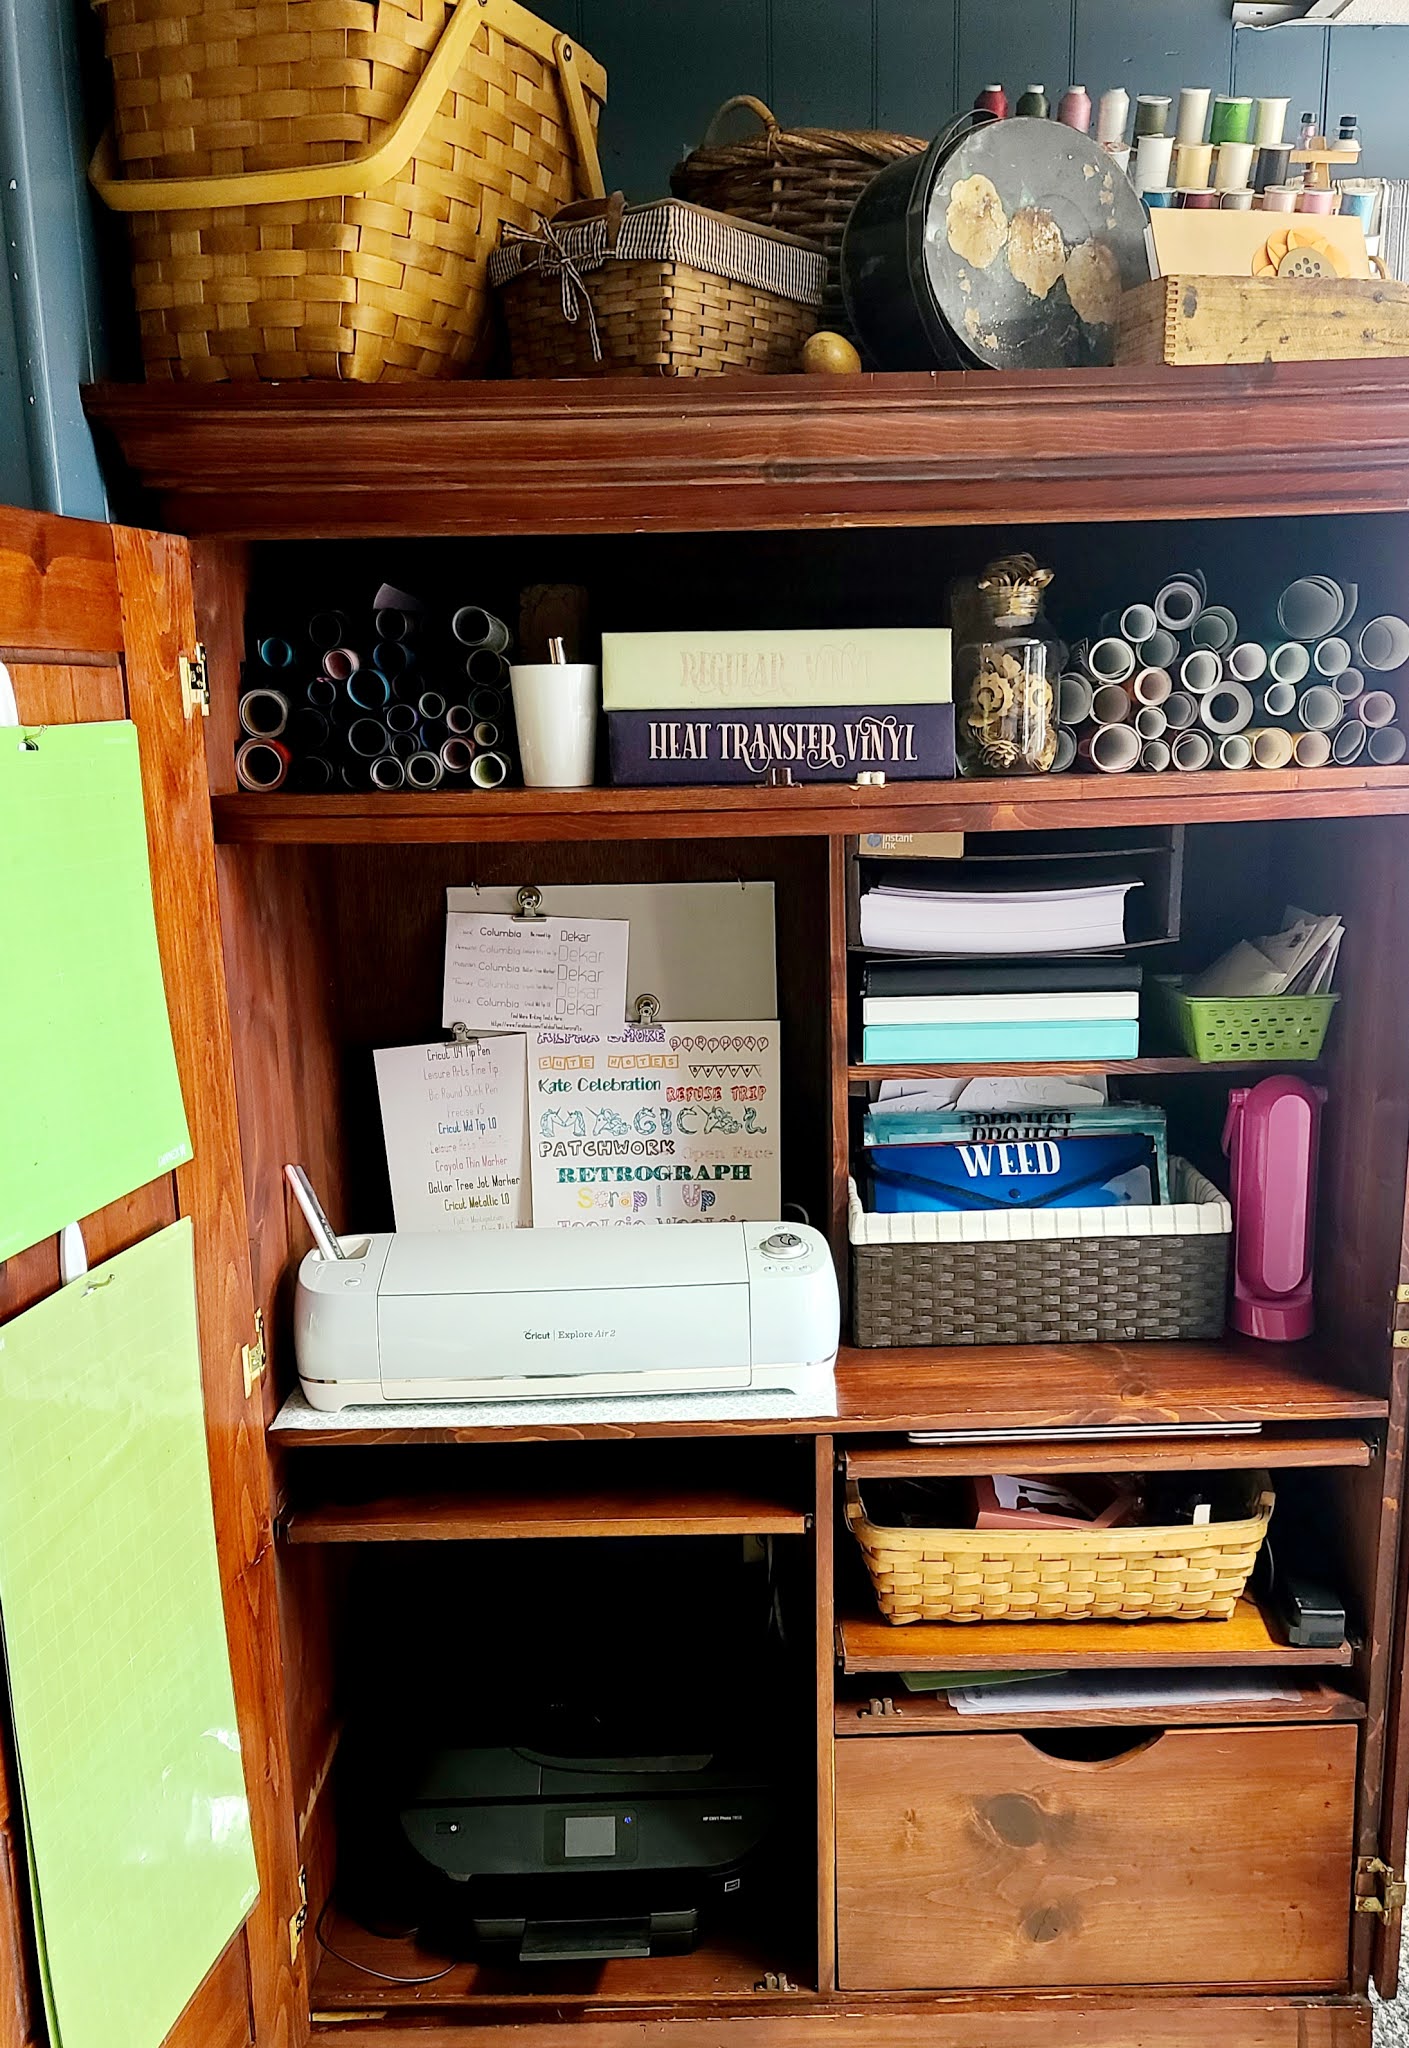
I'm still using a basket.  It's just organized with these plastic folders now!  Three of the thicker folders, $1 each, 13 inches wide by 9x5 tall, are labeled WEED, APPLY, SORT.  Two packs of thinner folders, sold 3 for $1 at the Dollar Tree, are labeled "Projects".  The projects folder have all the items for a project such as the Amazon ornaments, where there are print then cut stickers, boxes cut and ready to be folded, and vinyl to be applied to the outside.  My "APPLY" folder is more for single cut projects.  Say a name for on a cup, or a decal to iron onto a tote bag.  If a project has a lot of colors and pieces, I put it in it's own PROJECTS folder instead. A lot of paper projects, especially the 3d paper projects, go straight to a PROJECTS folder, for instance.  One project per a folder.  

I found this old office armoire, which looks like it may have come out of a hotel room, at our local thrift store.  There's a counter to the right where I work most of the time, but this closes up and hides all of my cricut supplies, most of the time.  The top shelf holds my rolls vinyl and the two binders of vinyl scraps & 12x12 scraps.

Each of these folders has a piece of cardstock inside.  That's mainly to help the folder stand up a bit better - they are pretty flimsy.  But they also work as dividers.  I put htv on one side of the cardstock divider, and "regular" vinyl on the other.

My "SORT" folder is for vinyl scraps - this is where I toss them until I pull the binders down and sort the scraps into the pages where they belong.  Originally I had one 12x12 scrapbook for my scraps, but when that got ruined in the above mentioned plumbing issue [frozen pipes - flooded the room] that necessitated the remodeling of this room, I replaced it with two binder style 12x12 scrapbooks [These are made by Stampin Up]  that I had found in my attic.  I now have one binder for htv, and one for regular vinyl - each color is in it's own page protector. 

Inside of the "APPLY" folder, behind the cardstock divider, is a pack of "Index Dividers" - also from the Dollar Tree.  These are typically used in binders.  I am using them to hold htv projects.  because they are plastic, I can stick the weeded htv right to the divider.  

============
In my Planner, I keep a "Projects At A Glance" Planner Sheet.
You can download it to use yourself, for FREE,  here:

=======================