Berkeley Gadgets Geocaching Shirt (Using Cricut Contour)

How to Use an SVG Converter

Quick Links:

We are headed to WVTim's geotour kick off in Berkely West Virginia this week-end.  This is a geocaching event, geocaching is my husbands favorite hobby.  WVTim's gadget caches are his favorite geocaches.  It's going to be a fun week-end.  But I couldn't let him go in one of the generic geocaching shirt I have made him...  

So I went looking for a logo for the event.  And since the event has a geocoin, there is a logo!  Woohoo!  But the only version I found is very small.   It's being used on websites to promote the tour, and might be what the official geocaching souvenir will look like in our profile once we complete the tour?  

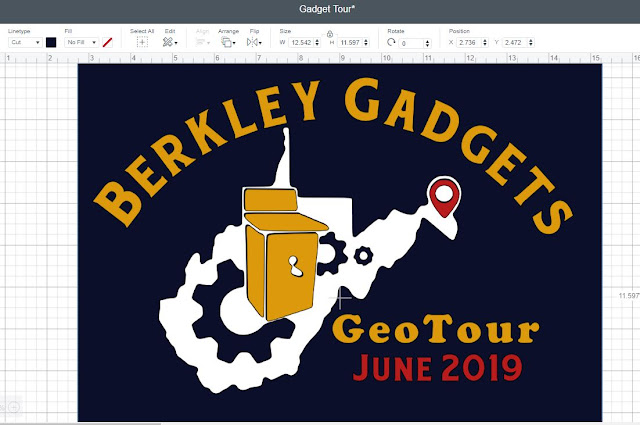
It's not much, but I can work with this.  This is how I took one little thumbnail sized logo and converted it to a 11.5 wide t-shirt decal

First, I saved the image to my computer.  Then I used the windows snipping tool to crop just the logo.


Next I went to https://www.pngtosvg.com/
There are quite a few sites and programs that will do this, but for simple, small, multi color designs like this one, I like pngtosvg best..  You can see a list of alternatives, and examples comparing them, here. For PNGtoSVG, scroll the the bottom of the page and upload your image.  (the ads at the top are confusing!  Scroll past them.)  Then I changed the number of colors to 4.  It turned my red piece yellow, but that's ok, I can change it back in design space.  If I go to 5 colors, it does not add red, it added a light blue I do not want to show.


When the svg is generated, download it, then open design space and upload it.  This uploaded with a white box around the design - making me think I probably should have taken this down to 3 colors - but that is ok. 


In the top right I chose ungroup, then I deleted the white layer. Drag the blue layer to the side, select the yellow layer and duplicate.

Select one of the yellow layers, and on the bottom right, choose contour.  Choose "Hide All Contoursl" so that all of the design is light grey.  Now select just the two shapes on the far right.  You COULD slice this image off , but if you look close at mine, there are extra little lines from the svg conversion.  Using contour deletes all of those little extras that I do not want.

Select the second image, repeat the process, but this time only select the pieces of the birdhouse that  I wanted.  Then I added a dark blue rectangle shape, because I wanted to use a dark blue shirt, and this helps me to see how the colors will look on the shirt.  I added my text, and changed the colors a few times....

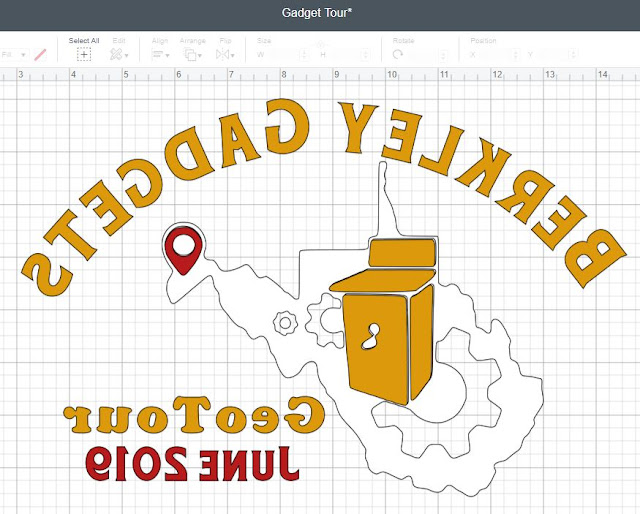
Before making the design, I hide the blue rectangle, and select all of the design and flip horizontal.  That's easier for me than remembering to mirror.  


That's it!  It was pretty quick and easy to do, and I love the way the shirt came out!


==================


Free SVGS For Geocachers

How To (quickly & easily) Fix The Keurig Brew Interrupted Error


The needle in the keurig, that punctures the bottom of the k-sups, is hollow, and sometimes coffee grounds get in there.  That causes an error message, because it has disturbed the pressure of the brew.

Apparently keurigs used to come with a handy little tool that you popped in just like a k-cup, and it cleaned the needle and fixed this problem.  My machine did not come with one.  It's only $4.90 on Amazon, and I'm happy to order one to have on hand..  but I am not waiting two days for my morning coffee...

Thankfully, it's really simple to fix with a paperclip or needle.  Just take the bottom piece out of the machine, remove the rubber gasket covering the needle, and poke a sewing needle or a paperclip into the hollow back of the kerig needle. 

Then run plain hot water through the machine once, just to clean out any extras you might have missed or loosened..  and then brew as normal.  I couldn't believe that was all it took - but sure enough, I had coffee in hand in minutes.

===========================

The tool on amazon, just in case you want to keep it on hand for next time...

https://amzn.to/2JTubYW

==============================


See How Much Time You Spend On Facebook & Instagram


Note - This only works in the app, not on a computer.
Click on the three lines on the top right
Click on Settings and Privacy
Choose "Your Time On Facebook:"

Once you look at your graph, look under the graph for some nice options.  Clicking on each section allows you to modify settings and set preferences on what you want to see, and do not want to see, in your feed.


======================
On Instagram


How To Manage & Organize All Of Those Great Fonts

Did you know that Main Type, the best free character map around, is also a great font manager and organizer?  I've been looking for a way to organize my fonts, and it turned out the answer was literally right in front of me! 

 [Maintype works on Windows based systems only.  Sorry - I do not use Apple Products and have no idea how to organize fonts on their system]
==========================
I know this post is long, and can feel a bit overwhelming, if you are new so here's the "Quick Version" before we get into all of those details.  This particular post is all about how I set up Maintype Font Manager to make it work efficiently for me.  

1. First I organize my fonts into folders by category.  One folder for Stencil Fonts, one folder for easy glyph fonts, one for good cutting fonts...

2. Then I tell Maintype Font Manager where to find those folders - and it shows each folder as it's own "Group" - so when I want to preview my stencil font options, it shows me just the fonts I have in my stencil font folder. 

3. Then I use FontLab Pad to open that font [The majority of my fonts are NOT installed on my computer], and in that free little utility, I type my text [or copy and paste it from the preview in Maintype], save it as an svg, and upload it to Design Space.

============================
The Longer Version
Back To The Details Of 
How I Set Up Maintype Font Manager
============================

Here's how I set it up:

The first thing I did was sort all of my fonts into folders, by categories that make sense to me.

====================
CATEGORIZING MY FONTS
====================

Here's a detailed look at what each of those categories means [to me] and a look at some of what is in each folder

Once I have them in folders, Maintype will view each folder as a "Group", so I can simply click on each group to preview every font in that folder.  Quick and Easy!

==============
Getting Them Into Maintype
================

The Font Maintype Font Manager from High Logic is a FREE download.
There is an option to pay for the premium version, for extra features, but that's not necessary.

Once you have downloaded and installed the program, you will need to tell it where your fonts are stored.

In the top middle of the screen, you'll see a folder with an a, and a plus sign.
Click on that, and a box will drop down giving you the option to browse for your fonts.

Personally, I store all of my fonts in onedrive [cloud drive] as well as have them backed up on external hard drive.  All of my categorized subfolders are in one folder named 0Fonts. 


I have two  boxes checked on this screen.
Index Recursively [includes sub folders]
And sync every 60 minutes.  You do not need to allow it to sync automatically, you can refresh the folders manually whenever you would like.  

Click Ok, and Maintype will add all of your folders into its directory.

Next you'll want to organize your view.
This is not what your program will look like by default.

Start by going to view/panels and choosing what you want to see.
For me, I want my main screen to have big panels showing the things I actually use.  Those are:

  • Preview [a list of fonts]
  • Characters [a character map]
  • Sample [the text I am creating]
  • Zoom [a zoomed in view of the item selected on the character map]

There are other panels that I find helpful, and want to be easily accessible, but that I do not look at all the time.  Those are:
  • Views - this is how I see my system fonts, which I do not have in any of my groups.  All of those Microsoft fonts and fonts installed with various programs by default.  Under Views, click on "ungrouped" to see those.  If there is something there I REALLY love, I'll copy it from my system font folder into one of my category folders, to back it up. 
  • Tag Search [a search feature for any tags I add to fonts]
  • Groups [the folders of fonts by category that I have added]
  • Information [name of the font, who created it, etc]
  • Tags [how you add tags to fonts]

So how did I get those options all off to the side, out of the way like that? Well, it's different than in any other program I've ever used, and it can take a little trial and error. It's not difficult, I promise, it's just..  different.

I'm going to add the "Integrity Panel", to show you how this is done.  
View/Panel click on integrity
Where the panel appears depends on which panel it is.  The Integrity Panel appears on the bottom left.

Click on the blue bar, and drag it up.  It will now float on top of your screen.

This is where it becomes unique.
Click on the blue top bar again, and drag it until a new icon appears on the screen

It looks a little bit like a space ship.
Each section of our "spaceship" is an area where the panel can be moved.  We're trying to move it to the top left, so drag the box not to the top left of the screen, but rather to the far left of the "spaceship" icon.  

Right where my cursor is in the above photo.  You'll see part of the screen turn blue, once it does - as shown above - release your cursor.

The panel is now on the main screen, on the top right.  See at the top of the panel, there's a pushpin?  Click on that pushpin.

Now the panel is off the main screen, and listed on the left.  To see it, click on it over there.  To remove it from that sidebar, click on it to view it, then click on the x beside the pushpin.

Repeat those steps until you have everything over there that you want, and once you are happy with your layout, go to View/Save Layout. Here you can save your layout, so if you accidentally mess it up later, it's quick to put it back to your default.

Now I can click on "Group" on the far left, and see my font folders.
I choose the folder I want to display, and those fonts are all listed for me to work with.

Note that at this point I have not tagged anything.  I will add tags later - for things like My Go To  Favorite Fonts, or Good Geocaching Fonts, or easy to weed fonts..  but that's for another day - and if I never get to it, it really won't matter, it's not necessary at all.

===========================

Tips & Tricks For Using Fonts In Design Space


Comparing Font Managers To Organize My Fonts


A look at 3 different font managers, to see if one of them could help me organize my collection of fonts.  I'd like something with a character map built in, and I'd like to sort my fonts into groups - easy glyphs, lots of glyphs, no glyphs, cursive & print...  etc.

Google - Find My Phone


Misplaced your phone?  Go to your computer, open google, and type "Find My Phone".
If your google account is connected, it will show you where your phone is located, and allow you to turn the ringer on.

For more information - https://support.google.com/accounts/answer/7177579


Ok Google - Add To My Shopping List


This works on both my google home, and just on my phone.  It's pretty nice when cooking and realize I am almost out of something to just say 
"Ok Google - Add This Item To My Shopping List".
without having to stop, clean off my hands, open an app or find a pen.

To see your list shipping online:


And it's not just for shopping lists - you can ask google to create a list for anyting, then later just ask google to add an item to that list.  I keep a to do list on there, that I later transfer over to a better to do list app - I just use google to take a note of what I need to do, really.
I can't find a shortcut to view that on my laptop though..  currently my only way to access it is to ask google to show it on my phone  - or I can ask google home and it will read it to me.


======================


Tech Tips


See My Pinterest Board Of Tech Tips Here:
https://www.pinterest.com/htruck/tech-tips/

Google - 
Tips - 
In The Archives
(These are very outdated - but I've saved them, because there is some interesting info still in some of these posts...)


Pin This:

Cooking With Blue Apron - Crispy Za'atar Chicken Tenders


Week One Recipe - Crispy Za'atar Chicken Tenders

Quick Links:
  • We LOVED it.  Fabulous meal.  Would definitely make it all again!
  • Prep Time about 15 minutes
  • Ingredients that were new to us - Za'atar seasoning, Labneh Cheese
  • To buy the ingredients locally - Roughly $40 - and "locally" is a stretch, I'd have to order some of them online. (Labneh & Preserved Lemon Puree are most of the cost - without those, the ingredients come to around $12. )
  • Portion Sizing - Great.  I COULD have stretched this to 3-4 servings if a couple of the kids dropped in unexpectedly, by adding some fruit (there is always applesauce in the pantry), a salad, some bread...  
  • Week One Unboxing
  • An Intro To Blue Apron

The Ingredients:
Everything but the olive oil was included.  Even the tiny containers of vinegar and sugar.
I'm rounding up for math purposes here - at $40 a week, These ingredients cost $13.33 from Blue Apron.  
  • Chicken (already sliced for tenders) Roughly $3.39 if purchased at Aldi, & Sliced myself at home
  • 2 sweet potatoes $1.56 at Wal-mart
  • 2 Persian cucumbers  - $2.69 for a bag of them at Aldi
  • Tempura batter $2.69 At Wal-Mart
  • preserved lemon puree $15.95 on Amazon (Make Your Own - But It Takes Weeks.)
  • Labneh Cheese $9 at Wal-Mart (Or Make Your Own, It takes a day or two)
  • Za'atar seasoning $4.49 At Wal-Mart Online (I looked at how to make your own - it's cheaper for me to order it already made than to buy all of the ingredients.  We liked this so much that this is a spice I do want to have on hand!)
  • Sugar & Vinegar & Olive Oil (I'm not counting them in my price totals, they are items I would always have on hand, and the recipes used very little of them)
So to buy the groceries to make this meal would have cost me $39.77.  The bulk of that cost is for preserved lemon puree and Labneh cheese - so by skipping the cucumber dish, I would bring this cost down to around $12.  (We loved the cucumber dish, and I'm pretty excited to have learned about these new ingredients that I can make myself here at home now...)


It's super easy to follow the recipe in the app.  It even includes wine pairings, and helpful cooking videos.  You can watch videos of this meal being made, step by step, if you want!   But these recipes were pretty simple - a beginner cook could handle them easily I think.

Cooking the sweet potatoes took the most time in this recipe - roughly 30 minutes to cook.  I am following instructions for this trial, but when I make this meal next time, I will cook the sweet potatoes in the air fryer in half the time.  


It is ridiculous how much we loved these cucumbers.  I didn't think the marinade could possibly do it's thing in those few minutes - but I was wrong.  I'm sure that's because these are sweet, small, cucumbers. Marinate them in a sugar and vinegar mixture, then we dipped them in the labneh cheese mixed with preserved lemon puree.  I didn't know what Labneh, nor preserved lemon puree was.  Now I know how great they taste, and I have researched how to make my own, and I'm pretty excited!  

 Note- the amount of cheese included was at least double what we needed.  Which is awesome, because I stopped at Aldi and bought a bag of cucumbers so we can have this again this week-end...

What is Labneh?
Labneh is sort of a cream cheese spread.  Kind of.  To make it you stir a teaspoon of salt into 2 cups of greek yogurt, and hang it to strain for a day or two.  If you let it drain long enough, it will become the consistency of cream cheese, and you can even make a cheesecake out of it!

Or you can make this:
"One of my favorite appetizers is to take the thick labneh, form it into 1 oz. balls with a scoop, and marinate them in a jar of olive oil, za'atar, and herbs. Perfect for spreading on toasted bread or crackers with a glass of wine."  - The Spruce Eats 
 (I will be making this this week-end!)

What Is Preserved Lemon Puree
I thought i knew what this was.  I was wrong.
I didn't know "preserved lemons" meant something different than a sort of lemon jam.
Preserved lemons are lemons in salt & lemon juice, left to ferment for weeks. (Three weeks minimum)  Here's a step by step:

At the end of her post are a list of things you can use it in - salad dressings, marinades, in hummus, etc.  There are more here, in this step by step of how to make just the puree from the preserved lemons https://www.elinorhutton.com/blog-list/2016/10/25/preserved-lemon-puree-and-brine

We are a family who LOVES lemon.  So this is pretty exciting for me.


The chicken was pretty straight forward.  I followed the recipe, and my batter was not nearly as runny as shown in their photos, but it coated nicely, so I didn't worry about that.
The thin strips cooked beautifully.

And we loved the taste.  Za'atar is a Mediterranean spice I look forward to using more often!

What Is Za'atar
1 tablespoon dried thyme- crushed ( or sub oregano)
1 tablespoon ground cumin ( see note)
1 tablespoon ground coriander
1 tablespoon toasted  sesame seeds
1 tablespoon sumac
½ teaspoon kosher salt
¼ teaspoon or more aleppo chili flakes- optional

"My Egyptian father would make his own version of zaatar and would love to sprinkle it over hummus, baba ganoush or over pita bread drizzled with olive oil before going in the oven to toast. " https://www.feastingathome.com/zaatar-spice-recipe/

These are the types of recipes I had hoped to learn in the Mediteranean Cooking Class I took locally this spring...  while I loved that class and the overall experince, I'm disappointed to not have learned about Za'ater and Labneh sooner!


=====================
So Overall?
Oh my word we loved this.
The meal had great taste.  We would have ordered this in a restaurant.  (Ok, so Dan would never order sweet potato willingly, but he ate some of it, and it's good for him..  but he loved the rest of it as much as I did!)
I learned how to make two new things - Preserved Lemon Puree and Labneh.  I learned about a new spice, which I expect to use on a somewhat regular basis in future meals.

This meal was pretty much worth the entire weeks cost, in amusement value alone.  I feel like I took a fun cooking class, learning new recipes and trying new ingredients, right in my kitchen.  I doubt all of the recipes will be this exciting, but this first recipe alone justified the cost of week one, for me.

======================
See the Unboxing Of Week One, and each of the recipes as I make them, here:


==========================

Week One - Unboxing Blue Apron


WEEK ONE
This was the menu we chose for the week, and we're pretty excited about it.  There's nothing here that we aren't really looking forward to eating!

Quick Links:
Unboxing Week One - 

Everything was kept good and cool, nothing leaked, and all of the produce is in good shape - nothing slimy or expiring.
I hate all the extra packaging, and I love that each meals "extras" are packaged separately.  I know. I'm conflicted, and it's a no win situation.

I'll review each recipe, with prices from local stores for each, as I make them.

  • Making Cajun Spiced Steaks & Biscuits
  • Making Crispy Za'atar Chicken Tenders
  • Making Pork Chorizo Tacos
==================================