Use your weeding tool to punch a hole for the floral wire
Use the Guide Option in Design Space to add notes on how to make the flowers, so you remember later.
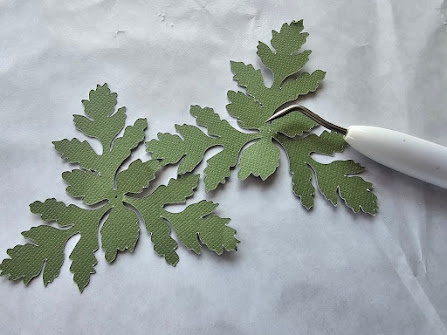
I use my vinyl weeding tool to gently lift small pieces off the mat.
Basic Tips:
It's often much faster to cut the larger flowers by hand. Cut one set of the larger petals with your machine, then use it as a template, you can cut several pieces of paper, stacked together, all at once.
Remember to stagger your petals. Once you have attached the "base" layer of petals, layer the next layer so that the middle of the next petal overlaps two of the bottom petals - as you'd see in a flower in nature.
When assembling rolled paper flowers, roll from the outside in - ending with the center base.
Glue - I prefer hot glue most of the time, but a quick dry tacky glue works great too.
Paper - I use just regular (preferably textured) cardstock [typically 60-80lb] - same as I use for cards. But crepe paper makes really beautiful flowers! I've used felt too - and lighter papers...
================
SITES TO CHECK/ CRAFTERS TO FOLLOW
These are some of my favorite Paper Flower Crafters
Reminder - I'm an affiliate for a number of sites. If you click on a link on this page and make a purchase, I may earn a small commission. This in no way effects the price you pay
==================== Affiliate Disclaimer - remember, I'm an affiliate for a number of sites, so if you click on a link in this post and make a purchase, it's possible I may may a small commission. It will in no way effect the price you pay. =====================
You'll want to use the rotary blade for cutting crepe paper, and that blade can only be used in the Maker series of machines.
Then, you'll want to make sure the grain of the crepe paper is going in the correct direction for the petals. Grain is important when working with crepe paper.
It's often easier to just cut a template with the cricut, then use the template to cut the crepe paper by hand.
Abbi Kirsten recommends setting the pressure to "more" when using the maker
Glue cannot be tacky enough nor thin enough. Water will cause the crepe to stretch and will ruin the texture/stretch of the paper - so use sparingly. Consider double sided tape in place of glue. You'll also want a hot glue gun, for some of the assembly.
Fine crepe paper is more realistic, but heavy crepe paper is more forgiving.
TIP - Save your crepe paper scraps and ball them up to form flower centers [in place of Styrofoam balls]
============== Choosing A Crepe Paper ===============
There are 3 main types of Crepe Paper, based on where it is manufactured:
Chinese, Italian, German
For a more in depth explanation [and other tool tips]
10 Things to Know About Crepe Paper by Lia Griffith
You all know how I feel about Youtube Videos [If you are new - I can read SO much faster than you all can speak] but I watched this one. Yes, it's a bit of an informercial for Lia Griffith crepe paper, but.. Lia Griffith really is the best when it comes to crepe paper flowers. She knows her stuff. This video is a great explanation of Chinese, Italian, and German crepe papers. The differences, and why her collaboration with the German company is made specifically for paper flower makers. She still recommends Italian Paper [not hers] if you want to make really large paper flowers. While she obviously promotes her own brand here, she also lists other brands she recommends, and tells you to work with whatever you have.
Note - a possible substitution for her panpastel set [$57] is eye shadow. I know a lot of crafters have been using eye shadow palettes when making paper flowers.
I'm a big fan of Lia Griffith, and someday will likely subscribe for her membership. At this point in my life, I know I simply don't have the time to really use it - but it always tempts me, she has gorgeous projects in her classes.
However, her crepe paper is far and away the most expensive option. According to a guide by Oksana, "For example, a pack of 10 rolls of Lia's “heavy crepe paper” cost $20, that is, 1 roll cost $2. But the size of this roll is 5 times smaller than standard crepe paper roll. So, in terms of the amount of paper - 5 Lia’s rolls are equal to one standard size Italian or Chinese roll.
Thus, not only you have to buy several packs to make a large flower of one color (or if you need to make a lot of flowers of the same color), but you will pay a higher price ( $10) for the same amount of paper that you have in standard Italian roll ($7).
The Carte Fini brand, Italian, is recommended by several flower makers I follow
This video by Oksana is a little long - but if you skip through, you can see how she stretches the petals, with explanations on why it's important not to overstretch.
Picnic Foods A reference page in my personal cookbook with some very basic ideas and recipes
Pinwheels, Lebanon Roll Ups, Pasta Salads...
One of my projects in 2024 is to redo my personal cookbook, a "Volume 2" of sorts. I printed and bound copies of the first volume for all of our children when they first started moving out. For years I've been using that compilation myself, but I have it so written up with changes and additions, and many notes on recipes I had never written down or included.. it's time for a rewrite.
And now that it is picnic season for us, I wanted a quick reference page for picnic foods.
A staple at Pennsylvania Dutch gatherings, Lebanon bologna spread with cream cheese and pineapple may sound odd - but it's really quite good! You'll find variations at most picnics and pot lucks in our area.
I love pinwheel recipes for picnics. Quick and easy to make ahead, no silverware needed.
Pasta Salads, for me, are much like soup. I don't use a recipe, I simply open the fridge and see what I have that might work, then combine it all together. Sometimes I'll use a bottled sauce, sometimes I'll mix up something home made. The above chart is more of a guideline than a recipe chart.
Clafoutis and Quiche are picnic staples for us.
Our current flavor favorite for clafoutis is lemon raspberry
Comparing Sites That Convert Images To Layered SVGS
For this comparison, I took one image and ran it through 8 sites that convert pngs to svgs. From those 10, I chose my 6 favorites. Not all of them had great results for this image, but they are all sites I recommend trying. I could have worked with the results from 5 of the 6 sites I listed here. The 6th site, convertio, I included even though it didn't work for this image, purely because it works for so many other things.
When trying to convert a png to an svg, keep in mind that results will vary based on the image you start with. My number one choice for this list today may end up being my 3rd choice for another image on another day - it just all depends on what you start with, and what results you hope to end with.
To size this, I measured his hand at the base of his palm, and added 3/4 of an inch. That will allow the pot to cover the base of the painted hand which forms the flower stems.
For the name, on the top piece, you will want to use a stencil font. Any stencil font will work - but I used Brolike Regular. It's free on Dafont.
One you type the name in a stencil font, attach it to the top piece. Or, you can slice it - but attach will do the same thing here.
I included the text as an svg - it is in a font that will work well with the pens. To use the pens, attach the text to the bottom piece. If you prefer to use another font, here's a list of many free ones that work well with the pens in cricut:
If you prefer to print then cut, select the text and the bottom piece and flatten.
Then we painted his hand for the stems, and added painted finger prints for the flowers. I used scrap paper for that, and then cut roughly around the piece once the paint had dried.
We finished with a magnet on the back, under the age of 2 or 3, these are often a good size for a fridge magnet. Larger sizes could be made into a card, or maybe add an easel for it to stand..
After 2024, you can use contour to remove the date, if you'd like.