
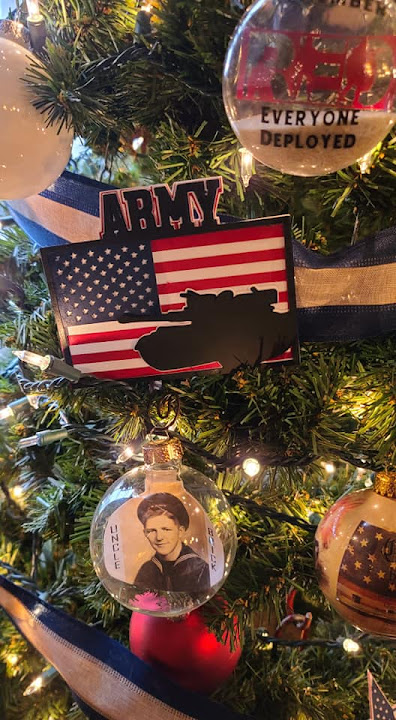
Our son arrived back on US soil very early this morning. I'm not completely sure our just turned 2 year old grandson fully understands that Daddy will actually be here in person to pick him up tonight, not just on a phone screen, but he is very excited about the dinosaur he picked out for on his shirt.


The dinosaur svg is free from:
https://crafthousesvg.com/products/free-halloween-svg-bundle?ref=6959505
https://crafthousesvg.com/products/free-halloween-svg-bundle?ref=6959505

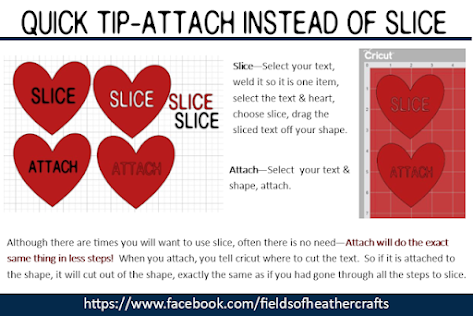
When working with real, quality, svgs, it's so simple to use just certain elements. For this, I deleted the hearts and text, used contour to remove the "means" from the banner.
I sliced the eye out of the dinosaur shape, so it would be one less layer to apply. I'm putting this on a white shirt, so the white can show through, no need to use white htv on top.
Then I chose select all, and flipped the design horizontal, and changed the colors to fit our patriotic theme.

Next, I typed "Daddy" to fit in the banner, then sliced it from the banner. I did not need to slice this - I could have just attached. Often attach will work exactly the same as slice, in fewer steps, and this is one of those times. But I sliced it so I could share a screenshot of the design to show my daughter what it would look like, and get her opinion.

Next I added this free American Flag svg.
This is my favorite flag svg - because it's easy to weed and layer. To help weed out the stars, I use painters tape - roll it in a circle around my finger, then dab the area, so the star pieces are picked up by the tape.

For the font, I used Biosha Caps. I downloaded the Biosha fonts a couple of years ago when they were temporarily free, and this set of fonts is hands down my most used fonts.


I used the curve feature in Design Space to slightly curve the Welcome Home.
Next I decided I would rather waste a little vinyl than take the time to piece and line up the design. Here's the difference:

If I had just clicked "make it", without attaching, Design Space would line all the red pieces up like this. Once weeded, I would need to place them correctly on the shirt.

By selecting all of the red pieces and then choosing "Attach", Design Space keeps all of the red pieces exactly in place. It wasted a little more vinyl, but makes it so much faster to apply to the shirt.
My favorite htv is Caregy, or transwonder. They are much more inexpensive than Cricut brand, and I find the quality to be much better.
I keep a vinyl comparison price chart here:

Because this is being cut from HTV, to apply to fabric, I needed to Mirror the design. For htv, you are actually cutting on the back of the vinyl, so the image needs to be reversed. I do not trust myself to remember to click the mirror button, so for all htv projects, I click select all, then flip horizontal.

I cut this using my Maker, and again, I'm just not impressed with this machine. Compared to my Air 2, it is just much more inconsistent in it's cuts. Here you can see it cut the red htv quite well, then cut through the backing of the blue htv in places, making it harder to weed and apply.

This is the transfer sheet, after I ironed on the design. This should not happen. Yes, I can change the settings so it cuts with "less pressure", but then it wouldn't have cut all the way through on the first piece. The machine is extremely inconsistent - I don't have this problem every time.
Here's a more detailed look at my experiences with the Air 2 and the Maker, and why I generally recommend the Air 2 machine over the Maker.

I ironed the blue pieces on first, then applied the red.
As always, I just used a regular iron - I don't bother with a heat press, nor an easy press, because I have never had any issues just using a regular old iron. Here's more about how I use a regular old thrift store iron for my htv projects:


