Showing posts with label Christmas Ornaments. Show all posts

Squeeze My Cheeks Vintage Plastic Canvas Christmas Ornaments

"Squeeze My Cheeks & I'll Give You A Kiss"
Reads the tags on these homemade ornaments popular in the 1980's.
The ornaments hold a Hersheys Kiss inside.

Here's where to find patterns to make them today:

Elf Yourself (or your grandchildren) Ornaments

Make Yourself (Or Your Grandchildren)
Into Movable Elf Ornaments
A Print Then Cut Project With Cricut (Free Project)
Quick Links:


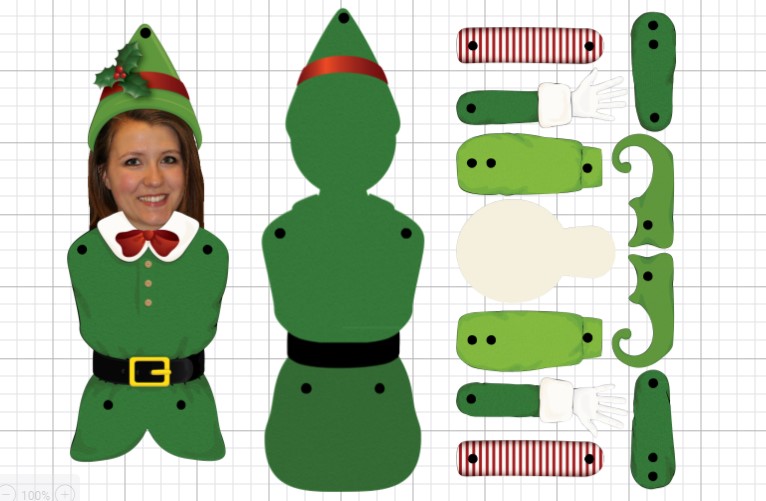
This is what the project looks like in Design Space.
The white image in the middle of the first row is unused in my version, I am not really sure what it is for - but my best guess is if you would prefer to cut a photograph to glue fast, or have a child draw a face rather than use a photograph, that piece would work as the face.

For my version of this, I did not need two holes side by side on the leg and arm pieces, but I put two holes there, in case you want to make them with the string like Melody Lane did.  I think our grand-kids would just break them faster if they had a string, I am happy just to have the arms and legs move.  
This is the image that is used for these.  This project was free in 2019, and is still free if you pay the monthly rental fee for Cricut Access.  For me personally, I always find it better to purchase one image as need from cricut, rather than pay for access.  When you purchase the image, you can use it as long as you can use Design Space.  When you pay a monthly fee for cricut access, you are merely renting the images, and once you stop paying the monthly fee, you stop having free access to those images. 


Quick Reference:
  • I sized this to fit on one sheet of paper, the finished elf is approximately 8.5 inches tall
  • Attach the black dots.  Attach - not flatten.  For all but the piece on the left, this is already done.  If you flatten the dots to the body, they will not cut, and you will need to use a hole punch.
  • Once you add the face, select the hat, coat, and face, and flatten!  Then attach the dots.

Crop your photo as much as possible before uploading it to design space.  Then use the eraser tool to crop out the face.  Do not worry too much about it being a little jagged, the imperfections will fade out, and many will be hidden completely by the hat and the coat.  If you need help learning how to use the eraser tool when uploading to Design Space, this may help: https://fieldsofhether.blogspot.com/2018/12/how-to-convert-simple-free-clipart-to.html

Move your face around and resize until you like the way it looks.

For this project, it's much easier to select in the layers panel on the right.  Click on each item, while holding the shift key down.  I group my 3 items to start.  Then move them over the image on the left, making sure the hat and coat will line up when you put them together.  once you are sure it's the right size, select your 3 items - hat, coat, face, and flatten.

Send your new flattened image to the back, and move your dots over.  In the photo above, the dots are not lined up.  You want to line them up so it looks like there is only one set of dots.  Then over in that layers panel, select the dots, and the image with your face.  Once selected, attach.  Then drag the image to the side once again.

Click Make it, and send to your printer.

Place the printed page on a mat. 
 Use the blue one if you have it, it's meant for paper.  I am using a green one here that is not too sticky - it's been used a lot.  You can wash your mats with soap and water and the stickiness will come back - but this one hasn't been washed recently, and has been used pretty hard, so it is not TOO sticky.

Here's one I cut on the blue mat.  :-)
I love the Cricut Spatula tools for removing small pieces of paper from the mat.
Put the arms and legs together first.  Then layer the pieces all together.  The hole at the top is for a ribbon, to hang them.


===============

An Index Of Tips, Tutorials & Free SVGS For Making Christmas Ornaments


=================
For More Tips, Tricks, Tutorials, and Free SVGS - 


Harry Potter Christmas Ornaments With Cricut (Free SVGS)


Harry Potter Inspired Christmas Ornaments
& Where To Find The Free SVGS for them

Quick Links:
Quick Tips:
  • When Cutting foil vinyl, always cut on vinyl+ and cut it twice.  When the machine stops cutting, do NOT unload the mat - tap the c button again, and it will repeat the exact same cut in the exact same spot.
  • The smaller the decal, the easier to apply to a rounded surface.  I kept mine at 2.5 - but smaller would have been better (but harder to weed)
  • Cut the vinyl and overlap it on the sides if it "bubbles".
  • Use a hairdryer to warm up, and smooth down, the vinyl


In Design Space, I create circles so I can decide what colors to use for each ornament.

Then I laid the ornaments out in front of the screen, to make sure I had the right colors.  :-)
Most of the glitter for these came from the packs sold at the Dollar Tree! The packs have several colors, and you will want two of the same color for one ornament, so be sure to buy two packs if you are using these.  


This is a great file, BUT there is a problem with the second D in Quidditch.  It's simple to fix - just ungroup, delete, duplicate the first D and place  it, then select all and attach.

File is in about the middle of the page
You have to sign up for her emails first.  Click on the link in the email confirming you want to subscribe, and then you will get a second email with a download link.  
It's worth the hassle, in my opinion - this is the best hogwarts crest cut file I have found for free.  :-)


SVGS For the Faces are here
9 3/4 is typed in the Font MT Engraver

I used the Frisco Vinyl on these - It's super cheap (30 feet for $17) on Amazon, free shipping, and I am loving this vinyl!  It cuts and weeds beautifully!  I have only seen rolls of black unfortunately, but since black is what I use the most of, it was a good buy for me.


More SVGS For Harry Potter Inspired Ornaments:


Sorting Hat

=========================
Not A Cricut Project, but this tree skirt is really cute, and she tells you how she made it step by step:
http://www.sowderingabout.com/2014/12/harry-potter-inspired-christmas-tree.html

===========
A Facebook Group For Tips, Tricks, Project Tutorials, & Loads of Free SVGS!

For Tips, Tricks, Tutorials, and Loads Of Free SVGS - Find Me on Facebook:
https://www.facebook.com/fieldsofheathercrafts

An Index Of Tips, Tutorials, & Free SVGS For Making Christmas Ornaments
https://fieldsofhether.blogspot.com/2019/10/making-christmas-ornaments-index-of.html

Where To Find MORE Free Harry Potter SVGS

Our Hearts Aim High - Air Force Christmas Ornament


Quick Links:


Although shown in black here, I cut the logo and the text both from dark blue 651 vinyl.

I made this ornament before Design Space had a curve feature for text, so the font is Henny Penny, curved in the Phonto App. 

 Design Space now allows you to curve text, making this even easier! 

You can not curve once you have ungrouped letters.  If you ungroup your text, the curve option will go away.


====================

An Index of Christmas Ornament  Tips, Tutorials and Free SVGS
https://fieldsofhether.blogspot.com/2019/10/making-christmas-ornaments-index-of.html

Which Vinyl For Which Project - and the cheapest places to buy it - 
https://fieldsofhether.blogspot.com/2017/09/cricut-which-vinyl-do-i-need-where-do-i.html


Cricut Ornaments For Your Mailman


Quick Links:

When you upload this svg, it will be all black.
Click on each piece in the layers panel on the right and change the color at the top of the screen

Once you change the colors, attach like colors.  Select all the black, attach.  Select all the blue, attach.

For the text on the back, I used reverse weeding - those tiny letters can be tough!

 
When transfering the design, I like to layer as much as possible on the transfer paper first.
So I layered all of the truck pieces first, then applied those
Then layered the trunk on the tree, and applied that next.


Then make a quick gift box for it too...  


=============================

This is NOT an svg (even though it says download svg under hte graphic)
It's a Studio file for Silhouette.  You can convert it  to svg here:


====================
A Facebook Group For Tips, Tricks, Project Tutorials, & Loads of Free SVGS!

For Tips, Tutorials, & Free SVGS , Follow my FB Page - 


An Index of Christmas Ornament  Tips, Tutorials and Free SVGS
https://fieldsofhether.blogspot.com/2019/10/making-christmas-ornaments-index-of.html


Making 3D Paper Gift Boxes For Christmas Ornaments

I first made this ornament box back in 2019.  It's not a free file, but I've used it so many times over the past few years, it was WELL worth paying for.  It costs less than $2, and is just so perfect for "wrapping" ornaments as gifts.

I cut the box from one 8x11 sheet of paper, and the insert from a separate piece - but  you could cut it all on one 12x12 sheet

Quick Links:
Key Things To Remember:
  • Switch your writing to draw 
  • Attach the score lines and the writing to the box
  • The box will cut from one 8x11 piece of paper, but the bottom insert will require a separate piece of paper 
More Options:
This will all upload as one svg (all but the text, which I added)
I changed the color of the bottom piece, which is the insert. that will automatically tell it to cut on a separate mat.

Select the score lines - make sure they are set to SCORE and not cut - and attach them to the box.

Add text boxes for your text.  Be sure to switch it to draw!  
Attach the text to the box.
When using the "draw" feature in cricut, the pen will follow the path of the blade. That means you will often have "hollow", or "outlined" text.  Cricut would like you to pay a monthly fee to use their fonts, and if you do so, you could choose one of their writing fonts and it will write "solid".  You could also purchase one of the writing fonts from cricut - but remember that any purchases in DS cannot be downloaded.  You do not own them, it can only be used in the Design Space program.  There are however, hundreds - literally hundreds - of FREE fonts that will write in DS.  Some are super thin and will "collapse on themselves" and appear single line, others are truly single line.   My favorites for projects like this are Always Here, Montepetrum, and Matilde.  Find links to download all of my favorites, and see dozens of sample pages where I have tested more than 100 fonts, in different marker sizes, to find ones that work well with the pens in cricut.


The file comes with a pdf file to show you how to fold and glue it together, but it's really simple to put together once you have it in front of you.

The tutorial for this ornament, and the free svg, can be found here:
https://fieldsofhether.blogspot.com/2019/10/youll-shoot-your-eye-out-floating.html


==========================

To See All Of My Latest Free SVG Finds, 
Join Cricut Tips, Tutorials, & Free SVGS
There you will find themed posts with all of the latest links in the comments
And you can share your projects, tutorials, and ask questions there too!