Showing posts with label Cricut Kids Craft. Show all posts

Cotton Ball Snowmen - A Kids Craft With Cricut

Cotton Ball Snowman  - A Kids Craft Made With Cricut

There is no svg - this was made in Design Space, just using shapes.
You can access the project here:
https://design.cricut.com/landing/project-detail/61c0bfc8471fadd522422d34

When you click on a Design Space project link, a box will open asking you if you want to open design space.  Tell it yes, and the project will load.


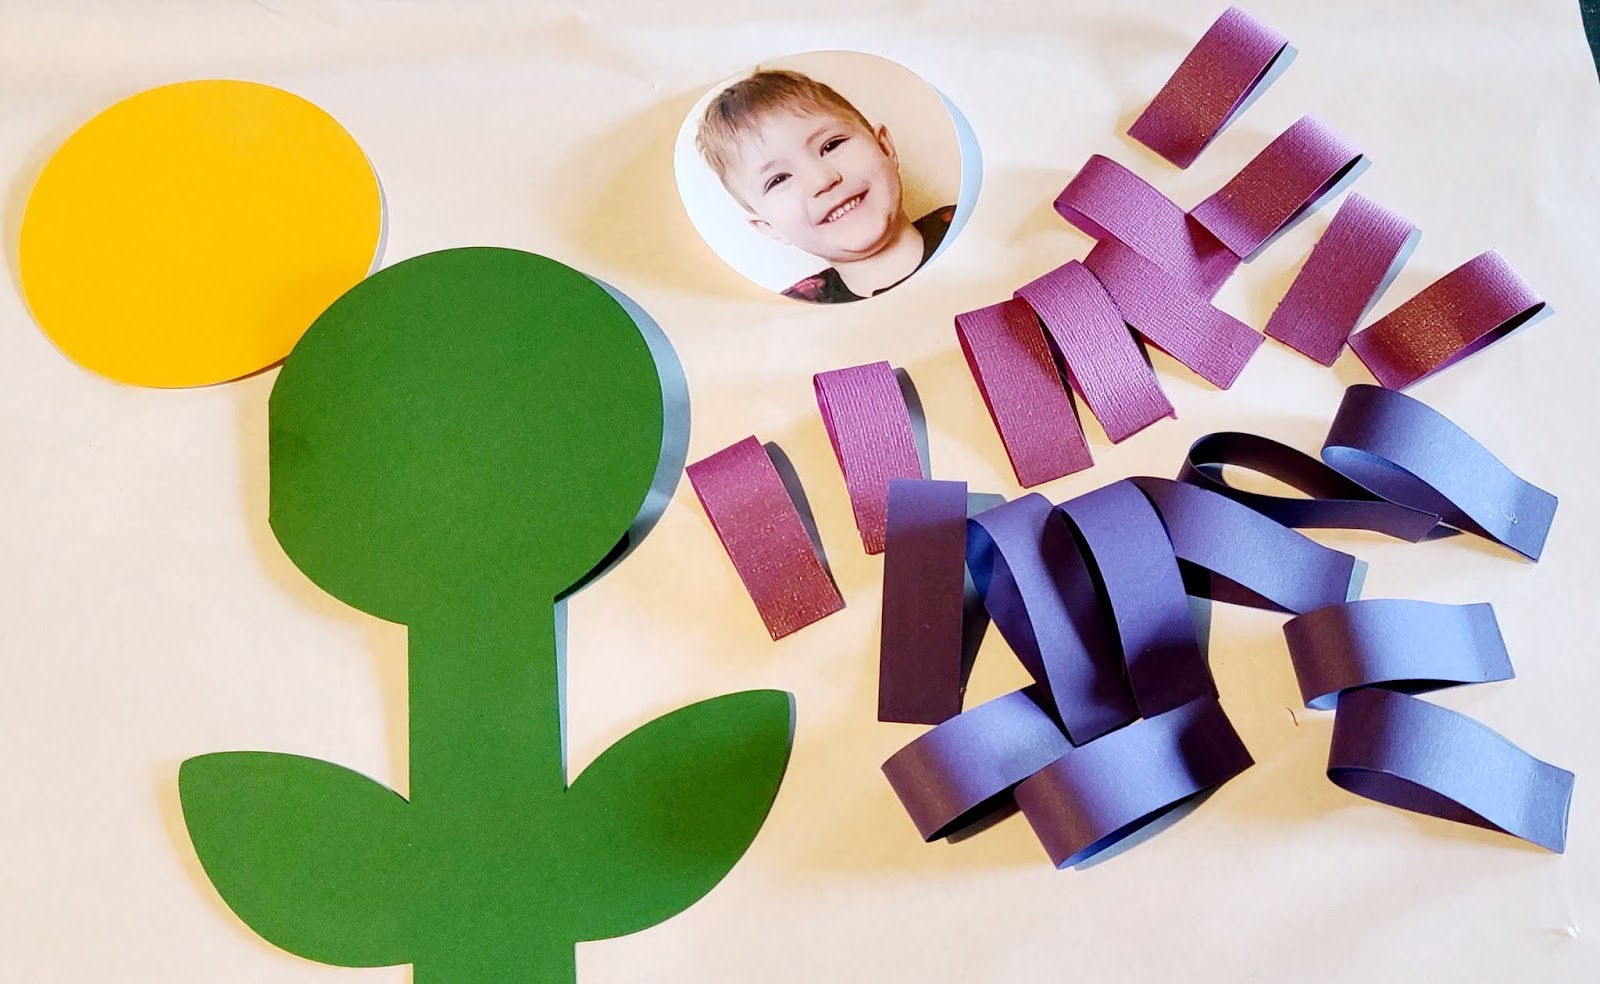
Upload your childs photo to the project, and use the grey circle to slice out the face you want to show through the frame.

I originally made this in card form, but we ended up gluing it closed, and putting a magnet on the back.  Having the second layer added stability for our magnet, so either way, if making this again, I would cut it this way.


My grandson just turned two.  He's had a lot of experience with "glue glue!" though, going through roughly a glue stick a day helping Grandma.  [If you follow my facebook page, I'm sure you have seen him helping with many projects her]  This was the first he was allowed to use the liquid glue, and he was quite excited.  

We pulled the cotton balls apart a bit before gluing them fast.  He likes that part a lot too.

I added the hat and buttons, and the magnet on the back, with hot glue.  He handed me the pieces, but is not allowed to work with hot glue just yet.  :-)
There's a hole at the neck, between the circles, where ribbon fits through to make the scarf.  I used hot glue to attach that as well.

This was inspired by an Easy Peasy kids craft.  They have lots of great projects on their site, available for download if you subscribe.  They are not however, svgs, and most of the projects, such as this one,  can easily be recreated as cut files in Design Space.

================


Kids Craft - A Sunflower Card

 
A Quick & Easy Sunflower Card - A Cricut Kids Craft

These cards would be quick and easy for a scout group, or classroom, to make for nursing home patients this fall.

Supplies:

  • Yellow Card stock
  • Brown Card stock
  • Green Card stock
  • Possibly - Black Card stock
  • Glue Stick
  • Foam Tape or Pop Dots
  • Free SVG for center piece

In Design Space:

For this project, you will want to cut:
One 3.5 inch circle, yellow
Two 2.55 inch circle, Dk Brown or Black
One 2.5 Inch Circle with holes, in Brown
One rectangle 3.5 x  0.75 (use the square, and click on the lock to resize), Green
One 2 inch circle, green
Nine 2 inch circles, yellow.

For the "Seeds" circle:
2.5 inches, dark brown
Either create your own circle, then add smaller circles and slice or attach


For the 9 Yellow Circles:
Either Duplicate to create 9 circles, OR, hide everything but the circle, click make it, and then at the top tell cricut to cut 9 copies of your project.

Quick tip - if you need cricut to cut 9 circles, you do not need to create 9 circles in Design Space. Create one - then click make it. At the top, change the "Product Copies" to 9, then apply.

Putting It Together:

Fold the sides in on each of the 2 inch circles, forming a "pizza slice" shape.

Glue down the large yellow circle and stem, then add the folded "pizza slices" around the larger circle.

Add foam tape, or pop dots, in the center
(You can find these at the Dollar Tree!)

Then add the remaining circles to your card.


===================


Cricut Crafts For Kids

Kids Crafts With Cricut

Kids Craft - Tissue Paper "Stained Glass" Butterflies

A Quick & Easy Kids Craft With Cricut

Supplies:
Upload the svg, Ungroup, then change the color of the solid butterflies so that cricut knows to send them to a separate mat.  
Top Butterfly Size: 5.8 x 3.9
Bottom Butterfly Size: 4.5 x 3.9
Cut:

  • 1 of each butterfly from the black paper
  • 2 of each of the solid butterflies from the contact paper


Assemble:
  • Apply one solid butterfly to the black cut out.  
  • Tear tissue paper into pieces, apply randomly. Don't worry if it overlaps.  If too much hangs over the edge, you can trim it later.
  • Once the tissue paper is all applied, place the second piece of contact paper over the tissue paper.
  • Add a string through the hole to hang.


OPTION 2 - 
You can also skip cutting out the contact paper.  Just apply the black cut out to a square piece of contact paper, add the tissue, place another piece of contact paper over top, then you could trim around it with scissors.  This may be the easier route for younger children.


OPTION 3 - 
You could also cut the solid butterflies (meant to be cut from contact paper here) out on white cardstock, let the children color the white butterfly, then glue the black over the top.

===================


Where To Find Free SVGS For Making Kids Toys, Activities, Games, & Crafts

Cricut Crafting With Kids
Where To Find Free SVGS for Making Toys, Activities, Games, & Crafts

Dinosaur Finger Puppets With Free SVGS - Cricut Crafting With Kids

I'm always looking for simple crafts that can be made with cricut and assembled by my grandsons.  These dinosaur finger puppets are each just two pieces to glue together - no tiny parts.  

Quick Tips:
  • I sized each dinosaur at 5 inches wide, but you can make them smaller for smaller children.
  • The finger holes are 3/4 of an inch when the designs are half an inch wide. That is large enough for an adult finger.  You can always use the contour button to remove those finger holes, and add your own smaller holes if that works better, but for the most part, kids seem to  do fine with the holes a little larger like this.

==================================
Ungroup To Change The Colors


There are two different svgs in the zip file.  Each has two different dinosaurs.
All of them will upload as black, but they are svgs, so it is simple to change the color to whatever you would like - you just need to ungroup each svg first.

You can also cut the top parts out in white  cardstock and let the kids color them.

Check the sizes once ungrouped - I sized all of mine at 5 inches wide, but I think a couple of the dinosaurs upload at a smaller size.  


=======================
Use Contour To Change The Finger Hole Size
To remove the finger holes, select ONE image, and then choose contour.  A box will pop up in design space - 

click on the finger holes, then close the box.  The circles will disappear.

Now you can add new circles in smaller or larger size as needed.  Just use the shape tool to add a circle.

Then you can either weld the two circles together and slice them, or you can add both the circles, select the two circles and the dinosaur and attach.  The circles will change to the color of the dinosaur and it will look like they have disappeared, but as long as you can see them in the layers panel to the right, they will cut out of the middle just as if you had sliced.


 =================

==================


Find More Cricut Crafts For Kids Here:
=========================
Find more free svgs for kids games, toys, activities and more!


Mothers Day Flower Cards - A Kids Craft With Cricut


There are two versions of this card  - one using strips folded into loops, and one with petals with tabs. The one with the petals and tabs may be easier for younger children to glue themselves.


Mothers Day Flower Card Option One 
  

Elements Needed
  • One stem from the svg (green paper)
  • One circle 3.8 in diameter (yellow paper)
  • One circle 3.4 in diamter (white paper)
  • 10 rectangles 5 x. 075 (outside petal color)
  • 10 rectangles 4 x .075 (inside petal color)
  • Photo cut into a circle 3 inches in diameter (Print Then Cut)

There are two stem options in the svg - a longer one, and a shorter one.  You can delete one of them, you only need one stem for the flower.  The little piece in the middle is only needed for option 2 of the flower, for the first option, you can delete that as well.


10 rectangles 5x.075
10 rectangles 4x.075

In Design Space, Click on Shapes, Choose Square
Select the square, click on the lock to unlock the size, and resize to  5 wide by 0.75 tall
Duplicate - you will want 10 rectangles of this size.
Now add a new square, unlock and resize to 4x.075, and duplicate to create 10 in this size.


Next add two circles.
The yellow one will go on the front of the card and should be 3.7 in diameter
The white one is for the inside of the card, and should be 3.4 in diameter

You can just add the white circle plain for the kids to write - or you can add the text and have cricut either write with the pen, or print then cut.
For Print Then Cut - Place your text on the circle, select the circle and the text and Flatten.
For Draw, Use a font that will work as a writing font, select the circle and the text & Attach.

For the photo - upload your photo, add a 3 inch circle, place it over the photo and slice.  Use print then cut.  OR - cut a 3 inch circle and use it as a template to cut the shape out of an existing photo.


The circle part of the flower gets folded, and each of the strips gets folded in half, and the bottoms glued together.


Glue the larger strips onto the green stem, then layer in the smaller ones.  
Glue the yellow circle and photo on top of the petals.

Mothers Day Flower Card Option Two 

Elements Needed
  • One stem from the svg (green paper)
  • One circle 3.8 in diameter (yellow paper)
  • One circle 3.4 in diamter (white paper)
  • 10 Small Petals 10 Petals 1.04 x 2.2 (outside petal color)
  • 10 Large Petals 1.23 x 2.6 (inside petal color)
  • Photo cut into a circle 3 inches in diameter (Print Then Cut)
Choose one stem from the svg, and this time keep the petal (it looks like a light bulb)

10 Petals 1.23 x 2.6
10 Petals 1.04 x 2.2


Next add two circles.
The yellow one will go on the front of the card and should be 3.7 in diameter
The white one is for the inside of the card, and should be 3.4 in diameter

You can just add the white circle plain for the kids to write - or you can add the text and have cricut either write with the pen, or print then cut.
For Print Then Cut - Place your text on the circle, select the circle and the text and Flatten.
For Draw, Use a font that will work as a writing font, select the circle and the text & Attach.

For the photo - upload your photo, add a 3 inch circle, place it over the photo and slice.  Use print then cut.  OR - cut a 3 inch circle and use it as a template to cut the shape out of an existing photo.

Ignore my glue mess - I pulled the yellow circle off to show how the petals are layered.


=========================

A magnet fits nicely between the layers, making these great to hang on the fridge too!


=================

==================

Find More Cricut Crafts For Kids Here:
=========================
Find more free svgs for kids games, toys, activities and more!