
On My Desk The Week Of 10/9/21 - Halloween Paper Crafts

Throughout the week, I post what I am working on on my facebook page, along with notes on what worked, and didn't work, for me when making the project. Occasionally I will then copy all of those facebook posts into one blog post.
Quick List Of Where To Find The SVGS:
Jointed Witch [CF]
Jolly Jointed Pumpkin [CF]
Cats Meow Tea Lamp [ CF]
3D Haunted House [FREE svg]
Paper Halloween Lanterns [FREE svg]
3D Haunted House [FREE svg]
Paper Halloween Lanterns [FREE svg]
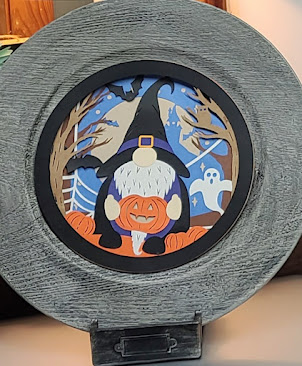
Halloween Gnome Shadow Box [UK site]
Pumpkin With Sunflowers [FREE svg]

For scale - and because I just loved seeing these all lined up together on my desk. :-)
The house and lantern are both about 12 inches tall. Winney Witch is closer to 15 inches.

These were my favorite project this week. I love how they turned out! The witch is about 22 inches tall, the pumpkin around 20 inches.

For Dreaming Tree (3dsvg) files, you will typically have to upload a lot of items. Each color will be one svg, so all of the blue items will be one svg, all of the black patterned pieces will be another svg, etc. I think this file needed 13 svgs uploaded to make it.

The individual svgs cannot be ungrouped. But if you want to use 8.5x11 paper, it is possible! Instead of ungrouping the blue for this project (ungrouping is not possible) I duplicated, then used the contour button to remove half the pieces on one, and the other half of the pieces on the other.
Each file from the Dreaming Tree comes with a pdf file - keep that handy. It's a helpful reference for which paper to feed into the machine next.

========================

A Halloween Lantern - Free svg from Burton Avenue.

In her tutorial, she uses a hammered black spray paint on the cardstock. I love the look, but didn't have it on hand this time.

I also did not have orange acetate for the windows, so I used the print then cut method on printable acetate. This is the same material I use for the floating Christmas ornaments, so this I did have on hand. Last fall I purchased a new brand of the acetate (transparency paper). It's much cheaper than my normal brand and it works great - once you figure out which side is which. It comes in a clear package, once I did a test print and figured out which side is the printable side, I labeled the clear package with which side is printable. https://amzn.to/3aia9CO
=======================

This is such a great file! It uploads all at once, the score lines are neon green, so easy to find to switch to score, and it goes together so well! I didn't watch the video, it would probably be even easier to assemble if you watch the instructions - but it's not necessary.

These are the amounts of paper I used:
2 sheets 8.5 x11 light grey or white (would also take 2 sheets of 12x12)
3 sheets dark grey - or 2 12x12
6 sheets black - or 4 12x12
1 (scrap) pumpkin orange
scrap of gold (appears as pale yellow in DS - door handles)
1 sheet vellum (one piece slightly different shade & goes to its own mat color sync before clicking make it)
4 sheets of purple - 3 of 12x12

Find the free file here:
=====================

The Winney Witch treat box. This is one of the items I purchased, to get the free bundle from Dreaming Tree. I don't love the treat box nearly as much as I do the other two projects - but that is mostly my fault. It's really an easy file to assemble, I just didn't do it carefully enough, and there are a lot of areas where I am not happy with my work on the completed project. All of the svgs from Dreaming Tree come with video tutorials for assembly. They aren't always needed, but for this one, it is definitely helpful.
========================

The Cats Meow Tea Lamp
Next time I think I'll cut the black from black glitter cardstock...
For this project, I wasn't paying enough attention. When you upload all of the files from a Dreaming Tree Project, 9 times out of 10, 29 times out of 30 even, they will all upload at the correct size. The pdf file included gives you the size it should be - so you can be sure. I forgot to check on this project, and sure enough, my orange vellum is too small. I'm ok with the green showing through, but if you are not, be sure to check the sizes before cutting this one. :-)

I did not have orange vellum, so I switched the orange piece to print then cut and printed it on clear vellum as a print then cut project. It worked great!
==========================

For these, I took a shadow box design and converted it into a layered circle design.
Here's a step by step how to:
Unfortunately, this is a Sea Salt and Samphire Design I bought in A Design Bundles sale years ago. You can no longer purchase it there [unless you pay for their membership, which is a LOT more expensive than CF's membership], but you can purchase it from the designers site. She's in the UK, so prices are in pounds -
Here's a post with more ideas for making Charger Plate Signs - with lists of free svgs:
And here's the post on making vertical signs on ceramic floor tiles, along with lists of free svgs, and a step by step tutorial for the seasonal Home sign:
==============

Before I switched to Halloween...
I added the layered pumpkin & sunflower paper cutting on top of the vinyl pumpkin, on my seasonal home sign.
Home sign (its a ceramic floor tile - and it has hung on my craft room wall, held up with just velcro command strips, for nearly a year now) tutorial & pumpkin svg can be found here:
The pumpkin & sunflower svg is free from :
==============

Here are the fall designs I made last month:
No comments:
Post a Comment