Showing posts with label Free svg. Show all posts

Retro Halloween Cat - Free svg


Inspired by the vintage Luhr Halloween Cut Outs - 
this version was cut on my cricut

I used a shiny thick black cardstock (in the packs from Dollar Tree - not certain they still carry them?) And for the yellow and orange I used Bazzil cardstock with raised polka dots.  The extra textures really help the design pop, in my opinion.  :-)


Miss Kate cuttables has a somewhat similar owl, as the Luhr design below, as an svg, for $1.


Vintage Luhr Halloween Cut Outs

Today's Rabbit Trail - Vintage Luhr Halloween Cut Outs, and The Dennison Bogie Book (Games, Recipes, and decor ideas for Halloween Parties)
The vintage Halloween cut outs that I love, and wanted to recreate with my cricut, were made here in Pennsylvania, by the Beistle Company of Shippensburg - still in business today. H.E. Luhrs worked his way up through the firm, becoming president of Beistle in 1941. The company was well known for making very detailed paper die-cuts, lanterns and table items.
There were two premier American die-cut and party supply manufacturers from this era: the Beistle Company of Shippensburg, Pennsylvania and the Dennison Manufacturing Company of Framingham, Massachusetts.


The Dennison Company published an annual "Halloween Bogie Book" from 1909 into the 1930s. Primarily an advertisement for their Halloween decor, the booklets are full of great illustrations, suggested menus, party games, decorating tips, costume ideas and tips for making the costumes.. They are wonderful to browse, and many of them are available in online archives.
In the 1920s, Halloween Parties were for adults, they were not focused on children. They frequently centered around Bridge, Mahjong, and similar game. " Tables and walls would be decorated with a wide array of Halloween-themed items, really setting the party’s mood. The games’ winners would be given prizes to take home, like candy containers, lanterns or noisemakers. Only later did “trick or treating” come into vogue, with the holiday becoming then more firmly oriented toward children. I tend to savor those items made in the interlude before Halloween became so child-focused." Halloweencollector DOT com

Trick or treating is mentioned in some papers as early as 1910 - but it was not common. It became popular and widespread after World War II.
While the adults were playing games, the children were pulling pranks. Halloween in the 1920s was sometimes called "Gate Night" - as so many farm gates were removed from their hinges. Other common Halloween night pranks included tipped outhouses, farm wagons placed on barn roofs, and soaping windows. By 1933, the pranks had escalated, with hundreds of teenage boys sawing down telephone poles & flipping cars.

In the 1920s, to help combat the prank problem, towns began holding Halloween parades, with the communities marching down main street in costumes, to a bonfire, sometimes with free candy distributed.
"Basements Of Terror" (early haunted houses) became popular in the 1930s. A 1937 party pamphlet suggested decorating with old fur strips and raw liver hung on the walls.
During World War II, 1942-1947, sugar was rationed, allowing only half a pound of sugar per a person, per a week. Common Halloween treats were peanuts, coins, fruit, and small toys. In Pittsfield, Massachusetts, children pledged not to vandalize, in support of servicemen abroad
By the late 1940s, towns were holding Halloween Window Painting Contests, with the idea that if the children painted the towns store windows, they would be less likely to soap them.
Dennison published booklets for a variety of holidays and crafts, not just Halloween. In 1948 they published a 37 page booklet (originally published in 1923) titled How to make flowers with Dennison crepe paper. See that book here.


In the facebook post here: https://www.facebook.com/share/p/1525fPHHHZo/
I have links where you can view and even download many of the old Bogie Books. Click on each photo, the links to the books are in the photo descriptions. (Eventually I'll add them to this post, but I'm short on time at the moment)


Counting Monsters - Free svg

Counting Monsters
(Free SVG)


Add the correct number of eyes to each monster. 

I sized these at 3.49 x4, and used mini clothes pins - but you could make these much larger and use full sized clothespins too.  :-) 

Three layers - making them thick enough to not tear easily.  
The font I used for the numbers is the Stencil font - free on dafont - in case you want to make additional numbers.  

I glued a magnet to the back of each of ours, and they hang on the fridge.  This ended up being really nice, because my kitchen table is (porcelain) enamel topped - the magnets work on it, and keep the monster up just high enough that it's easy for little fingers to attach the mini clothes pins.

======================
======================


(Almost) every day I compile a daily list of free fonts, svgs, and various cricut tips, on facebook.


Corelle Snowflake & Corning Coneflower

 
My Gram's Pyrex & Corelle Collection

(Also, on the left, some of her PA Dutch Trivets.  She had these hung around the top of her kitchen almost like a wallpaper border)

After moving all (not all - all that is currently in my kitchen..  I am pretty sure there is more in the attic ...) my Gram's Corelle and Corning Ware into the corner cabinet, I started getting ideas about repainting the table with these designs stenciled on (I'm not going to do that), and making dish towels and recipe cards to coordinate...  

I haven't actually done ANY of that, but I did convert the images into svgs so that I can, eventually.   


===============
They will download in a zip file and will need extracted before uploading
================


After uploading these svgs, there are two things you will want to do.
(See the arrows on the right, above)

For the Corning Coneflower design (top, shown in black) make sure you attach, or weld

For the Pyrex Snowflake, it will upload with two pieces - the top piece is a thin black outline that you most likely will not want - hide, or delete that. 

=============
ABOUT THE DISHES
Manuals, Flyers, and a great commercial from 1965
=================

"Originally developed for military applications in World War II, CorningWare®’s Pyroceram® also proved effective for bakeware in the home after the war. This glass-ceramic, non-porous material was capable of withstanding sudden temperature changes and was resistant to stains and odors. The same dish could be used for cooking, freezing, and serving food, a boon to cooks looking for kitchen shortcuts. "


View the 1963 & 1965 "Cabinet Cards" (Sales Flyers) for the Corning Ware Coneflower design, here:

Pyroceram

In 1953 S. Donald Stookey of the Corning Research and Development Division accidentally discovered Pyroceram, a white glass-ceramic material capable of withstanding a thermal shock of up to 450 K (840 °F). 

Pyroceram was originally used in the ballistic missile program as a heat-resistant material for nose cones.

Stockey was working with photosensitive glass and placed a piece in a furnace, planning on heating it to 600 degrees Fahrenheit. When he checked on his sample, the furnace was at 900 degrees and the glass had turned milky white. He reached into the furnace with tongs to discard the sample, and it slipped and hit the floor without shattering.


Corning Ware  Coneflower 

The first pattern produced was Wheat; it was test marketed in 1958 but was not popular.  Cornflower Blue Corning Ware was on the store shelves by November of 1958. The first line consisted of a skillet, three sauce pans and four covers. 

The lids of CorningWare are typically made of Pyrex. Though some early lids were made of Pyroceram, most subsequent covers have been made of borosilicate or tempered soda-lime glass. Unlike the cookware, these lids have a lower tolerance for thermal shock and cannot be used under direct heat

After decades of continued popularity, Corning ceased production of Pyroceram-based Corningware in 2000. In 2001, the company rebranded with stoneware-themed bakeware.

There Are Similar Patterns By Other Companies

When Corningware introduced the Blue Cornflower collection in 1958, consumers snapped up the pieces like hotcakes. Immediately, other manufacturers created nearly identical copycat products, designed to capitalize on the Blue Cornflower buying frenzy.


===============================

Watch a fun 1960's Corning Ware Commercial here:

==============================


Dating The Pieces

  • Before 1998, the  read “Corning Ware” in two words. 
  • In 1998, the company switched to a one-word “Corningware”. 
  • In 2002, Corning discontinued their kitchenware. 
  • In 2009, the company brought its iconic kitchenware back. The newly made pieces displayed a one-word “CorningWare”.

With increasing interest in 1950s and 1960s brands, corningware recently brought Blue Cornflower cookware and bakeware back onto the market. In 2017, the company marked its 60th anniversary by reintroducing its enduringly popular Blue Cornflower line.


Corelle Snowflake

Corelle, a brand name for break-resistant glass dishware also originally created by Corning Glass Works, has offered matching designs to many CorningWare patterns

Pyrex snowflake blue (not to be confused with Blue Snowflakes, a different pattern) was introduced in 1970 and retired in 1976.


==================
For my children's reference:


Swan figurine is from Uncle Earl, top recipe box is Gram's (see card inside) bottom box is a variety of family recipes, mostly Truckenmiller,  but most are not marked as to whose recipe /handwriting they are.    

Also, there are a LOT of recipes for Rhubarb custard pie in that box.  I don't remember ever eating rhubarb custard pie in my life - but maybe I just don't remember.  Or, maybe Gram never actually made it.  I have a lot of recipes for things I never made...

Clear Pyrex "Jell-o Bowls" on the top shelf - also from Gram.  They are oven safe Pyrex..  I need to look up the pattern and name again.  Gram only ever used them for Jell-O at Christmas time.  Jell-o with fruit and nuts.

"There's a nose hair on the platter" (you have to be family to know that reference...) in the back is a Truckenmiller platter, and it is, as of the time I took this photo, still serving it's intended  purpose.  

When I was first married, we visited the corningware store and Pfaltzcraft outlet in Corning NY.  That is quite likely where many of both Pat (Grandma Truckenmiller) and Gram's (Freda Confers) various dishes came from - the outlet there.


Truck Thank You Note - Free SVG

 
Truck Thank You Note

Just a quick and simple card  - the svg will cut the white part, you will want to add a rectangle in Design Space (the blue part) to glue behind the cut out piece.  

I'd also add a score line in the middle, just to make it easier to fold - although that's not necessary.  


==============================
For more tips, tricks, tutorials, and free svgs for making cards:


Fish Place Card - Free SVG

Simple Fish Place Card

My husband asked if I could cut "pink triangles " to designate who ordered fish, for a dinner banquet tonight.

Nope. I can't cut pink triangles. Not when I can cut fish shapes instead! Lol! I prefer the larger, paler, version - but knowing how much stuff will be on the tables, I decided smaller & brighter would be more practical.


These were to go along with the perforated tickets I made for the same banquet -

They needed tickets that once purchased could be filled out with the meal choice - with one side of the ticket staying with the purchaser, and one being turned in for the meal count.

Here's how to make perforated tickets with Cricut:

================


Believe - Free Bundle Of SVGS


Believe SVGS

Years back someone online was charging an outrageous amount for svgs that were simply the word "Believe" in fancy fonts.   This was long before I had my own group or page, but I quickly made these svgs, using commercial use fonts, to show members of another group how easy it was to do this themselves - and that [at that time]  buying the font was MUCH cheaper than the svg.  

This year I'm working on a massive clear out of my stored files, and I came across these old svgs.  I bundled them all together in one file that you can download at the bottom of this post.

These days, there are so many FREE commercial use fonts, you don't even have to buy a font!

You will, in most cases, need to learn how to use a character map, however, to add all of the extra swirls and extras, known as glyphs.  Here's a step by step if you want to learn that.

https://fieldsofhether.blogspot.com/2019/02/how-to-find-use-glyphs-in-fonts.html

But if you just want to download the above Believe svgs, you can do that here:

==========================
Download all of these svgs in one zip file
==========================

Because of the way I merged these all into one upload, when you upload them, it will be a mess.


Simply click on the ungroup button, circled in red above, and then you can drag each svg to the side.  

I used the Santa Believe on our tree skirt.  Read more about how I made that, here:


This Is My Parade Candy Bag


Free svg download at bottom of post

Full disclosure - I did not actually make this.  This afternoon I designed this to make a parade candy tote for my grandsons, but when my daughter in law picked the kids up, she told me she changed her plans..  so the kids won't be going to the parade with us.  I guess could make this for my husband..  LOL!

There are two svgs.  One is all in one, like the photo above.  The second one I split, to make it easier to change the colors
First resize to something like 9 wide, so you can see better.
Then ungroup.

Then select everything on the right by dragging your cursor across  - once it is all selected, change the color, then choose attach.
Once you have the red attached, and the blue attached, then move the blue over 

Here's a quick video [no sound, no talking] showing all of the above:


In the video, I flip the svg horizontal.  I do that with all of my htv projects, so that I do not have to remember to click the "mirror" button on the next screen.  

I'm very likely to forget to mirror.  But If I flip the design before I save it, then it's ready to be cut from htv.

==================
===================

See the Index Of Tote Bag Posts, here:


Basic Circles Geocaching Shirt - Free SVG

 
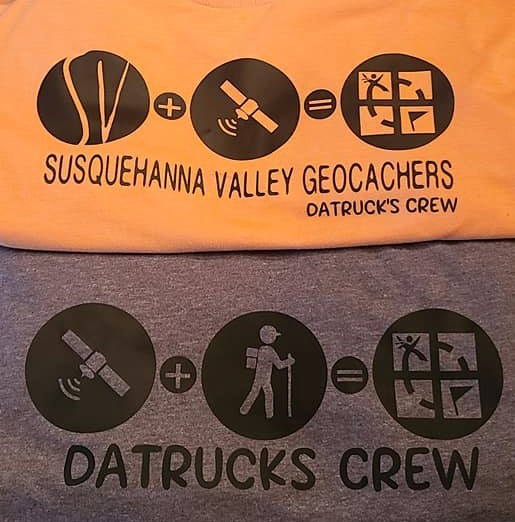
A basic geocaching shirt

This is a basic shirt that I make often.  I put our geocaching name under the logo.

I often adjust this slightly to fit a theme - such as the Susquehanna Valley Geocachers version

Or this one, for SeeMyShells 2018 tour across America.

The Design I used on the shirt above.

=======================

====================
====================


Find an index of my geocaching with cricut posts
and free svgs here:


Geocaches Are Out There - Free svg

 
Geocaching is a game - sort of a treasure hunt, but there is no real treasure other than the find.
You download the app  - geocaching.com - and then look for geocaches near you.  Go find them, sign the log inside, and then log it online.  

Some of the geocaches will be on guardrails and stop signs, or in a lamp post in a parking lot.  NOT my idea of fun.  Other caches are hikes in the woods, overlooks, beautiful and historical locations..  those I love.  My husband is an avid geocacher - he not only wants to find them all, he builds caches and teaches others about geocaching.

Me?  I go along for the fun stuff - the pretty hikes to overlooks, and historical spots.  We've found so many cool sights we never would have found on our own, through geocaching. 
 
I've made a LOT of geocaching shirts over the years.  But this Geocaching is out there is his absolute favorite.  He's always asking me to make him another one.

I've never been able to share the svg with you, because it's someone elses design that I adapted.

But today I realized I could share the link to the FREE design I started with, and just upload the svg that I added to adapt it.  So you have to download from two different places, contour out the adventure and is, then add in the second svg and weld them together. 

Weld, or combine, whichever you prefer - but you want to weld or combine so that the overlapping h in geocaching doesn't leave cut lines in the "swoosh"
I started with this FREE svg from
https://hellosvg.com/product/somewhereoutthere/

I removed the word Adventure & the word is
[use contour]

Then I added this:


================
Find more free svgs for geocachers here: