

Step By Step How To Use HTV, Including How To Layer It
So far in this 12 week Christmas Craft Challenge, we've covered how to cut paper, how to use the pens to write, how to transfer vinyl, how to layer vinyl with registration marks, and last week we tackled Print Then Cut. You can find an index of the past projects here:
https://fieldsofhether.blogspot.com/2020/10/the-12-week-christmas-craft-challenge.html
https://fieldsofhether.blogspot.com/2020/10/the-12-week-christmas-craft-challenge.html
This week we're learning about HTV - Heat Transfer Vinyl. When you are applying vinyl to fabric, it always needs to be HTV. Regular vinyl with rarely hold up for more than a few days on fabric.
For "Choose Your Own Adventure" section this week, there's a section of free svgs for making dish towels. These make great, quick, Christmas gifts!
As always, I'd love to see what you make! Join the group for this page to share your progress, ask questions, and be absolutely inundated with free svgs, posted by themes. :-) Join The FB Group For This Blog By Clicking Here
For which vinyl to buy, I have a list of my favorites, and price guidelines, here:
============
Step By Step
Little Red Truck
Christmas Themed Dish Towels
=================
Supplies:
- Dish Towels. Many use the cheap "flour sack" towels from Wal-Mart. They are very cheap, and great to learn on. Those "flour sack towels" are what I use when I need cheesecloth for cheese making - they are great cheesecloth - but they are not my favorite dish towels. My favorite towels are the Aunt Martha brand that can be found in the embroidery aisle at JoAnns, or on Amazon - https://amzn.to/2J4qHnt
- Free Little Red Truck SVG - There's a list here: https://fieldsofhether.blogspot.com/2020/10/where-to-find-free-christmas-themed.html (or any other svg you wish to use!)
- HTV vinyl in the colors you wish to use. For most little red truck designs that will be red, green, and black. Possibly some white. You can use any colors you would like. These are my favorite brands and prices for purchasing vinyl. https://fieldsofhether.blogspot.com/2017/09/cricut-which-vinyl-do-i-need-where-do-i.html

Unwashed on the bottom, washed on top. I lost 3 inches in length, and 2 in width by washing them.
About the Towels
- If your towels are 100% cotton, you should probably wash them first. Washing items first is a controversial issue - many will tell you never to do so because customers may be allergic to your detergent, or I have heard that fabric softener can keep vinyl from adhering, etc, etc. I don't sell, and I've put vinyl on shirts we've worn half a dozen times before they saw vinyl, so neither issue has been a problem for me personally. If your dish towels are 100% cotton, they are going to shrink when washed. Sometimes they shrink a LOT. Can you put the vinyl on and have it stay? Quite possibly. But I lost 3 inches from the length and 2 from the sides on my latest towels - and that would change where my vinyl was placed, even if it didn't change how the vinyl stayed adhered.

These towels are both 100% cotton, both the exact same brand. They were washed together in the exact same load of laundry. The unbleached cotton wrinkles SO much worse than the bleached cotton. I was so surprised by this difference that I double checked the tags. Exact same brand, just two different colors. Both 100% cotton from India.

The Text
Normally I'd tell you about the text after we upload the design, but there's a lot to process here if you are new, so I'm going to go out of order. If you are used to working with system fonts in Design Space, here is all you need to know:
- I used the Herina Font, it's free, commercial use, find it here: https://bit.ly/3XyCWJr
=============
If You Are New To
Using System Fonts In Design Space
==============
- Fonts are installed on your device then found in the system tab in Design Space. Fonts are NOT uploaded to Design Space.
- How to download and install system fonts to use in Cricut Design Space - step by step: https://fieldsofhether.blogspot.com/2017/12/all-about-fonts-text-in-cricut-design.html
- Design Space cannot read font ligatures. So if you use the Herina Font in Design Space, it will not look the way it looks in pretty much any other program.
- Fontlab Pad is FREE. It reads font ligatures. It does not work on ipad, unfortunately, it's for computers - either Mac or Windows. It's a utility - a tiny little program that does very little. You type your text in the font of your choice, save it as an svg. Upload it to Design Space like any other svg. Once uploaded, attach or weld as needed. (Attach for plain text, weld for cursive) https://fieldsofhether.blogspot.com/2018/01/using-fontlabpad-with-cricut-design.html
- Fontlab Pad can read from zip files. It can also use fonts you have installed, and fonts that are unzipped.. but if you download Herina, it will come in a zip file. Open fontlab pad, choose file, browse to find the zip file, choose one of the options (either one, it won't matter for this -- one is otf, one is ttf) and type your text. Save as an svg.
- Glyphs Vs Ligatures. Glyphs are alternate characters you choose, frequently alternate versions of a letter with swirls, tails, etc. Ligatures are automatic. They are written into the font to occur naturally based on certain letter combinations. I did NOT use glyphs for our name, these are naturally occurring ligatures in Herina.

The top version is typed into Design Space
The bottom version is typed into fontlab pad and saved as an svg.
The SVGS:
- If you have never uploaded an svg to Design Space before, here's a step by step:https://fieldsofhether.blogspot.com/2019/01/how-to-download-install-svg-to-design.html
- The main thing to remember is that the svg will look like your default internet icon - it will look like an html file. If you are given the option to "clean up", or the option to choose simple vs complex, you uploaded the wrong file.
- The red truck svg is from Crafthouse and can be found here: https://crafthousesvg.com/products/free-christmas-truck-rear-view-svg-fb13?ref=6959505
- The Santa face is from Caluya and can be found here: https://caluyadesign.com/hohoho-santa-svg-png-eps-dxf/

Upload your svg, and if you are adding your last name to the tailgate of the truck, resize it to fit on the truck. Select all, then resize your entire design to fit where you want on your towel.
For these towels, after washing, from the stripe to the fold I have about 5.5-6 inches of width to work with.
Two important things:
ATTACH
Select like colors and attach. Select both tires, attach. Click on white space to unselect. Click on all of the red pieces, attach. Etc. Attach can only be one color at a time. When you attach, you are telling cricut to cut all of those pieces on one matt, at exactly where they are positioned in relation to other items of that color. So it will not cut random pieces you have to put together like a puzzle, but rather, will cut one truck back.
NOT ATTACHED

The tires here are attached, but I did not attach our name. See how it split the text all up?
By selecting the text box and choosing Attach, it then does this:
ATTACHED
 |
| Now our name is all one word, I won't have to piece it together like a puzzle. |
Also notice, my name is backwards. That's because with HTV you are cutting the design on the backside of the material. Always flip or mirror for HTV
MIRROR OR FLIP HORIZONTAL
Because you cut htv upside down (shiny side on the mat) you need to make your design backwards. When you click make it, there is an option to mirror. I always forget to turn mirror on, I find it easier to select all and flip my design horizontal.

Flip horizonal, at the top of the screen, and then your design will appear backwards in Design Space.

Or, if you prefer, once you click make it, click the button beside "Mirror" to turn it on:
|
| Mirror is on the bottom left. Here it is show off, because I flipped horizontal instead. |
The Vinyl:
- When using HTV - Heat Transfer Vinyl, you put it on the mat shiny side own
- Good News! HTV is almost always SO much easier to weed than regular vinyl, and it's already on the transfer sheet.
- I do not like Cricut vinyl. These are the brand I like, and where to find them, all much cheaper than cricut brand, and better quality too. https://fieldsofhether.blogspot.com/2017/09/cricut-which-vinyl-do-i-need-where-do-i.html

HTV goes on the mat shiny side down, and the machine cuts on the backside of the vinyl.

Almost all HTV comes on it's own transfer, or carrier sheet. That's the "shiny side" we placed down on the mat. Cricut will cut the vinyl, but not through the carrier sheet. You weed the design as normal. This is so much easier to weed! The design stays stuck to the plastic sheet.
The Iron:
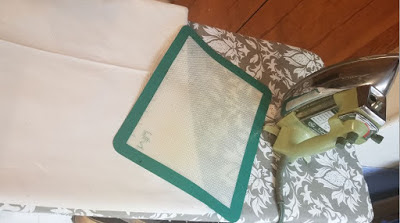
This is my set up. I will not tell you what you need - I would if I could, but you are going to have to figure out what works best for you, and I can't possibly answer that for you. All I can tell you is what works me.
Three years, and literally hundreds of projects later, I have no inclination to purchase a heat press, and definitely not an easy press. I use a thrift store iron. The old heavy versions that gets good and hot. I don't know that a cheap modern iron would work as well. Rowena makes a good iron, but they are a little pricey. I've been sewing for most of my life, so I purchased these thrift store irons long before I had a cricut, because I found the "new" (this was nearly 20 years ago) irons to be cheaply made and did not think they worked well just for ironing fabrics in general.
I do not "stand on my iron". I don't press all that hard at all. I've always found those comments about needing so much pressure to be baffling. Again, that's me. My height may help. I'm 6 foot tall, so I naturally have a bit more leverage when pressing down. I also am a farm wife. An old out of shape farm wife, but I still toss hay bales. Not too often, and not very well, but enough that I do have some arm strength. I have had no issues just using an iron, for any of my projects.
I do work on an ironing board, to the horror of everyone on every cricut facebook list everywhere. :-) I was using it long before I learned that you "can't do that". Well, apparently I can. My ironing board is more than 100 years old and is solid wood, so I'm sure that is a bit different than using a metal ironing board with a bunch of little holes in it - you do want a SOLID surface to press on. Your kitchen counter may work, or a large cutting board. Something that can handle the heat, so depending on the finish on your kitchen table, that may not be your best choice.
I do not wash anything special, or separate here. I do not turn things inside out. Everything just goes in our regular laundry. I will never be a professional crafter - I'm a farm wife who crafts, and I am way too tired for a bunch of complicated extra instructions. :-)
Here's a step by step for exactly how I use an iron with htv:
Putting the Design On the Towel - How To Layer HTV

For a simple one color design like this, you just place it on your material, cover with parchment paper (you may be able to use a thin pillow case if you don't have parchment paper) and press.
For Layered Designs:
You can only iron on one color at a time, for the most part. So how do you know how to layer them?

Flip all your pieces over and piece them together like a puzzle, right on your mat. Like this:

Now place the entire design on your towel - all three layers, each still stuck to their own clear plastic carrier sheets.

Now gently pull up just the red part, leaving the tree and tires stuck to the towel, exactly in position.

Press lightly. You want to press JUST long enough to get these attached so you can remove the carrier sheet. For me, that's my iron set between cotton and wool, and I press for about the count of 10.
If when you try to remove the clear plastic sheet the vinyl pulls up, give it another quick press.
Once both of the clear plastic sheets are removed, then put the red section back down, lining it up around the tree and tires

Press again. Again, just long enough to remove the carrier sheet.
Once the entire design is down, cover with parchment paper and press again.

Hold it up to the light. Can you see the pattern of the fabrics fibers through the vinyl? Then it's good! If your vinyl is completely glossy smooth, with no pattern, press again. Short presses until you learn your iron or press. You can melt the vinyl by pressing too long. It may take a few tries to learn what works best with your set up, but go slow and you will be fine.

==========================
Here's the brutally honest part - I messed up. I do that a lot. Remember how frustrated I was with how wrinkled that towel was? I was already running behind on my self imposed deadline to have this post published. I had the iron turned all the way up, trying to get those towels ironed.
And I forgot to turn it back down. I pressed the first couple of quick layers with no trouble, because I was pressing really quick. But when I pressed the "final", my iron was too hot (all the way up) and I pressed as long as I would normally with the iron set between cotton and wool.

I melted the left tire a little.
Would that have happened if I used an Easy Press or a Heat Press? Probably not. However, I'm sure there is some other mistake I could make with either of those items, and I promise you, I would eventually make mistakes with either of those as well.
Ready for more? I'll come back later and add more free svgs that I think will work well for dish towels. I'm running very far behind this week. For now, here's a few to get you started:
=============
CHOOSE YOUR OWN ADVENTURE
More Dish Towel Ideas
===============

Find an entire list of free kitchen themed svgs here:


Find an entire list of free christmas svgs here:

This is a silhouette studio file. You can convert studio files to svg here:

And another silhouette file that you can easily convert
The Studio to SVG online converter -
Preparing For Next Week - Thank You Notes
Next week 6 we are going back to paper for a week, purely for practical reasons. This is a great time to get those thank you notes made ahead of time!
Supplies:
- Paper. I use the recollections brand of cardstock from Michaels the most
The week AFTER next, Week Seven, we'll be doing glass etching. If you do not have a craft store nearby, you may wish to order the etching cream now, it can take awhile to ship. I use the armor etch because it's what our local store had. But here are some options:
- Armor Etch - $20 for 10 ounces (or 3oz for $11)
- Etchall - $18 for 4 ounces
- Etch-I-M - $30 a qt. I have never used this, but have read it works. It's WAY more than the average person would ever need.. 3 ounces lasted me two years.
=====================

The Christmas Craft Challenge Index
====================

The Christmas Index
Where To Find: Free Christmas SVGS By Theme (Nativity, Grinch, A Christmas Story, Etc), Where To Find Free Christmas SVGS By Project (Gift Tags, 3D Paper, Earrings, etc) and Where To Find Free Christmas Project Tutorials & Gift Ideas. Including an entire extra index just for making Christmas Ornaments. Find it all here:
No comments:
Post a Comment