Where To Find Free Cut Files For Cricut Or Silhouette Machines - The List

An Alphabetical List Of Sites With Free SVGS

Don't forget to check the facebook page, Crafting With Fields Of Heather.  Each day I post a Daily List Of Free Fonts & Free SVGS.    And see seperate posts on this blog for a list of sites with free svgs for paper crafting, and another post of sites with  free svgs for card making.

How To Cut Faux Leather With Cricut - Tips & Tricks for Making Faux Leather Earrings

After spending two days making earrings, out of all sorts of different faux leathers, I have a better idea of which settings work..  Although I admittedly still have a lot to learn!  These are all the things that worked, and did not work, for me as I made what feels like a zillion pairs this week.

On This Day, Under The Stars - Floating Christmas Ornaments

Last year I saw star maps made as signs for weddings.  I love them, but I don't have much empty wall space here. As I was making Christmas ornaments this year, I realized I could easily convert this idea into a Christmas ornament - and there's always room for more Christmas ornaments here.  :-)

Making Earring Display Cards With Cricut (And Free SVGS)

It's quick and easy to make display cards to hold your faux leather earrings!
Here's how to make your own, and a list of free svgs for them too:

Cricut & The Dollar Tree Potholders


Scroll past the "Step By Step" to get to the LONG list of free svgs for making pot holders.

These are one of my favorite quick and easy things to make!  They are great wedding gifts, teacher gifts, housewarming gifts, and Christmas gifts.  You can add a spatula or whisk, and a cake or cookie mix in the pocket... and you have an inexpensive hostess gift ready in minutes.


Cliff Notes:

STEP BY STEP:

You can order the pot holders and have them shipped to your local  Dollar Tree store, if your local store does not have them in stock.  Find them here:
https://www.dollartree.com/home-collection-red-cotton-neoprene-pot-holders/
They come in a variety of colors, search neoprene pot holders to find them.

Further down I have LOTS of links and suggestions for free designs, so I am going to skip right to how to make them for now - 

Sizing The Design

The pot holders I buy at the Dollar Tree (silicone backed, with a pocket) have a roughly 6x6 pocket.  It's larger than that, something like 6.5 by 6.3 or something like that...  6x6 is easy to remember, and I don't want to go near those edges anyway.

 I keep most of my designs for pot holders at  5.5 x 5.5 or less.

Remember that this is htv - so you want to mirror your image.  You can do that once you send the design to cut, but I am likely to forget it I wait.  Whenever I am working with htv, I select all and flip horizontally, before I click "make it". 
  (if you do this, flip your design horizontally, do NOT mirror it on the next screen!)

When you place your htv on the mat, you'll see it has two sides - one side being "shinier" than the other.   That shiny side is the transfer paper.  Place the htv on  the mat shiny side down, and your cricut will cut through the top layer only, cutting the vinyl, but leaving the clear plastic transfer sheet intact.  When you weed your design, you'll be left with just your design on a clear plastic sheet.


Once cut, weed your design, and iron it on.  You can buy all sorts of things to use as weeding tools.  A dental pick from the dollar tree, a set of picks from Harobor Freight... but my favorite is actually the cricut weeding tool.  


Ironing the Design On To The Pot Holder
I use an old iron I bought at the thrift store for $2.  It's heavier than the cheap plastic irons you'd typically find cheap at Wal-mart, but it is really nothing special. Do not use steam.

I work right on my ironing board, because it's always set up here by my craft area (which happens to be in my laundry room) and it's the perfect height for me to press.  When I say press, I mean press - but nothing herculean.  I'm never "standing on my iron" or even putting much effort into it.  

Just hold the iron down firmly in one area, do not "iron" back and forth.

You could certainly use an Easy Press or a heat press if you prefer!  But an iron always works great for me.


This is my only "trick"  I place a silicone baking sheet (it's folded in half here, so that it fits) inside the pocket.  Someone messaged me awhile back and we were talking about this - I can't tell you why I started doing this.  I would guess that someone suggested using something I did not have, I had these, and I used one..  and it works great.  I use them for all of my htv projects.  (for shirts, I place one inside the shirt).  Anyway, the woman I was taking to via messenger did not have a silicone baking sheet, so I suggested she wrap a piece of cardboard (she had a cereal box) in aluminum foil.  It served the same purpose - creating a bit of a flat surface, that reflects heat, and it worked well for her.

The other tip is to not get too close to the seams - make your design smaller so it does not go to the edge.  It's hard to get even pressure over a design near the seams.  (the same is often a problem when putting designs on onesies)

I place parchment paper on top of the carrier sheet, press for 15 seconds, then remove the carrier sheet, replace the parchment paper, and press again for another 15 seconds. 

If when you try to remove the carrier sheet any of the vinyl starts to lift with the carrier sheet, put the clear carrier sheet right back down and press again!  

That's it!  Quick and easy and cheap!  My favorite type of project!  :-)


Where To Find FREE SVG's for potholders:


For these potholders, I used the free monogram svg from here - 
Just delete the split monogram in the middle of the wreath, and add a letter in the same font.  I added all the text under the wreath - to make the thin lines beside the THE, just add a square in design space, click on the lock to unlock it, and resize to a thin long rectangle)

Free Monograms & Split Monograms (great for pot holders!)
http://fieldsofhether.blogspot.com/2017/11/free-monograms-split-monograms-for.html

All homemade gifts for a wedding shower - including pot holders


Thanksgiving Themed:


Touchdowns Turkeys Thanks Truckenmillers
I can't remember where I found that turkey svg!  Here are some free turkey svgs that you could use instead:


Christmas Themed:


I did a BUNCH of the little red truck design pot holders last year.. 
Find a list of free little red truck svgs here:


Basic Holiday Sayings
(use your own fun fonts to make your own designs with these sayings!)
  • Bakers Gonna Bake
  • "Name"'s Kitchen
  • The Holidays Are What You Bake Them
  • Tis the Season For Baking
  • We Whisk You A Merry Christmas
  • Baking Spirits Bright
  • Tis The Season To Get Baking
  • It's Beginning To Taste A Lot Like Christmas

NOT FREE - Christmas Themed:
But if you want to pay for designs, or are looking for more inspiration...  

Sew Your Own Pot Holders:

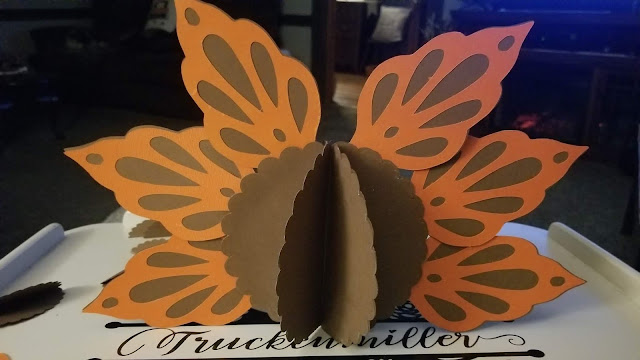
3D Paper Turkey - A Cricut Project


This is a great Thanksgiving project for kids - it's pretty quick and easy to make!


Cliff Notes:

  • Made with free shapes, all included in the step by step below.
  • Cardstock is from the packs at Michaels that are often for sale 4 for $10.  About 9 sheets of brown, 1 of black, 2 of orange, and a scrap of yellow for the beak
  • I used an elmers glue pen and a glue stick (but there are probably better options... those are just what I had on hand)

By Step:


It's easy to find a scalloped circle and upload it to design space.  For this project, I looked to see what is already in design space, and after searching for "scalloped circle" and filtering by free, I found this blue one that looks to be perfect for this project.  It has a green a on it, which is supposed to signify "free for access members", but I am NOT an access member.  I do not pay anything to use design space.  And this circle was still free for me.  If it is no longer free when you try to make this (the free items change regularly, but I suspect that since this is a basic shape, it may always be free) it is still very simple to google "scalloped circle" and upload one.


You can right click on these to download them, upload them to design space, cleaning them up, and then resize them to 3 wide and 6 high.  Cut 6 of each.


Using the same scalloped circle from earlier, unlock the size, resize it to 2 wide by 3 high to make it an oval, and cut 7 of them, for the head.


Make another copy of the feather insert, and size this one to 2 wide by 4 high.    This will be the waddle.


Right click on the image above (for the beak), save as, then upload it to design space, clean it up, and size it to 
W 2.782 H 0.783

Using the shape tool, add a circle.  Resize it to .05 and duplicate it - for the eyes.


This is what my design space looked like before I clicked on make it.


  • 6 large scalloped circles for the body
  • 6 feather backs (brown)
  • 6 feather "inserts" (orange)
  • 1 resized feather insert for the waddle
  • 1 beak
  • 7 scalloped ovals for the head
  • 2 0.5 circles for the eyes (black)

Since I was using 8.5x 11 sheets of paper, I spent some time moving images around and attaching them, to fit the most on each page.  It took a few minutes, but wasn't too hard.

After I put this together, I decided he needed a hat.  

For The Hat

  • 1 circle 2.5
  • 1 circle 3
  • 1 rectangle 2 x 4.5

Assembling The Turkey


 Fold each of the scalloped circles in half.  Glue the outside sides together - leaving the center of the "taco" open.


Once they were all attached, I laid them flat and cut straight across the bottom so the body would sit flatter.


Repeat the same process for the head.  Include cutting the straight edge, if you want to add the hat.


Add the beak and eyes.  I struggled a lot with the beak and still think there's a better design..  but this is what I did:


Glue the inserts to the feathers

Add the feathers to the middle of the body.  Leave space in the middle (at the top) so there is room to attach the head.


For the hat, roll the rectangle, attach to make a tube, and add the small circle to the top, larger circle on the bottom.


Add the waddle in the middle of the body - and you are all done!