

It's quick and easy to make display cards to hold your faux leather earrings!
Here's how to make your own, and a list of free svgs for them too:
- Finished size - varies greatly. I'd suggest starting at 2.5 x 3.5
- Size for earring circles - 0.068 works well
- Remember to attach! Attach your circles so they cut from the card, attach your writing so it writes where you want it on the card.. attach, attach, attach! :-)
- Free Fonts that work as writing fonts
- Alternative (not cricut) markers that work in cricut machines, no adapter needed

Finished sizes: (Suggestions only, I've seen so many variations!)
- 2.5 x 4
- 3 x 3
- They do not need to be larger than your earrings!
You can create a rectangle using the shape tool in design space, but for more detailed shapes, try the KG Flavor & Frames fonts, free on Dafont.

See them all here: https://www.dafont.com/search.php?q=kg+flavor+frames
There's also a free tag svg here - https://www.lovepapercrafts.com/free-curvy-tags-svg/
For the Holes: Add 2 circles . .068 works great!
I spaced them an inch apart, with the the outside edges being on the inch lines.

Use the "align" to make them perfectly across from each other - you can see one is slightly higher than the other in the photo above. Align will fix that.

Print and Cut
For print and cut (using your printer) you will want to slice the circles out of your tag. Select both circles, choose weld. Then select both the circles and the tag, and slice. (You can also just attach the circles, but you need to make sure you do not flatten them to your shape)
Next add your text. Then select your shape and your text and choose flatten. You will see the printer icon to the right of your flattened item.

(The grey rectangle here is completely unnecessary. I only added it here so the white tag would show up and you can clearly see the holes for the earrings)
Write and Cut
For write and cut, you can skip slicing the circles, and just attach them. When you attach them they will change to white (the color of your background shape) and they will cut.
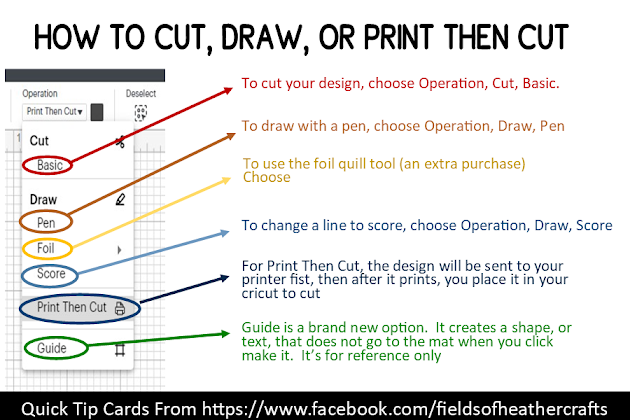
Be sure to choose a font that will write - not all fonts work as writing fonts. There's a list with samples of free fonts that work - here - http://fieldsofhether.blogspot.com/2017/11/6-single-line-fonts-that-will-write.html

In the layers panel on the right, be sure to click on the scissors beside your text, and change it to the pen.
This has changed with the new update - now you choose Draw/Pen in the top toolbar.
==========================

Loads Free SVG's For Faux Leather Earrings
==========================
Find More Cricut Project Tutorials Here:
https://fieldsofhether.blogspot.com/2019/04/cricut-step-by-step-project-tutorials.html
==========================
What do you use to make the display cards?
ReplyDeleteCardstock. Nothing fancy - just the packs from Michaels. :-)
DeleteHi, do you have the care cards for badge reels?
ReplyDeleteHave you done display cards for keyrings?
ReplyDeleteHi! May I ask how heavy your was? I tried extra heavy (110lb) but it’s not compatible with my printer. I’m worried lighter cardstock isn’t strong enough for the earrings 😩
ReplyDeleteThank you!
I just wanted to say thank you, and you are really awesome for sharing all of this information . I truly appreciate you!!
ReplyDeleteHow would you do the same cards but with a printed logo or design and still have the circles cut?
ReplyDeleteFlatten the text to the card, then attach the circles to the flattened image.
DeleteI am so new to the whole idea of cricut, have never seen one in action. I am on a budget so need advice, will any cricut work with files like this? Or would I need a specific model? I am looking at buying a used cricut.
ReplyDeleteAvoid buying used unless you know the person and can trust them! A lot of people will scam and sell you a deactivated cricut and then you’re just out the money with a very expensive paperweight
Delete