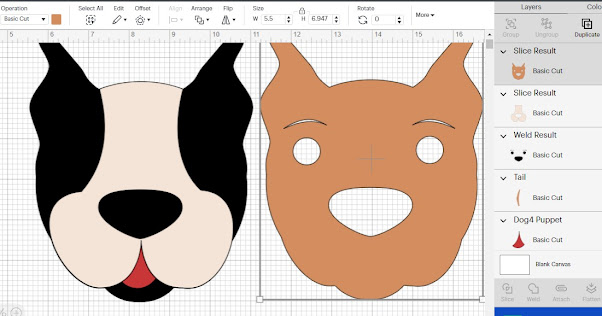
I am using a paper bag puppet svg, free from Easy Paper Crafts for the example, but these are the concepts that will work for almost any svg. This, for me, began when my grandson asked if we could make a dog craft today. Of course! I knew he'd love these puppets I saw awhile back.
But when I uploaded it and saw those little tiny eyebrows.... Well, my almost 3 year old helper is an excellent gluer with a lot of experience with a glue stick. But still. Larger pieces would be better for ME to work with. :-) And placing that tongue in the correct location was also going to be tricky. So - a little duplicate, weld, and slice, and we had much thicker layers to work with.
After duplicating, welding, and slicing, these are much larger pieces to work with.
Here's the step by step:
First, while the svg is still grouped, resize it to 5.5 wide - so it fits on a brown paper bag.
Make sure the lock at the top is CLOSED. In this current version of DS, unlocked is the default when you upload an svg. Click on the lock, and it will "lock" the size ratio. Then change the width.
Then Ungroup the design. (Top right of the layers panel)
Now select just the nose svg, and duplicate it. I forgot to screenshot that step, but duplicate is also on the top right of the screen. Drag the duplicate nose off to the side
Do the same for the brown face - duplicate, and drag off to the side. Change its color to black.
Next hold down the shift key and select the original 5 black pieces. Two eyes, the eyebrows, and the original nose. On the bottom right, choose weld.
Select the black layer you just welded, and the original brown face, then at the bottom right, choose slice. Delete the black welded layer, and the newly sliced brown pieces, leaving just the brown face with the eyes, nose and eyebrows sliced out. Note - you do NOT need the nose sliced from this layer. I sliced it because it kept everything spaced correctly. You can use contour to put the nose back on this layer.
Now when you layer the brown face over the black duplicate, the black will show through.
Next we're going to delete that tongue. I tried welding it, but because of the way it fits the image, it left extra cut lines. I could have tried resizing, but for this shape, it was just easier to delete and add a shape from the shapes menu on the right in Design Space.
Delete the red tongue.
Duplicate the peach face insert
I then sliced the nose out of the original, pink, face insert. That step is NOT necessary - but it will help my toddler grandson know where exactly to glue the nose piece.
I don't know what this shape, in grey above, is called - but it's in the shapes menu. Add it, place it as shown, then select the face insert and new shape and weld. Once welded, change he color to red, and layer it behind the original face insert.
=========================


Thanks for the post. I always wondered how to do this. Definitely going to give it a try. Thanks
ReplyDelete