

When working with a bunch of text at once, it can be very difficult to weed. Creating a box around each section of text removes excess vinyl and makes smaller sections to work on, one at a time. It really makes it much easier!
This is not something you will want to do all of the time. It is an extra step. But especially when working on Christmas ornaments, this really helps with weeding those little boxes of text.

Now that there is an offset option in Design Space, you can just add an offset to your text, and attach your text to that offset shape. I used an offset of .97 here.

Just be sure to attach your text to the offset shape. It will look like your text disappeared, but when you send it to cut, the letters will cut out of the inside of those offset shapes.
Or you can still do it the old way, with rectangles:

First, Type your text, then add a rectangle shape to cover the text. Resize by clicking on the lock on the bottom left, to "unlock" the shape.

Once all of your rectangles are created, select them all, and then choose arrange/ send to the back. This isn't strictly necessary - but I like to see that my text is placed in the rectangle correctly.
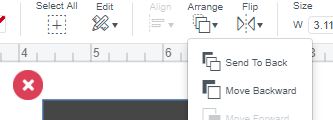
Send To the Back is under Arrange, at the top of your screen in design space.

Now choose Select all, and attach. This will turn everything the same color.

Now when you weed, start with the outside, and it will weed all the excess around your rectangles. Now you can weed one rectangle at a time.

===============================
Thank you for this. I will try this the next time I have small print.
ReplyDeleteawesome hack thanks so much!!!
ReplyDelete