Finishing up some Dishcloths

Part of my 52 Projects in 2013, where I am trying to use up some of the supplies in my craft closet, finish half finished projects, and finally get to some of the projects I have had in the back of my mind for a long time.


I had some cotton yarn leftovers in the craft closet, so I pulled it out and quickly made up a few dishcloths. In the process, I remembered how much I really enjoy making these.  So quick and easy!


My favorite "pattern" is two rows of double crochet, one row of triple crochet.  Repeat. 

I have a lot of cotton yarn in a pink and green variegated color.  I think it would make nice wash cloths.  Add in some home made bars of soap, and they might be Christmas gifts this year...

I'm looking at pattern ideas here:
and I think I want to try this one:

and this pinterest board has so many great patterns!


Painting a worn out travel coffee cup

I've included this in my 24 days of Simple Christmas crafts, because it would be simple to paint a Christmas theme, or paint one as a gift..  but travel mugs in general make great simple gifts.  Watch for sales at Shutterfly and Ink Garden to make nice travel mugs with your photos on them.  I did one for my husband last year with our family photo (all of us in Steelers jerseys) and not only does he love it, but it has held up really well.


From This: To This:

in 5 easy steps.

(And the after will look even better if you have any actual artistic abilities...  )

Step One:
Use a brillo pad to remove the rest of the existing design.  This was a coffee mug from sheetz that I love.  It has a great lid, a great seal, and it keeps my coffee hot.  But the design wore off where I held the cup all the time.  

Step 2 - Base Coat

I used a paint named "camel" and sponged it on.  

Step 3 - Paint on your Design
(this is an after pic, I didn't get a pic of the just painted step, so it will not be this shiny at this point)
I know that painting and drawing are not my strong suits.  I could stenciled, I could have traced a design on and painted it in, or I could have even used decals or stickers.  But I love Fraktur, and I liked the idea of painting this imperfectly freehand.  

Step 4 - Modge Podge

The next thing I did was spray a clear coat onto the cup.  And then i watched all the paint (and sharpie - I used sharpie to write on the verse at the bottom) run down the cup.  Learn from my mistake.  Paint on a coat of modge podge to seal the paint on the cup.  I probably could have stopped there, or added a couple more coats and left it at that..  but I chose to add the clear coat, which made the cup shiny and smooth.

Step 5 - Clear Coat


No Sew - Recovering the footstool


This embarrasment has sat in my kitchen for the last year.  Ok, maybe two.  I would often toss a throw blanket across it to hide the tear...  but that was as far as I got.

Why?  Because I was convinced there was some great, exciting, perfect new technique that I would want to try on it, and I didn't want to do something less than spectacular.  So instead I settled for embarrassing.  I know it makes no sense, but it's how I often work.  Or don't work.

Recently I bought the exact same color, same type, of fabric, planning to slipcover this until I found something more exciting to do with it.  (Because my dog sleeps on this, and I put my feet on it after coming out of the garden, fancy embroidery was not a good idea. Not that I DO  fancy embroidery, but I had ruled that one out anyway)


So today I finally pulled out the material, changed the thread on my sewing machine, and...  got sidetracked by cleaning out the craft closet. Then I walked past this and decided I should cut the extra material off the bottom before I covered it.

THEN I remembered the black spray paint I found when I cleaned out the cleaning cabinet today.

 Which reminded me of this fabric that was in my craft closet, meant for a tote bag and bible cover I never made.  And since I use a bible app on my phone these days, probably never would make.  I didn't sew a bit of this - not one thing.  Folded over edges, and a staple gun.  The bottom edge is the salvage.  Took me about 15 minutes, after the paint dried on the legs...  It is not perfect, it is not fancy, and it does not match the chair it sits in front of..  but I was planning to recover the chair anyway.  And this looks soooooo much better than the before!  :-)


One of my goals for 2013 is to complete 52 projects - mostly completing projects I already have started, and using up supplies in my craft closet.  I have a pinterest board where I am posing all of the completed projects, to keep track of my goal progress:

Making Pajama Pants

I was hoping to make us all a pair of Air Force print fleece pajama pants for our "super secret surprise Christmas eve gift * this year, but JoAnns has only ugly AF fleece, and it's very expensive.  I may have to settle for a dark blue plaid?  This will be our first year without all of our children home for Christmas.  Luke is stationed near Spokane WA, on the other side of the continent, and cannot come home at all over the holidays.  :-(  I'm making t-shirts that say "Proud Air Force Dad", "Proud Air Force Brother", etc, to go with the pajama pants - which we'll wear when skyping with Luke for Christmas.  Since Luke is 6'5 and off the shelf pajama pants are never long enough for him either, I'll make him a couple of pairs as well.

* Each year our kids have been able to open one gift on Christmas eve.  Every year it has been pajamas.  I used to include crayons and a coloring book, when they were younger.  Because they have always gotten pajamas on Christmas eve, they started calling it "The Super Secret Surprise Christmas Gift", when they were young teens.  


I'm 6ft tall.  With long legs.  I think pajama pants are made for women who are 5'9 or shorter..  they rarely come in a tall.

Pajama pants are VERY easy to sew.  Just lay a pair of your favorites out on the material to use as a pattern.  Be sure to stretch the waistband out, especially if they are elastic, and add a healthy seem allowance.  And if you are tall like me, add 2 inches, or more, to the length!  :-)

Three yards of material
MAKE SURE YOU WASH AND DRY IT FIRST!  That way if they are going to shrink at all, it happens BEFORE you sew them.  :-)
Fold in half by width, then fold in half long ways.

See how the leg seam is lined up on the fold, but the waist is not?  I started with the waist at the fold, then stretched the elastic waistband out.  Where they lay now is how far they stretch - so that is where I want to cut.  


 Leave a few inches extra at the top for rolling over for the elastic.  I gave myself a full inch seam allowance, which is half an inch on this side - because the pants I am using as a pattern are a stretchier material than the flannel. And I added a few inches at the bottom..  even if you do not need to add inches, be sure to leave enough for a hem allowance


Sew the inside seam for each leg, as shown above.

Then turn one leg right side out, like below:

Now put the leg that is right side out INSIDE the leg that is inside out, so that the right sides of the fabric are together.  Now sew the U Shape.  (Ignore the seam difference in the photo below. I got the bright idea to try to make the back of my pjs "longer" than the front..  a good idea, but all I actually did is make one SIDE of my pajamas longer than the other.  LOL!  )


For the waistband I fold over a small bit of fabric and iron it down.


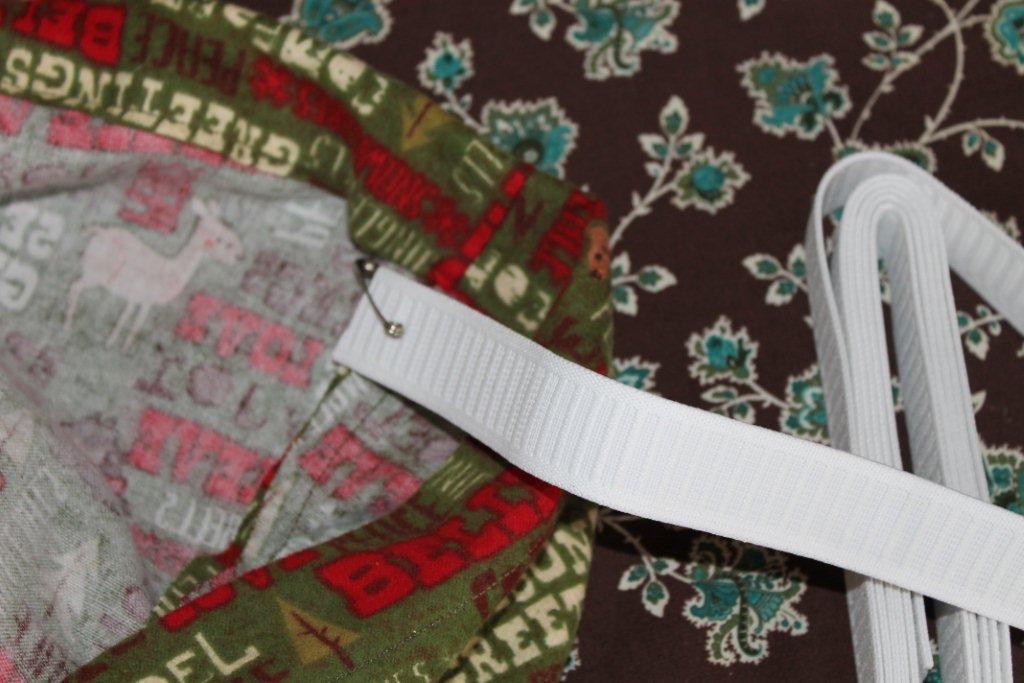
Then I used the elastic to decide how far to fold the material the second time.  Once folded, I iron again, then stitch.  Remember to leave half an inch or so un-sewed and open so you can feed the elastic in.

A pin on the edge of the elastic to pull it through the casing for the waist band


Once the elastic is through, I finish the waist seem and close it up where the elastic went in.

For the hem I do the same fold and iron twice routine, then sew once.  


TA DA!  Pajama pants that cover my ankles!


The Answer Is Chocolate


Wiifit Island Run - Follow the Dog!


Follow the Dog, On Island Run

Last week I started doing the island run on wiifit.  I remembered my kids mentioning something about running ahead of your guide and following the dog, so I did..  fun!  The dog is right at the starting gate,  run fast so you go right past your guide and catch the dog.

He takes you on a different path, and you jump off cliffs.  Twice. 


stick-with-it-saturday-updated

1M