How To Make Vinyl On Acetate Printable Bigfoot Ornaments - With Free SVGS
As an affiliate for Amazon, and several svg sites, if you click on the links in this post and make a purchase, there's a possibility I will earn a small commission.
- Bigfoot Silhouette (Transparent PNG) & Free Santa Hat SVG
- Round Plastic Ornaments from Michaels, the ones that come 25 to a tub for $19.99 (but they are always on sale for much less!)
- Acetate (transparency film) $7 for 30 sheets
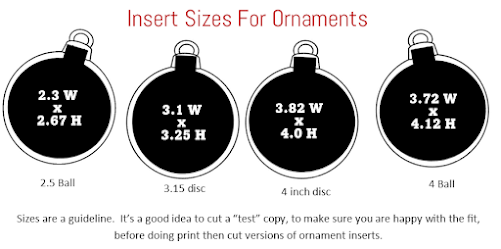
- Free Floating Insert SVGS
- Vinyl scraps in red and black
- Snow/glitter from the Dollar Tree
- 2 inch tall mini bottle brush tree
- Glue - I used Super Weld - E600 or hot glue or super glue should work too! Tacky glue did not work for me.
=============
First, Cut The Insert
The Floating Inserts:
- Free Floating Insert SVGS
- I used the 2 5-8 size - I fit 12 on one sheet
- Cut on " Foil Acetate", if using a cricut, it cuts beautifully on that setting.
To be sure I had the right size, I cut one from paper first.
The Bigfoot Design
- Bigfoot Silhouette (Transparent PNG)
- Free Santa Hat SVG
The silhouette is a png, not an svg, but that is ok! We are only cutting a silhouette, so you can upload it, tell it to cut and it will cut just as if it was an svg.
To size the design, I added the floating insert, changed the color to white, and then resized the images to fit on the insert. Then before clicking make it, I deleted the insert.
(I put the text "believe" on the outside of the ornament, not on the floating insert)
For little designs like this, I like to layer the vinyl before I transfer it, then transfer the completed design all at once.
Putting It Together
I used Super Weld, because my husband had let it sit in the laundry room, and the tacky glue I tried first did not work. Super weld worked great! But I think E600, or hot glue, or even super glue, would all work too. Something that dries pretty fast is best. I used the tweezers that come in the cricut tool set to place the tree in the ornament.
Then I used a funnel to add the glitter snow, before rolling the acetate and inserting it in behind the tree.
The last step was adding the word believe to the outside of the ornament. You can use any font! I used the Deadhead font here - it was a "free this week only" font years ago, and is no longer free. Simple fonts like this, rather than a script [cursive] font that is connected, are much easier to apply to a curved round ornament like this.
I have a difficult time photographing ornaments.
This is a round ornament, not a flat disc, but a full "ball" .
=============
An Index of my Christmas Ornament Posts
Tips, Tricks, Tutorials, and Free SVGS For Christmas Ornaments
How to make Print Then Cut
Photo Transparency Ornaments


I would like to try the bigfoot ornament...are they the flat ones or round?
ReplyDelete