Showing posts with label Crafts. Show all posts

From thrift store painting to menu board


When I bought this painting at the thrift store, I actually intended for it to be a sign for my porch.  But then when I was spring cleaning my kitchen, I decided it would make a great menu board..  I had primed the entire thing off white when it was meant as a sign, but that just made it easier to make it a chalkboard.  I used raft paint on the frame, a deep dark red.  When I sprayed on the chalkboard paint some of the overspray got on the frame - I rubbed it on and added a bit more black craft paint giving it that sort of crafty antiqued look.

I'm really surprised by how much my family loves this.  They all really like knowing what is for dinner each night.  Especially my husband!


Valentines Project - Button Heart on Canvas

Decorating For Valentines Day 2015

 
The inspiration piece came from here:

I had all the materials on hand, but I did buy some extra red buttons, because I didn't want to use up all the red ones in my button collection.  Which sounds silly, but if you have an awesome button collection, you know exactly what I mean.  :-)
It would probably be best to paint the canvas white first, but I was using an old canvas and the black covered what was already on there.  :-)
To evenly space the lines, I covered the top with painters tape, then removed every other strip.

Because it is painters tape, it peeled right off without hurting the paint underneath at all.  
It really made this super quick and simple

Then I used a cut out of a heart and outlined it in glue, to form the heart
On the original she used a red burlap heart behind the buttons - but I didn't have red burlap on hand, and I was ok with some of the background peeking through.


=====================
An Index of My Crafting Posts
https://fieldsofhether.blogspot.com/p/crafts.html

Printing Monograms on Burlap

Did you know you can print on burlap, just using your printer?
This is an old post, from 2014, long before I even knew what a Cricut machine was.  But even n w that I own a cricut, this is still a fun project.  

Making Cheer Bows

I've been a football mom for years.  This year, I'm adding cheerleading mom to my resume.  It's been an experience.  I was a dance mom for 8 years - and still it didn't prepare me for this.  :-)

At a cheer parents meeting recently, they rattled off the costs for the competition cheer bows, and I about fell off my chair.  $25 for a bow?  That's more than we paid for the spanx.  A few weeks later I attended my first cheer competition, and saw a stand selling bows.  $15 each.  They did not look that difficult, or expensive, to me, so I went online and started researching cheer bows.  Wow.  Some moms take these really seriously.  Me?  Not so much.  I'm looking to have fun with them, but we're definitely not into beauty pageants here.  This is the simple cheer bow tutorial. I didn't sew layers of sateen to ribbon, or anything complicated.  (And to be clear, neither did the people selling the bows for $25, and $15, that I have seen around here)

Supplies:
  • Grossgrain Ribbon  You can use other types of ribbon - but this is a little hearvier and stiffer, and really works well.  It's what I saw on most of the bows sold at the competition.
  • Fancy ribbon to tie around the center
  • Wire
  • Hair ties
  • Glue (I used E600)
  • Spray Starch
How To:

Cut the ribbon into strips. (For these, I cut at 25 inches.)

Form the bow  - this takes some practice and there are lots of tutorials on youtube..  but the best way to figure this out is to pick up the ribbon and see what you come up with that you like.  The first 4 took me forever to make.  After that, it was a very quick process.

I use a clothespin to hold the ribbon roughly into the shape I want for the bow.  Then I wrap wire around the ribbon, inserting the hair tie and  removing the clothes pin, and shape a little more.  


Place on a pan (I lined mine with foil for easier clean up) and place balls of aluminum foil into the loops of the bow to fluff them up.  Spray entire bow with lots of spray starch.


Bake at 200 until thoroughly dry.

Cover the wire with pretty sparkly ribbon, glue into place.  


Using a lighter, get the edges of the tail close enough to the flame to melt them slightly, to keep them from fraying.  Be careful to not actually get the ribbon into the flame.

Add the monogram sticker.

Done.


Tips:

I recommend starting with a cheap ribbon to practice and get the right size.  We read so many different numbers..  but ended up using 25 inches as our ribbon length.  This made a bow roughly 6.5 inches across, with some "pouff".

Mini zip ties work great to hold the bows together. I used wire because I was afraid to bake the zip ties..  but at 200 degrees, they may be fine. I haven't experimented yet.  The wire does loosen on it's own, the sparkle ribbon glued around the middle really helps keep everything in place.

Always put your hair in a ponytail first - the ponytail holder on the bow is just to hold the bow to your hair, not meant to form the actual ponytail.    


Costs:

Light blue pola dot ribbon - $3.99 for 3 yds.  Makes 4 bows.  $1 a bow.
Dark Gray polka dot ribbon - $3.99 for 3 yds.  Makes 4 bows.  $1 a bow.
(I used a 40% off coupon (JoAnn app on my phone has the coupons right in the app) on the one spool - making it $2.39 a spool - 60 cents a bow)

Celebrate it sparkly ribbon (used in the center of the bows)
    $3.99 for 3 yards.  40% off (Michaels app on my phone has the coupons right in the app) - $2.39.  I'm using roughly 2.75 inches of it per a bow, meaning i can easily make 39 bows from this one spool.
  .06 cents a bow.

Hair ties - $1.99 for 30 - .06 cents a bow

Monogram letters - 99 cents a pack.  Because I won't use all the letters, this is hard to calculate exactly, but lets say 10 cents a bow.


Costs that are hard to pinpoint exactly:
Spray Starch.  $1.39 a can.  I imagine you could make 100 bows with one can, easily.  
Aluminum foil.  I'm not sure how to accurately add this into the costs - I made 8 balls of aluminum foil and used them over and over, doing 4 bows at a time.  
E600 glue.  I have this on hand, other glues would work  - another cost I can't accurately calculate, but minimal at best.
Wire - again, on hand, leftover from some project..  you can buy spools of it for $1 and it would make many, many bows.

Let's say all of the above works out to an extra $1 a bow.  It doesn't - the actual cost is much less, but lets round up.

$2.82 cents a bow.  I didn't add tax -so lets round up some more to $3.

$3 a bow.

This is shopping at local craft stores.  If I buy the ribbon online in bulk, i can save even more.

If we use the lower price ($15) charged for bows similar to these, on sale at the last competition, that is $12 a bow in profit.  And we're paying $17 & $25 for bows that I think are similar to the ones I made here.  (Being new to all of this, it is very possible I missed something that makes bows more expensive - but I don't think so.  I think the profit margin on these really is insane.)

The first 4 bows took me about 2 hours to make - not counting drying time.  I had never made one before, so it took me some time to figure out a process that worked.
The next 4 took me less than 15 minutes.  This is not especially hard, or especially time consuming.  

Denim Chenille Quilt Made From Old Jeans


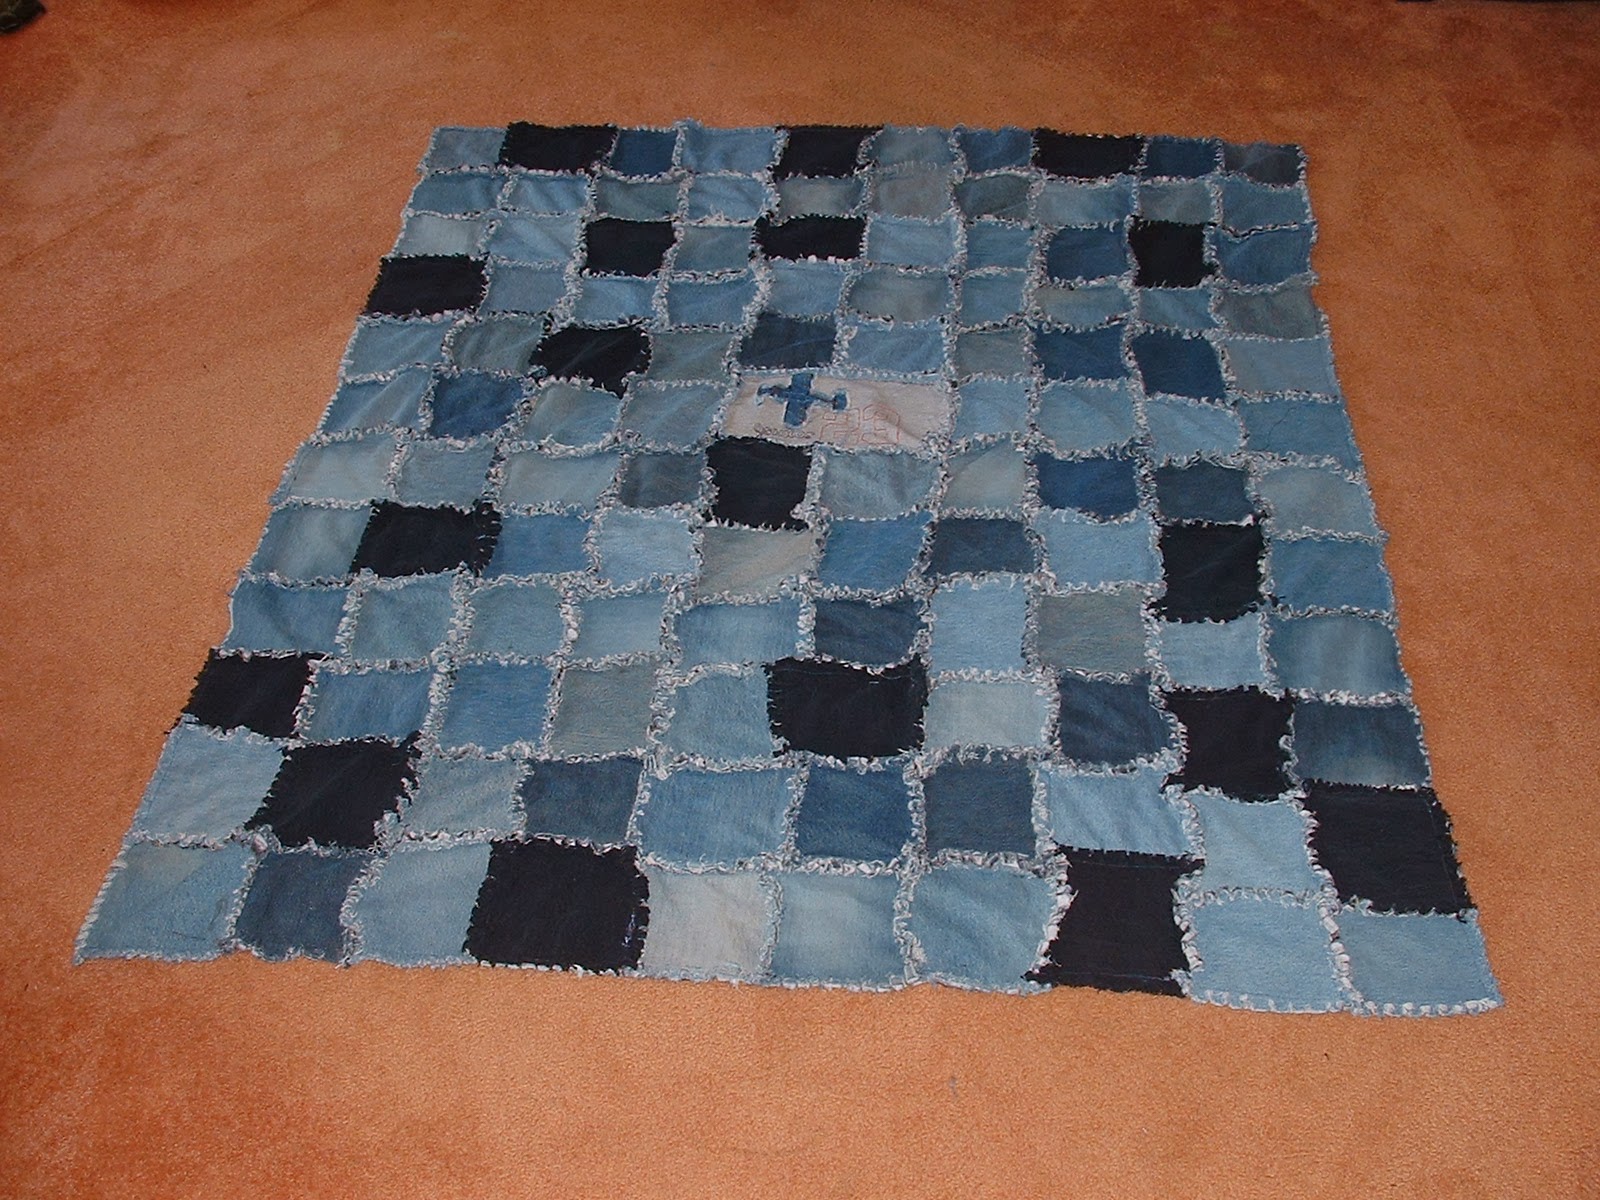
I made this about 9 years ago, but accidentally deleted the post from my blog when I was cleaning up and reorganizing.  I found the photos of the process recently, and decided to repost them.  

This is a heavy quilt, great for picnics, and can easily be made in a week-end.

 With three boys, we had plenty of outgrown/worn out jeans.  Even the ones with the knees ripped out and stained worked for this - the backs of the jeans were still good material.

See the t-shirt off to the right in the photo above?  It was our youngest FAVORITE t-shirt when he was 5.  You know the one, the one that you can barely get through the wash before he has it back on...  it had a denim airplane on it that I thought would make a great center design for this quilt.

You can choose the size for your squares - just make sure they are all the same. 
I think these were 6x6

 
The t-shirt design cut out for the center

Next I laid the squares out to find a design that I liked.

The back of the quilt, and what makes the "chenille" for this, is flannel.  You need one flannel square for each denim one.  To start sewing, you layer FOUR pieces.

Layer 1.  one denim piece upside down
Layer 2.  one flannel piece right side up
Layer 3 - A second denim piece right side down
Layer 4 - A second flannel piece right side up

So you are sewing one side, through four pieces of fabric at one time - just one seam.
At least half an inch seem allowance.

If you look at the photo above, you can see the pieces sewn together - first you will have just two squares together, like the bottom row.    

It goes together quickly from here. 


Once I had all the squares sewn into blocks of two, I used the strip quilting method to sew them into 4 rows, as shown above. Then it was simply sewing the 4 rows together.


Once it is all sewn together, you need to snip through the denim & flannel that are standing up, about 1/4 to 1/2 an inch all the way around every seam. 

 I did not measure.  This is not an exact science, just start snipping, being careful not to cut through your seams.

 A closer look at my cuts.
After this is done, through the blanket in the washing machine, wash, and dry.  It will come out similar to this:

It's the washing that gives you that "chenille" look.


A view of the back:


=======================================================
 Rooted In Thyme 

Yesterfood     


Brown Paper Lunch Bag Valentines

I made these in 2014, for our children and my husband.  I think they all still have them - I keep finding them in drawers when I clean.  :-) They are really simple to make, with some scrapbooking supplies and brown paper lunch bags.


This site has step by step instructions, with photos, for how to make them..  but it's not difficult.  Lay brown paper lunch bags flat, sideways.  Fold in half.  Punch holes, then run ribbon through all the bags to hold them together.  Decorate. Stick small candy bars in the pockets.


  ==============
Find an Index Of My Craft Posts here:
https://fieldsofhether.blogspot.com/p/crafts.html


Memory Ornaments


For our sons first Christmas away from home, I made him an official "Get The Tree Day" box & shipped it out to him on base.  We wanted to make him ornaments with family photos from over the years, so when I went into JoAnns with my 40% off coupon and saw these, I was inspired,

 25 Wedding Favor Tins


I simply cut out photos and glued them in, then added some glitter for "snow".  Placed the top on them, glued a ribbon around the edge and a tie on the back.  I used the labels meant to be used on the front, on the back to write descriptions of the photos.

These would be great for small vacation mementos like sea shells from the beach, beach sand, pebbles...


Our sons first tree on his own, with the memory ornaments on it.


To see more 
24 Days Of Simple Christmas Projects
http://fieldsofhether.blogspot.com/2013/11/24-days-of-simple-christmas-crafts.html